background image


POWXG6211TA 

EN


Copyright © 2019 VARO 

P a g e

 | 

9


www.varo.com 

8.3 

To adjust the rear wheel cutting height position (Fig. 3b & 3c) 


Turn the mower on its side. 


Pull the rear wheel axle towards the mower’s catcher flap. 


Locate the wheel axle into the desire cutting height adjustment position. 

Note: Make  sure  that  both rear right and  left wheel  are  located  in  the same 
cutting height adjustment position. 

8.4 

Power connection 

The mains voltage (220-240 V) indicated on the rating plate must correspond with the mains 
power supply. Mains connection fuse: min. 10A. 


Insert the plug of the mower into the socket of the extension cable. 


To prevent the extension cord from disconnecting during use, fit the extension cord 
(socket end of cord) through the loop of the cable strain relief and secure over the hook 
before connecting the plug. 

8.5 

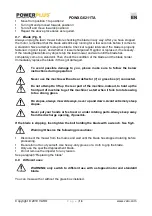
Switching on and off (Fig. 4) 

WARNING

Do not switch on the unit until it has been completely assembled. 

Before switching on the unit, always check the connection cable for signs of 
damage, only undamaged connection cable may be used.  

Note: Damaged connection cables are highly dangerous! 

If you try to start the lawn mower in long grass, the motor might overheat and 
become damaged. 


Switch on: firstly press the safety button (5) on the combined switch and keep it down, 
then pull the switch lever (6) and hold it pressed. 


Switch off: release the switch lever (6). 

Note:  While  mowing,  lay  the  connection  cable  safely  on  footpaths  and  on 
areas which have already been mown. 

WARNING

When  the  motor  has  been  switched  off,  the  cutter  continues 

running  for  several  seconds  therefore  do  not  touch  the  underside  of  the 
mower until the cutter has come to a standstill! 

8.6 

Mowing your lawn (Fig. 5) 

Select the cutting height which will suit your desired grass height. If necessary, mow in several 
layers so that a maximum grass height of 4 cm will be cut in one single pass. 
Make sure that you will avoid paths which could hamper free movement of the extension 
cable. 
Empty the grass box (2) once it is full to avoid obstruction of the discharge opening. To avoid 
obstruction of the discharge opening and unnecessary motor overloading, make sure that you 
will not move over any grass left on that part of the lawn you have already mowed. 
We recommend to use your mower as outlined below in order to achieve optimum results and 
to reduce the risk of cutting the mains cable. 


Place the bulk of the mains cable close to the starting point. 


Switch the mower on as described above. 


Proceed as shown in fig.4 

Summary of Contents for Powerplus POWXG6211TA

Page 1: ...Adjusting the cutting height Fig 3a 3b 8 8 2 To adjust the front wheel cutting height position Fig 3a 8 8 3 To adjust the rear wheel cutting height position Fig 3b 3c 9 8 4 Power connection 9 8 5 Swi...

Page 2: ...POWXG6211TA EN Copyright 2019 VARO P a g e 2 www varo com 11 5 Replacing the blade 12 12 STORAGE 12 13 WARRANTY 13 14 ENVIRONMENT 13 15 DECLARATION OF CONFORMITY 14...

Page 3: ...able strain relief 13 Top carrying handle 14 Grass box warning system 15 Switch box 16 Soft grip 3 PACKAGE CONTENT LIST Remove all packaging materials Remove remaining packing and package inserts if i...

Page 4: ...achine from the electrical supply before clearing inspecting or adjusting any part of it or if the supply cable has become damaged or entangled Always keep the electrical supply cable away from the bl...

Page 5: ...wer tool Keep the cord away from heat oil sharp edges or moving parts Damaged or entangled cords increase the risk of a lethal electric shock When operating a power tool outdoors use an extension cabl...

Page 6: ...in the manner intended for the particular type of power tool taking into account the working conditions and the work which needs to be done Using a power tool in ways for which it was not intended ca...

Page 7: ...ed Do not tilt the machine when starting or switching on the motor except if the machine has to be tilted for starting in long grass In this case do not tilt it more than absolutely necessary and tilt...

Page 8: ...he switch Fig 2a Connect upper and lower handle with supplied washer and clamping screws Fig 2b NOTE Keep cable on the upper side of upper handle part Connect the cable to the handle tube using the 2...

Page 9: ...g grass the motor might overheat and become damaged Switch on firstly press the safety button 5 on the combined switch and keep it down then pull the switch lever 6 and hold it pressed Switch off rele...

Page 10: ...sure to follow the below instructions during operation Never use the machine without rear deflector 7 or grass box 2 connected Do not attempt to lift up the rear part of the machine instead to hold up...

Page 11: ...25 45 65 Material housing PP Grass box material PP Number of height positions 3 Adjustable handle height no Carbon brush motor Yes Diameter front wheel 140 mm Diameter rear wheel 140 mm Insulation cla...

Page 12: ...d resharpening the mowing blade At the end of the mowing season always resharpen the mowing blade or if required replace the mowing blade with a new one Preferably have the mowing blade resharpened or...

Page 13: ...oad Definitely excluded from the warranty is damage resulting from fluid permeation excessive dust penetration intentional damage on purpose or by gross carelessness inappropriate usage use for purpos...

Page 14: ...apparatus voids this declaration European Directives including if applicable their amendments up to the date of signature 2006 42 EC 2014 30 EU 2000 14 EC Annex VI LwA Measured 92dB A Guaranteed 96dB...

Page 15: ...5 6 ADDITIONAL SAFETY RULES FOR GRASS TRIMMERS 5 7 ASSEMBLY 5 7 1 Assembling the motor housing Fig 1 5 7 2 Assembling the handle Fig 1 5 7 3 Mounting the guard 6 7 4 Use of the cable holder Fig 2 6 8...

Page 16: ...h 4 Guide handle 5 Handgrip 6 Motor housing 7 Guard 8 Spool holder 9 Cover with cutting knife 3 PACKAGE CONTENT LIST Remove all packaging materials Remove remaining packaging and packing inserts if in...

Page 17: ...ty warnings and instructions for future reference The term power tool in the safety warnings refers to your mains operated corded power tool or battery operated cordless power tool 5 1 Working area Ke...

Page 18: ...tain control over the power tool in unexpected situations Dress properly Do not wear loose clothing or jewellery Keep your hair clothing and gloves away from the power tool Loose clothes jewellery or...

Page 19: ...place Before using the appliance remove sticks stones wire and other obstacles from the surface on which you intend to work Only use the appliance in an upright position with the cutting line pointin...

Page 20: ...g into the extension cable and attach it to the handle Pressure the switch and make the trimmer turn at no load thus the line length is automatically adjusted Only approach the implement to the grass...

Page 21: ...e with different characteristics to those of the original can permanently damage the grass trimmer as well as annulling the terms of the guarantee 9 TECHNICAL DATA Rated Voltage 230 V Rated Frequency...

Page 22: ...costs shall always be borne by the customer unless agreed otherwise in writing At the same time no claim can be made on the warranty if the damage of the device is the result of negligent maintenance...

Page 23: ...he apparatus voids this declaration European Directives including if applicable their amendments up to the date of signature 2006 42 EC 2014 30 EU 2000 14 EC Annex VI LwA Measured 92dB A Guaranteed 95...

Reviews: