4
indicator starts to illuminate and the defaulted low steam rate indicator will flash. And you can select other steam level
by pressing the steam level control button according to your requirement. When being selected, its corresponding
indicator will flash. Make sure that there is enough water in the tank.
5. Turn temperature dial to your desired setting, which is depended on the fabric of garment, and temperature indicator
will illuminate. Refer to IRONING TIPS latter.
6. The water in the tank will be heated, after a few minutes, the temperature indicator will be extinguished, it indicates
the soleplate temperature has achieved the selected temperature. If the indicator of defaulted steam rate has been
changed flashing to illuminating, it indicates you can take out of the iron and iron the garment with steam by pressing
the steam release button of the iron.
Caution: 1) Do not touch hot soleplate at any time before cooling down!
2) Never direct the steam at people!
7.During operation, if there is less water in the tank, the lack of water indicator will be illuminated, following with two
beeps can be heard. At that time, you should refill the water tank through the filling aperture or move out of the water
tank to refill it.
8. After finish ironing, press and hold the Power button for a while, following with one beep can be heard, and the
appliance will be turned off and all the indicators will be extinguished. Or you can put the iron the thermal insulating
cushion, if there is no steam sprayed out from the soleplate within 10 minutes, the appliance will be turned off
automatically. Remove the plug from the wall socket. But the soleplate is still hot, never touch it with hand, place it on
the thermal insulating cushion until it cools down completely.
CLEANING AND MAINTENANCE
Before cleaning, firstly disconnect the power outlet and let the appliance cools down.
1. Wipe flakes and any other deposits on the soleplate with a damp cloth or a non-abrasive (liquid) cleaner.
NOTE: Do not use chemical, steel, wooden or abrasive cleaners to scrape the soleplate.
2. Clean the upper part of iron with a soft damp cloth. Wipe the water drop on the steam generator and the thermal
insulating cushion with dry cloth.
3. To remove the mineral deposits collecting at inner steam generator, firstly put the iron horizontally on a level surface,
then tilt the steam generator and open the drain water cap on the bottom by it rotating manually(see Fig. 1).
Hold the base unit over the sink, empty all water and loose scale from the boiler into the sink. Using clean water, refill and
empty the boiler repeatedly until all scale has been rinsed out.
WARNING: To avoid a risk of scald, make sure the steam generator has been cooled down completely
before unscrewing the drain water cap.
Fig. 1
4. After drainage, screw the drain water cap tight and recover the steam generator standing.
5. When do not use the appliance for a long time, pour out the water in the tank, and store the iron on the thermal
insulating cushion.
6. To store the device, pull out the cord clamp first and after winding the cord around the cord winding groove, push the
cord clamp back.
IRONING TIPS
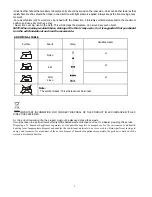
-Always check first whether a label with ironing instructions is attached to the article. Follow these ironing instructions in
any case.
-The iron heats up quicker than cooling it down, therefore, you should start ironing the articles requiring the lowest
temperature such as those made of synthetic fiber.
-If the fabric consists of various kinds of fibers, you must always select the lowest ironing temperature to iron the
composition of those fibers.
Summary of Contents for Stiroplus SP 1079
Page 1: ...SP 1079...
Page 2: ...GR 1 2 3 4 5 6 7 8 9 10 11 12 13 14 15 16 17 18 19 20 21 22 23 24 25 26...
Page 3: ...1 70 T 120 C 100 T 160 C 140 T 210 C MAX 170 T 225 C...
Page 4: ...2...
Page 5: ...3 1 10 1 2 3 1 2 3 4...
Page 6: ...4 27 F 50 1 1 7 Lt MAX 2 3 4 5 6 1 2 7 2 8 10 1 2 3 1 4 5 6...
Page 7: ...5 1 100 To...
Page 8: ...6 2002 96...
Page 15: ...www vassilias gr 8 111 45 210 8543260 Fax 210 8543271...


