EN
ENGLISH
6
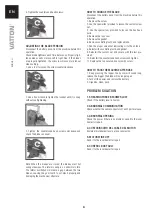
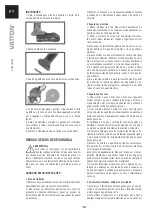
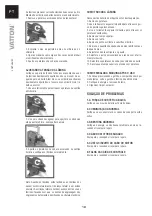
4. Tighten the countersunk head screws.
ADJUSTING THE BLADE TENSION
Disconnect the battery pack from the machine before this
operation.
Check blade tightness each time before use. Properly tigh-
tened blades will not move left to right. Also, if the blades
are properly tightened, the scissors will save more labour
when cutting.
1. Use a tool to loosen the screw counterclockwise
2. Use a hex wrench to tighten the locknut until it is snug,
without overtightening.
3. Tighten the countersunk head screws clockwise and
check the blades as usual.
Note: When the blades are closed, the blades must not
swing sideways. The lateral swing is an abnormal state.
The lateral oscillation will create a gap between the two
blades, causing the gear teeth to not mesh properly and
damaging the mechanical structure.
HOW TO CHANGE THE BLADE
Disconnect the battery pack from the machine before this
operation.
1. Remove the screw.
2. Use the special tool provided to loosen the custom screw
nut.
3. Use the special tool provided to loosen the hex head
bolts.
4. Remove the top cover.
5. Remove the gasket.
6. Remove oscillating tooth and replace blade.
7. Add the proper amount of lubricating oil to the oil tank.
8. Reinstall the oscillating tooth and gasket.
9. Reinstall the custom nut and secure with the tool pro-
vided.
10. Reinstall the countersunk head screws and tighten.
11. Replace the top cover and secure with screw.
HOW TO PACK THE MACHINE AFTER USE
1. Keep pressing the trigger, the buzzer will sound long,
release the trigger, the blade will no longer open.
2. Turn off the power and remove the battery.
3. Organize, clean, pack.
PROBLEM SOLUTION
1. SHEARING FORCE BECOMES LOW
Check if the battery level is too low.
2. ABNORMAL COMMUNICATION
Check whether the cable connectors of each part are loose.
3. ABNORMAL OPENING
Check the power, if there is no problem, send it to the local
dealer for repair.
4. CORTOCIRCUITO DEL CABLE DEL MOTOR
Envíelo al distribuidor local para su reparación.
5. MOTOR WIRE OFF
Send it to the local dealer for repair.
6. CONTROL BOX FAULT
Send it to the local dealer for repair.
Summary of Contents for 48306
Page 1: ...48306...


