background image

Battery Operation


Your safe uses a 3.7V 18650 rechargeable lithium-ion with a flat top. A minimum 

2000 mAh capacity is required, however 2200 mAh or higher can be used to 

increase operation time. A high capacity battery upgrade is available as an 

accessory through our website.


Battery Installation

To get started open the safe using one of your backup keys via the keyhole at the 

back of the safe. Open keyhole cover, push key in and rotate key clockwise to open 

the safe.

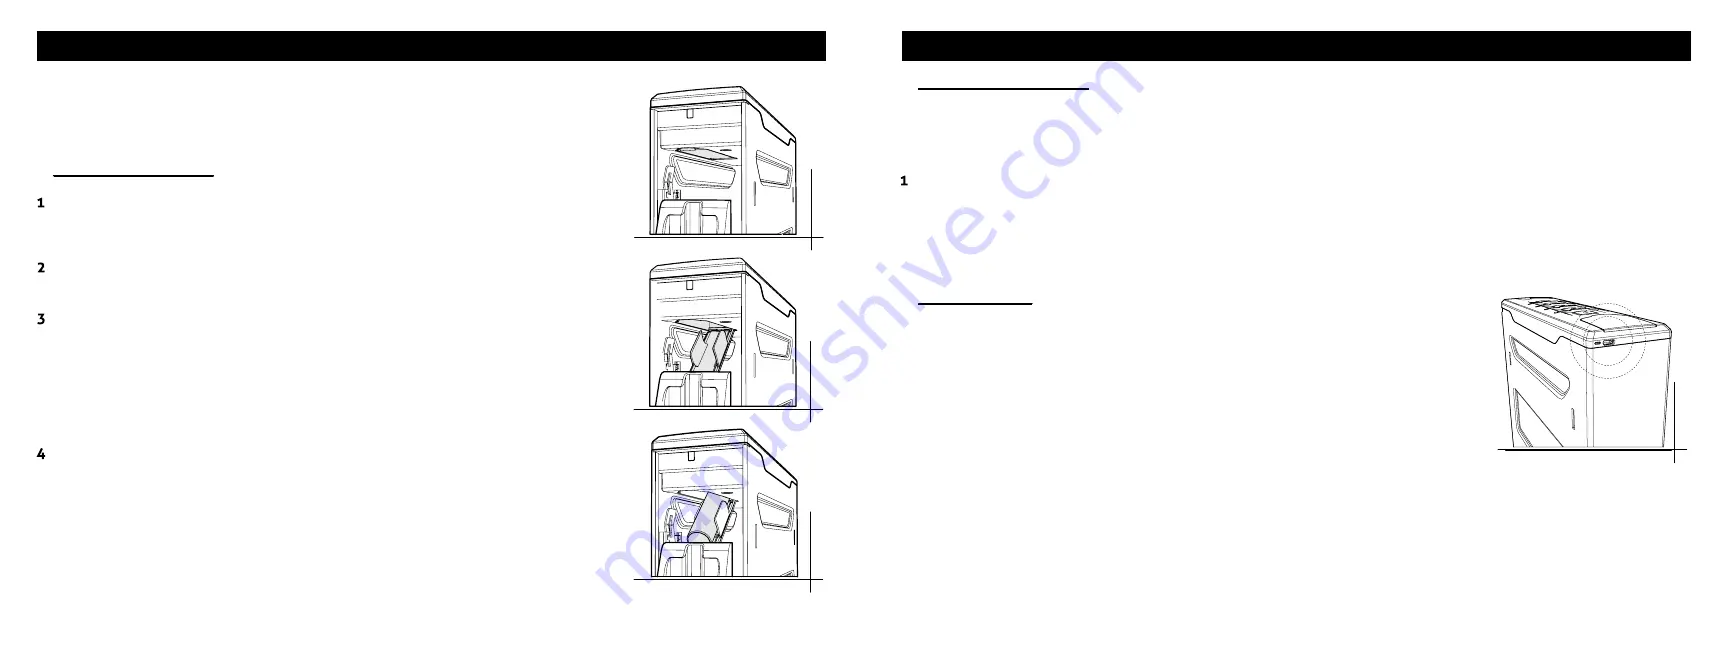
Locate the battery door and open by depressing the tab near the front of the cover, 

allowing the door to fold down (Figure A/B).


Snap the battery (included in accessory box) into the battery door (Figure B/C). The 

battery door has molded snaps for the battery to clip into. Note that your Vaultek

®


safe automatically detects the polarity of the battery and can be snapped in either 

direction.


TIP! 

Make sure to push battery to back of the battery door allowing the door to 

close properly.

Close the battery door. When the battery door is closed you will hear a short 

welcome tone and the keypad will light up.

IMPORTANT: First time users should change the default code immediately after 

installing the battery to prevent unauthorized access to your safe. 

Charging the Battery


Your Vaultek

®

 safe is powered by a rechargeable lithium-ion battery and comes with a charging kit which includes 

an AC power adapter and a micro-USB cable. Safe and micro-USB cable can be used with all international power 

adapters. Under normal usage, a fully charged battery can last at least 3 months. 

05 Vaultek

®

06 Vaultek

®

To recharge the safe

, plug the micro-USB cable into the micro-USB receiving jack located on the back side of 

the safe (Figure D) and connect to a standard USB port or wall outlet using the AC power adapter. Approximate 

recharge time is 2.5 hours. 

The LED next to the receiving jack on the back of the safe (Figure D) will glow RED indicating charging and GREEN 

indicating charged.

FIGURE D

FIGURE C

FIGURE B

FIGURE A

Charging TIPS

After installing the battery, use the charging kit provided to charge the unit 100%.

The charging kit can also function as an external power supply, which means you 

can open your safe even when the battery is depleted. 

Leaving your safe plugged in continually will 

not

 harm the safe or battery. However, 

to preserve battery life we suggest that you unplug occasionally to allow the battery 

to cycle down.

A specially designed


Vaultek powerpack is available as a separate accessory to 

extend operation time.

A

B

C

D

E

2

The adapter used to charge the battery should output 5V/2000mA or above when using micro-USB cable.

See the FAQ section for additional information about the battery.

Summary of Contents for SLIDER

Page 1: ...Quick Setup Scan code use phone camera or visit www vaulteksafe com setup sl20i sl20 S L 2 0 i S L 2 0 I N S T R U C T I O N M A N U A L...

Page 2: ...hind our product and you our customer On behalf of the entire team thank you for your purchase We believe personal defense should be handled seriously and we re excited for you to experience the ultim...

Page 3: ...Master Code Programming 08 Biometric Programming SL20i Only 09 12 Helpful Programming TIPS 09 Programming Admin Fingerprints First Two Users 10 Programming Additional Fingerprints 11 Deleting Fingerp...

Page 4: ...l Holster with Spare Magazine Slot 07 Mounting Plate Release Clip 08 LED Light 09 Battery Compartment Door 10 PROGRAM Button 01 Biometric Scanner SL20i Only 02 Key Hole Cover 03 Backlit Keypad 04 Moun...

Page 5: ...ecutive incorrect keypad entries are entered or 6 incorrect fingerprint scans are made The safe will not accept any entries for four minutes If any additional attempts are made the alarm will beep The...

Page 6: ...ery Your Vaultek safe is powered by a rechargeable lithium ion battery and comes with a charging kit which includes an AC power adapter and a micro USB cable Safe and micro USB cable can be used with...

Page 7: ...app will ask for your safe s master code during pairing and anytime you change the code the app will ask you to re pair Battery Maintenance Testing the Battery Power To check the battery level press a...

Page 8: ...RED TIP If all keys are blinking RED and the fingerprint LED turns solid RED then refer to programming fingerprints 3 20 on next page Using the helpful programming tips provided on page 11 place your...

Page 9: ...int LED blinks GREEN When the 1 key starts blinking RED you can enroll a NEW fingerprint TIP If the administrative print is left on the scanner too long the safe will begin to program that fingerprint...

Page 10: ...om memory Anytime a new Smart Key is paired with the safe the previous Smart Key will be erased from the safe s memory A B Smart Key Entry Modes After pairing you can toggle between access modes from...

Page 11: ...erprints Press and hold 3 and 5 then enter master code By default the unlock feature on the Vaultek app will be disabled To toggle this feature press and hold keys 1 and 4 followed by the PROGRAM butt...

Page 12: ...authorized access in the event your phone is misplaced To create your pattern lock simply drag your finger along the screen to connect at least four dots This unique pattern will be required each time...

Page 13: ...visit the Vaultek website at vaulteksafe com and click Support Product Registration Enter the required information in the form and click submit Securing Your Safe Mounting Plate Configurations Your Va...

Page 14: ...When installing the plate be sure the bottom is parallel to the floor Fig P so the safe opens horizontally Angling the plate or aiming the safe downwards can affect the rail mechanics and prevent safe...

Page 15: ...om and select Support STOP Do not return to retailer If you have any questions about your Vaultek safe or need help configuring the system please visit Support at vaulteksafe com 24 Vaultek Customer S...

Page 16: ...ules These limits are designed to provide reasonable protection against harmful interference in a residential installation This equipment generates uses and can radiate radio frequency energy and if n...

Page 17: ...REV 080320...

Reviews: