www.vax.co.uk
6
operation
4. Operation
Preparing the Carpet
IMPORTANT: Do not use the carpet washer as a
dry vacuum.
1. Vacuum carpet thoroughly. Use a vacuum cleaner
with a revolving brushbar for best results.
2. Remove as much furniture from the room as
possible. If unable to remove the furniture, place
plastic or foil under and around the legs until the
carpet has dried completely.
Helpful hints for cleaning carpet:
1. Only use Vax Ultra Sloution with this carpet washer.
2. Do not oversaturate carpet with cleaning solution
while using the carpet washer.
3. For heavily soiled areas, additional applications may
be necessary.
4. Allow plenty of time to dry carpet thoroughly.
5. Wipe cleaning solution from woodwork and wood to
prevent any damage.
6. Try not to walk on carpet until it is completely dry.
7. After carpet is thoroughly dry, vacuum the carpet
using a vacuum cleaner with a revolving brushbar.
8. Before cleaning, determine where to start and end,
making sure not to walk over previously cleaned
areas.
Check for colour fastness:
Before cleaning carpet, test for colour fastness.
Dampen a white cloth with solution. Test a small area
in an inconspicuous area. Gently rub the cloth over the
area. Check each colour for colour bleeding. If the cloth
remains clean, it should be safe to clean the carpet.
After cleaning:
• Allow carpet to dry completely. Try not to walk on
the carpet until it is dry.
• If it is necessary to walk on the carpet, place white
towels on the areas to be walked on.
• If the carpet is not dry and the furniture must be
placed back in the room, use plastic or foil under the
furniture to prevent staining the carpet.
• Thoroughly clean the dirty water tank with warm
(max 40
o
C) tap water.
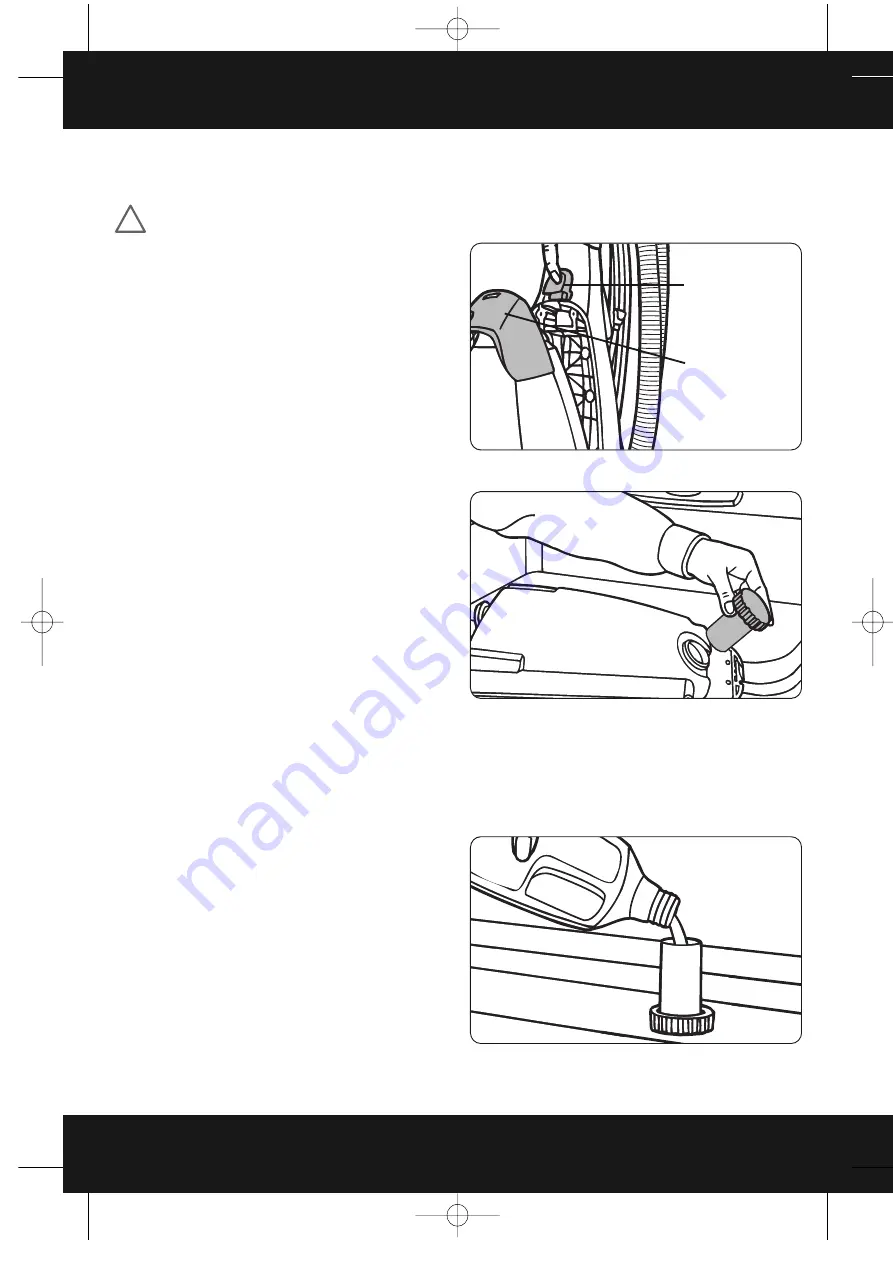
How to Operate
Grasp clean water tank under handle while pressing clean
water tank latch.
Tilt clean water tank away from cleaner and remove
(Fig.4/1).
Unscrew measuring cap from back side of clean water
tank (Fig.4/2).
Fill measuring cap with solution (approximately 5 capfuls).
Pour into clean water tank (Fig.4/3).
NOTE: Use only Vax Ultra solution. Using other
cleaning solutions may cause excess foaming.
Excessive foam will cause the float to shut off the
carpet washer prematurely. Using other solutions will
void the warranty.
Fig.4/2
Fig.4/5
Fig.4/3
Fig.4/1
!
clean water
tank handle
clean water
tank latch
V-028PX User Guide v2.qxd:V-028PX User Guide
14/3/08 10:53 Page 6
All manuals and user guides at all-guides.com
all-guides.com