background image

XTi-VBox Android TV Gateway User 
Manual 


6

. System Manage


6.6

. Remote Access (beta) 

27 


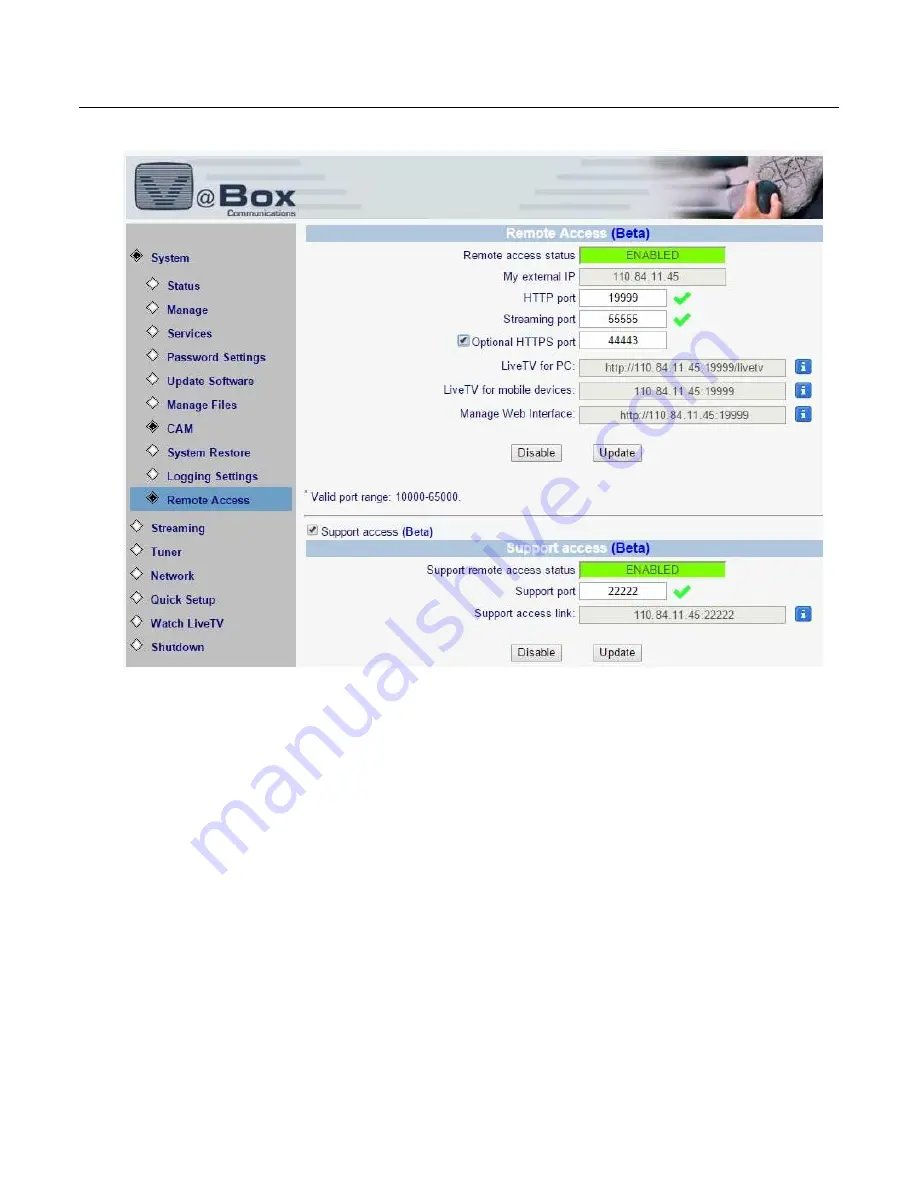
Figure 20: Remote Access 


My external IP – States the current external IP port, this IP address may change from time 
to time, depnding on your Internet Service Provider (ISP). Please remember to update your 
links and applications whenever your ISP assisgns a new IP address 

o


VBox recommand to use Dynamic DNS service on routers that support this feature, 
please consult your network router user manual for more information 


HTTP port – Application interface and web interface port 


Streaming port – Live and recorded TV streaming port 


Optional  HTTPS  port  –  Enable  this  port  to  access  and  configure  your  network  storage 
remotely 


LiveTV for PC – Copy this link to your web browser to watch live TV  


LiveTV for mobile – Enter this IP address and port on the VBox Live TV app 


Manage  web  interface  –  Copy  this  link  to  your  web  browser  to  access  the  admin  web 
interface 

1.


Please make sure that all your ports pass the automatic port test and receive the green  “V” 
mark, if you see a red “X” mark next to one of the ports you can menuall type an alternative 
port address between 10,000 to 65,000 and press the Update to check if the port is available. 

2.


Support –  

Summary of Contents for XTi 4134

Page 1: ...VBox Android TV Gateway XTi 4134 DVB S S2 Product Full User Manual Product Version 1 0 Release Date August 2019 Document Revision 1 0 ...

Page 2: ...vboxcomm com shop support product registration html to like us on Facebook to follow us on twitter and YouTube By following VBox you ll instantly start enjoying these exclusive benefits Get product updates and other valuable information Be among the first to find out about new features and updates When you register you can also tell us about your experience with your TV Gateway VBox listens to our...

Page 3: ...onfigure the Live TV Channels using Tablet iPad 5 4 Configuring your Router and PC to Use the UPnP Protocol 6 4 1 Accessing XTi VBox TV Gateway on PC using My Network Places 6 4 2 Accessing XTi VBox TV Gateway from Mac OS X 8 5 Setting up XTi VBox TV Gateway using the Web Interface 9 5 1 Step 1 System Setup 10 5 2 Step 2 Tuners Setup 11 Step 2 Tuners Setup for XTi 4134 11 5 3 Step 3 Scan for XTi 4...

Page 4: ...th Channel Pairing 40 7 3 3 External XMLTV beta 41 7 4 Add Channels 42 7 5 Language Settings 42 7 6 UPnP Support 43 7 6 1 Limit single channel streaming per UPnP client 43 7 7 IPTV Support 44 8 Tuners 45 9 Quick Setup 46 10 Network Status 47 11 Shutting Down and Restarting the System 48 12 Players 49 12 1 Mobile Devices 49 12 2 3rd Party Applications UPnP 49 12 2 1 PC and Mac 49 13 Recording 51 13...

Page 5: ... Figure 4 Windows 7 Network Media Devices showing VBox TV Gateway 7 Figure 5 VBox TV Gateway interface Welcome page 9 Figure 6 Quick Setup Wizard Step 1 System Setup Device Configuration page 10 Figure 7 Quick Setup Wizard Step 1 System Setup System Settings page 11 Figure 8 Quick Setup Wizard Step 1 System Setup Streaming Settings page 13 Figure 9 Quick Setup Wizard Step 2 Tuners Setup Tuner 1 pa...

Page 6: ...l Software Update 31 Figure 26 Manage Files 32 Figure 27 System Logger 33 Figure 28 Streaming Status 34 Figure 29 Manage Channels 35 Figure 30 Program Guide 39 Figure 31 Add Channels 42 Figure 32 UPnP Support 43 Figure 33 IPTV Support 44 Figure 34 Tuners Status 45 Figure 35 Quick Setup 46 Figure 36 Network Status 47 Figure 37 Network Manage 47 Figure 38 System Restart and Shutdown 48 ...

Page 7: ...ve different types of media from various sources and share them with any computer laptop tablet Smartphone Smart TV or Media Streamers device connected to your Local Area Network LAN 1 1 XTi VBox TV Gateway 41XX Product Line XTi VBox Android TV Gateway Family includes several products Each product is available in one or more models Table 1 lists the products and their models and summarizes their s...

Page 8: ... iOS device laptop PC or Mac Apps VBox apps available for free from Apple Apps Store or Android Play Store or any UPnP app Network router Wireless broadband router 802 11n at 5MHz or higher On your router make sure UPnP is enabled A Google Account 2 3 Installing the XTi VBox TV Gateway Device To install your device take the following steps 1 Connect the XTi to the network router by Ethernet cable ...

Page 9: ...The 4 Tuner can be set independently or as Unicable SCR Each one for can be connected to independent satellite feed Or operating mode of Unicable SCR when one RF connector feed for all tuners Item Description 1 Power LED indicates whether the system is ready Orange indicates the system is connected to electricity but is still in the process of being started Green indicates the XTi device is ready ...

Page 10: ...F connectors 4 2 5 2 XTi 4134 Unicable Sanrio Rear Panel XTi 4134 can be in the operating mode of Unicable SCR when one RF connector feed for all satellite tuners Note that the second RF connector is not in use XTi Unicable RF1 Connector Tuner 1 DVB S2 Tuner 2 DVBS Tuner 3 DVB S2 Tuner 4 DVB S2 Unicable Multiswitch ...

Page 11: ...1 Download and run the VBox TV Source app and follow the screen instructions 2 When you re done setting up you can watch live channels on any device through the VBox Live TV app that you can find in the iOS Android Microsoft app stores or a variety of third party applications that you can find on our site 3 3 Configure the Live TV Channels using Tablet iPad 1 Download the VBox Live TV application ...

Page 12: ...is enabled you can access your XTi device using My Network Places as explained in the following section 4 1 Accessing XTi VBox TV Gateway on PC using My Network Places 1 Make sure your PC is connected to a router 2 Connect the router to the XTi device using an Ethernet cable 3 Turn on the XTi device by pressing the ON OFF button on its front panel Figure 1 on page 3 The ON OFF LED turns orange ind...

Page 13: ...device webpage from the context menu Figure 4 Windows 7 Network Media Devices showing VBox TV Gateway NOTE The XTi device s default name is VBox TV Gateway vbox_xxxx where xxxx is the product s number This name appears on devices that are connected to your network and have the UPnP Protocol enabled When Setting up XTi VBox TV Gateway using the Web Interface as explained in the next section you hav...

Page 14: ...ou have VLC web plugin installed The web plugin is a separate VLC packaged and not part of the VLC player http nightlies videolan org build macosx intel 2 To configure the TV Gateway Open Safari and type your TV Gateway s IP address for example http 192 168 0 100 3 To view Live TV Open Safari and type your TV Gateway s IP address live TV for example http 192 168 0 100 liveTV 4 Save the page in you...

Page 15: ...e is displayed showing its Welcome page Figure 5 Figure 5 VBox TV Gateway interface Welcome page When configuring your XTi device for the first time it is recommended to choose the Quick Setup option Figure 5 NOTE You can later customize this quick setup by re launching the interface and clicking Manage The Quick Setup Wizard is displayed guiding you through the steps listed on the left panel Figu...

Page 16: ... as explained in Table 2 Table 2 Quick Setup Wizard Step 1 System Setup System Settings page Option Description Interface Language Select the language of this Web interface from the list Device Name Set name your device The name of your XTi VBox TV Gateway device This name appears on devices that are connected to your network and have the UPnP Protocol enabled Use the default name or override it b...

Page 17: ...V Gateway using the Web Interface 5 2 Step 2 Tuners Setup 11 5 2 Step 2 Tuners Setup Step 2 Tuners Setup for XTi 4134 1 Click Next The Step 2 Tuners Setup Tuner 1 page for XTi is displayed Figure Figure 7 Quick Setup Wizard Step 2 Tuners Setup Tuner 1 page XTi 4134 ...

Page 18: ...n configure Bydefault XTi uses the Ku Band Universal LNB with the options shown in Figure Low Enter the low band reception XTi is set to the default value of your LNB type High Enter the high band reception XTi is set to the default value of your LNB type Satellite Selection Select a satellite and transponders whose broadcasting you wish to receive Select satellite Select a satellite from the drop...

Page 19: ...iption RF Feeding Indicates that the satellite and transponder settings of another tuner in this case Tuner 1 have been applied to Tuner 2 Current Tuner RF feed shared with Tuner Shows the name of the tuner whose satellite settings have been applied to Tuner 2 Remove satellite and transponder settings Select this option remove the satellite and transponder settings and to configure them manually f...

Page 20: ... Wizard Step 3 Scan Scan Settings Review page XTi 4134 Option Description Scan Settings Review Summarizes your current scan settings DVBS2 Tuners Tuner Numbers Share the same feed Lists the names of the tuners that share the same feed from the selected satellite and transponders DVBS2 For XTi 4144 Tuners 1 2 3 4 Satellite Displays the name of the chosen satellite Modify Click to return to the Tune...

Page 21: ...he Scan Status and Scan Results Figure Figure 10 Quick Setup Wizard Step 3 Scan Scan Status and Results page XTi 4134 models The Scan Status informs you how many transponders have been scanned for the chosen satellite The Scan Results specifies which of the scanned transponders are available 2 Choose one of the following To repeat the scan for example if you wish to choose different transponders c...

Page 22: ...iple selection select all channels of a specific type FTA encrypted or radio or all available channels Once you select a channel you can customize it as follows Order set the channel s position on the channels list Click the Up arrow or down arrow to move the channel up or down respectively one step at a time Click the icon to show the channels order list You can now select the channel s position ...

Page 23: ...Start Over Discards your settings and restarts the Quick Setup Wizard Finish Saves your settings and completes your XTi VBox TV Gateway setup NOTE Since channels list may be very long the Start Over and Finish buttons appear both above and below the list for your convenience 5 5 Step 5 Recordings Setup Figure 12 Quick Setup Wizard Step 4 Recordings Setup page Option Description Recording media Sel...

Page 24: ... By clicking Manage your VBox the Wizard will display the System Status page summarizing your XTi VBox TV Gateway setup Figure NOTE You can return to the Quick Start Wizard by clicking Quick Setup Your XTi VBox TV Gateway device is now setup and you can start viewing and listening to content that is presented according to your preferences Figure 14 XTi VBox TV Gateway Interface Example System Stat...

Page 25: ...Manage 6 1 Verifying Current System Device and Software Status To check the updated system and software data access the SYSTEM STATUS OPTION Figure 15 System Device and Software Information The information under the Software Versions heading indicates the software type and version installed as well as the type of unit in use ...

Page 26: ...nage System Select System Manage option The following screen displays Figure 16 Manage On this page you can see the name of your XTi VBox TV Gatway device and select the language of this Web interface Under the System Time heading you can determine the device s date and time settings ...

Page 27: ... System Services Select System Services option The following screen displays Figure 17 Services Network services must be started at the system prior to being actually put to work Use the HTML interface and follow these steps to ensure that the required services are running on the XTi ...

Page 28: ... Manage Protection checkbox and press Enable The default user name is admin The default password is admin It is recommended that you change the system password regularly to prevent security issues This feature is available from Home TV Gateway version 2 48 and up 3 Your TV Gateway is now locked using the default user name and password 4 Enter the default user name and password and press log in Fig...

Page 29: ...age Protection 23 Figure 18 Change Password admin 5 Change the default password to protect your TV Gateway 6 To disable the password protection simply uncheck the Enable Web Manage Protection checkbox and press Update Figure 19 Password Setting Password Protection Mode ...

Page 30: ...e s memory and it will be erased when resetting the VBox to factory default therefore it is recommended to copy this backup and save it outside of the VBox memory Creating a backup You can create additional backups by choosing the backup target and pressing the backup button 6 5 2 Restore Choose the location of the backup file this can be either A Network path USB Recording path USB storage attach...

Page 31: ...clear all its settings databases and configuration files This will bring the VBox to the default factory settings once the reset is completed you will be prompt to run quick setup again in order to configure the VBox If you wish to use a restore file to configure the VBox instead of running quick setup please cancel the Quick Setup window and go to Backup and Restore ...

Page 32: ...onnect the Home TV Gateway to the Internet Your Home TV Gateway stream the full channel s broadcast quality and therefore requires fast internet upload speeds and fast internet bandwidth all the way to your outdoor device Note VBox cannot guarantee the quality of the stream outside of your home network and quality of stream may vary between different TV channels due to differences in bit rate broa...

Page 33: ...ort Application interface and web interface port Streaming port Live and recorded TV streaming port Optional HTTPS port Enable this port to access and configure your network storage remotely LiveTV for PC Copy this link to your web browser to watch live TV LiveTV for mobile Enter this IP address and port on the VBox Live TV app Manage web interface Copy this link to your web browser to access the ...

Page 34: ...r the Internet Figure 21 Software Update To update the VBox software over the internet press the Check For Update button A rotating cycle will appear while the VBox checks if there is a newer version this proccess should take up to 1 min depending on your internet connection Please note that if you are behind a firewall or a proxy server you may not be able to update your VBox over the internet pl...

Page 35: ...n vbx is accessible on a USB Flash Drive or on your local computer 2 Select the SYSTEM UPDATE SOFTWARE option The following screen displays Figure 22 Update Software 3 To upload a new file from your computer to the XTI click the Choose File button to search for the file on your computer and click the UPLOAD button The following screen displays ...

Page 36: ...nt make sure that the I Decline radio button is selected and click the PROCEED WITH UPDATE button No software is updated and you return to the SYSTEM MANAGE Status screen Contact your vendor with any questions Accept If you agree with the license agreement select the I Accept radio button and then click the PROCEED WITH UPDATE button The following screen displays 6 Click the Proceed with Updare bu...

Page 37: ...tem Manage 6 7 Update Software 31 Figure 25 Successful Software Update 7 As instructed on the screen wait approximately three minutes and then click the Click Here link Wait for your browser to connect to the XTI The SYSTEM Status screen displays ...

Page 38: ...re stored on the XTi select System Manage Files option The following screen shows all the filenames Figure 26 Manage files To upload a new file from your computer to the XTi input the filename in the corresponding form field or click the BROWSE button to search for the file on your computer and click the UPLOAD button ...

Page 39: ...ser Manual 6 System Manage 6 9 System Logger 33 6 9 System Logger 1 Select the SYSTEM Logging Settings option The following screen displays Figure 27 System Logger You can set here the Log Level Prints if necessary Debug operations ...

Page 40: ...ming option 7 1 Streaming Status 34 7 Streaming option 7 1 Streaming Status Select Streaming Status option The following screen displays Figure 28 Streaming Status A screen displaying the selected parameters and the current streaming status displays ...

Page 41: ...Gateway User Manual 7 Streaming option 7 2 Manage Channels 35 7 2 Manage Channels Select Streaming Manage Channels option The following screen displays Figure 29 Manage Channels Manage the channels as explained in Table 12 ...

Page 42: ...ng TV first This will sort all channels according to their LCN number and will place all the TV channels at first and Radio channels at the end of the list 2 Manual channel sorting You can change the channel number and press one of the auto scan options Use the up and down arrows to move channel order Use the icon and select the location of the channel from the drop down list 7 2 2 Changing Channe...

Page 43: ... file and point to the logo file and press the Update button The page will refresh and the channel logo will be replaced with the new one 7 2 2 2 Local Copy You can manually copy all the channel logos to the VBox s icon folder Open the VBox s recording storage path o On attached USB storage remove the storage device from the VBox and connect it to your PC Mac o On network NAS or folder open the re...

Page 44: ...root if you do not see the folder you can create a new folder and name it icons o Open the icons folder and copy all the channel logos into it o If you are using USB storage once all the logos are copied connect the storage device back to the VBox Open the Manage channel page and press on the channel icons of the channel you would like to change the logo ...

Page 45: ...her channel logos for all the logos you have copied 7 3 Program Guide Program guide is collected by the VBox TV Gateway and shared between the different player devices there are two main program guide sources 2 External source the VBox can receive guide from a standard XMLTV source located on the network or internet Figure 30 Program Guide 7 3 1 Live Signal The VBox collects the guide transmitted ...

Page 46: ...here channels with the same scheduling are provided with limited program guide on one of the channels 7 3 2 1 Pairing Channels Once selecting Live Signal with Channel pairing option two tables listing all the channels will be presented at the bottom of the page You can press the Auto Match channel this will attempt to link similar channels If Auto match is not available or you would like to match ...

Page 47: ... two ways to create an External XML TV path using the Wizard or doing it manually Below explains how to do it using the Wizard if you would like to do manually please refer to our guide on How to set an External XML TV path manually chapter section 14 4 Setting up External XMLTV 1 Locate the XMLTV file source 2 Set the sync time Set the VBox sync time to after the XMLTV file is updated 3 Match XML...

Page 48: ... Figure 31 Add Channels Select tuner from the drop down list Check the boxes of the transponders to be used to scan this satellite To select all transponders on the list check the top box To add your own transponder to the list enter its definitions into the bottom row 7 5 Language Settings Select Streaming Language Settings option The Figure 11 screen displays ...

Page 49: ... by UPnP radio button and click Submit button to cancel UPnP support 7 6 1 Limit single channel streaming per UPnP client The XTi VBox TV Gateway is configured by default to stream one TV channel per client If you wish to stream multiple TV channels to a single client deselect the checkbox Note When streaming multiple channels to the same client when changing channel some applications may not clos...

Page 50: ...ations such as VLC and Kodi XBMC s IPTV Simple add on For application configuration instructions please go to http vboxcomm com players html DVB EIT support some applications such as VLC TV headend can receive the program guide raw stream If you are using such an application and would like to stream the raw EPG data select this option Note Streaming EIT requires more CPU and uses higher network ba...

Page 51: ...e signal being received as a relative percentage of the total range of the XTi receiver The background color is green if the signal strength is within the acceptable range of 22 to 88 and yellow if it is outside of this range When the XTi S is locked onto the satellite transponder at the current frequency the signal lock bar is green and states Lock Otherwise the bar displayed is yellow with the t...

Page 52: ...9 Quick Setup 7 7 IPTV Support 46 9 Quick Setup Select Quick Setup option The following screen displays Figure 35 Quick Setup Click Start Wizard button The Quick Setup Wizard is displayed guiding you through the steps listed on the left panel ...

Page 53: ...work Status Network Manage Select Network Manage option The following screen displays Figure 37 Network Manage If your local network administrator instructs you to use DHCP select the DHCP radio button If you have been assigned a confeger DHCP or static IP address select the Static or DHCP radio button and input the IP address subnet mask and Default Gateway optional ...

Page 54: ...g the System 7 7 IPTV Support 48 11 Shutting Down and Restarting the System To shut down or restart the system select the SYSTEM SHUTDOWN The following screen displays Figure 38 System Restart and Shutdown Click the RESTART SYSTEM button The system shuts down and restarts ...

Page 55: ...The XTi supports many 3rd party UPnP applications letting you watch TV from your favorite application 12 2 1 PC and Mac VLC Support Live and Recorded TV Kodi Support Live Recorded TV and VBox TV Remote control The VBox TV Gateway automatically generates a M3U playlist of your selected channels allowing you to easily switch between channels The playlist URL is available on the on Streaming IPTV as ...

Page 56: ...XTi VBox Android TV Gateway User Manual 12 Players 12 2 3rd Party Applications UPnP 50 Press the link for a list of UPnP applications http en wikipedia org wiki List_of_UPnP_AV_media_servers_and_clients ...

Page 57: ... applications or 3rd party supported UPnP applications 13 1 Hardware installation 13 1 1 Attached Storage 1 The XTi records TV shows on to a removable USB storage or SD Card 2 You can connect Hi Speed USB 2 0 or USB 3 0 USB Flash Drive or Removable Hard Drive Make sure that your USB storage is fast enough to support your recording needs For full HD recording 25MB s write speed and above is recomme...

Page 58: ...nts 1 XTi VBox Android TV Gateway software version 2 40 and above 2 Supported storage a Shared Folder A PC running Windows 7 and above with shared folder b Network Storage NAS With Samba SMB Windows network file system support Network storage should be connected to the same router as the XTi TV Gateway Recommended Use a network storage connected with a network cable to the router WiFi network stor...

Page 59: ...ive TV directly to a PC in your network The XTi will stream the recording from the PC to all supported devices in your network 1 Make sure that the PC you are assigning will be running and connected to the network during recording 2 Make sure that you have enough free space a minimum of 1GB is recommended 13 1 2 4 Setting up the recording folder 3 Create a new folder or choose an existing folder 4...

Page 60: ...work and Internet 2 Choose Network and Sharing Center and press Change advanced sharing settings 3 Make sure that Password protected sharing is turned off 13 1 3 Network Storage NAS Shared folder 1 Make sure that you have sufficient free space for recording 2 Make sure that your NAS is Samba SMB Windows network file system compatible 3 Create a new folder in your NAS 4 Grant both Read and Write pe...

Page 61: ...device b SD Card Insert an SD card into the XTi SD card port located on the left side of the device c Network Locate the network folder where you want to store the recordings 13 2 1 Manage recording page 1 Recording path Set your recording device 2 External recording media information See the status of your storage device 3 Additional recording time Set a recording buffer before and after your set...

Page 62: ...ing the Wizard or setting it manually Below explains how to do it using the Wizard if you would like to set it manually please refer to our guide on How to set a Recording Path manually chapter 14 section 14 5 1 Choose Network 2 You can use secure HTTPS or HTTP If you are using HTTP continue to 5 3 Read and accept the note 4 Press Proceed anyway on the site s security certificate warning ...

Page 63: ...ox Android TV Gateway User Manual 13 Recording 13 2 Setting up XTi TV Gateway Storage Preferences 57 5 Choose the domain or workgroup where your PC or NAS is located 6 Locate the PC or NAS in the Server list ...

Page 64: ...cording 13 2 Setting up XTi TV Gateway Storage Preferences 58 7 The VBox TV Gateway will attempt to access the PC or NAS 8 If you require a user name and password to login to the PC or NAS you will be prompt to provide both user name and password ...

Page 65: ...XTi VBox Android TV Gateway User Manual 13 Recording 13 2 Setting up XTi TV Gateway Storage Preferences 59 9 Select the folder you have prepared in advance 10 Press Set to select the target folder ...

Page 66: ...XTi VBox Android TV Gateway User Manual 13 Recording 13 2 Setting up XTi TV Gateway Storage Preferences 60 11 A confirmation message will appear confirming that the recording path was successfully set ...

Page 67: ...id TV Gateway User Manual 13 Recording 13 2 Setting up XTi TV Gateway Storage Preferences 61 12 Your new network path will appear under Network You can change the network path at any time by pressing the Edit button ...

Page 68: ...navigation buttons 2 Press the recording button 3 To make sure that the recording is in progress go back to the more info menu or click one of the navigation buttons to see the channel info On recorded channels a red circle will is shown next to the channel number indicating that the channel is being recorded 4 You can switch to a different channel while recording a channel as long as you have suf...

Page 69: ...es recording on the Program Information page There are 3 options to record a series TV show Automatic EPG and Manual Advanced When pressing the Series Rec button the TV Gateway will automatically determine which option to use based on the available program Information provided by the broadcaster 13 4 1 Automatic Series Recording Automatic Series Recording is enabled when a special CRID tag is avai...

Page 70: ...set to record the news and instead a football game was on it will record the football game and program name will be taken from the EPG at the time To stop EPG series recording cancel the series recording Note The TV Gateway will record based on day start and stop time and will record even if the program is not airing 13 4 3 Manual Series Recording When no program information is available you will ...

Page 71: ...plication or VBox TV free application 2 To access recorded program from 3rd party application access the VBox box and go to the media folder 3 To access manage and view recorded programs from the free VBox TV app go to My Zone 4 In the My Zone area you can a Press the watch button to play the TV program b Press the Trash icon to delete the TV program permanently c View list of scheduled future rec...

Page 72: ... 1 How to switch between DVB T and DVB C Configuration 5 Access the XTi device using My Network Places Windows XP go to My Network Places display the network devices list and click VBox TV Gateway vbox_xxxx 6 The XTi VBox TV Gateway Web interface is displayed showing its Welcome page 7 Choose the Manage option The Status option screen is displayed showing System Device and Software Information ...

Page 73: ...s Troubleshooting 14 1 How to switch between DVB T and DVB C Configuration 67 8 Select Advanced option The Advanced Settings page is displayed 9 Click Advanced Settings button When prompted for the login and password input webadmin for both The following screen displays ...

Page 74: ...XTi VBox Android TV Gateway User Manual 14 Frequently Asked Questions Troubleshooting 14 1 How to switch between DVB T and DVB C Configuration 68 ...

Page 75: ...n DVB T and DVB C Configuration 69 10 Select TUNER MANAGE Update option The following screen displays 11 Select DVBC option radio button and click Update button The system is getting rebooted 12 Upon Reboot the SYSTEM MANAGE Status option is displayed Select Exit Advanced option The following screen is displayed ...

Page 76: ...ubleshooting 14 1 How to switch between DVB T and DVB C Configuration 70 13 Click to Go to Manage Application button When prompted to Start Quick Setup Wizard click OK button 14 The Quick Setup Wizard is displayed guiding you through the DVBS C steps listed on the left panel ...

Page 77: ... by certain programs to automatically open ports for communication Linksys routers have UPnP feature enabled by default To learn how to check the UPnP setting on a Linksys router click To check the UPnP setting on a router see your router documentation or contact your router manufacturer Follow the steps below to learn how to enable UPnP on your computer Windows Vista Windows 7 Step 1 Click Start ...

Page 78: ...requently Asked Questions Troubleshooting 14 2 Enabling UPnP Universal Plug and Play in a Windows based computer 72 Step 3 Select Change advanced sharing settings Step 4 Select Turn on Network Discovery and then click at the bottom of the screen ...

Page 79: ...14 Frequently Asked Questions Troubleshooting 14 2 Enabling UPnP Universal Plug and Play in a Windows based computer 73 Windows XP Step 1 Click on then click on Control Panel Step 2 On the Control Panel window click on Add or Remove Programs ...

Page 80: ...n the Add or Remove Programs window click on Add Remove Windows Components Step 4 The Windows Components Wizard window should open scroll down the list and click on Networking Services then click on the Details button Step 5 On the Networking Services window check the boxes for Internet Gateway Device Discovery and Control Client and UPnP User Interface then click OK ...

Page 81: ...14 Frequently Asked Questions Troubleshooting 14 2 Enabling UPnP Universal Plug and Play in a Windows based computer 75 Step 6 Click Next When the Windows Components Wizard is completed click Finish UPnP should now be enabled on your computer ...

Page 82: ...3 How to enable SMB1 from Windows 10 Since Windows 10 September 2017 update SMB1 is disabled As VBox files system for managing external files such as recordings or XML TV stored on NAS or a computer library works with SMB1 it is necessary to enable it Step 1 Go to Windows settings and select Apps Step 2 Select Programs and Features ...

Page 83: ... 10 77 Step 3 Select Turn Windows features on or off Step 4 Scroll down to SMB 1 0 CIFS File Sharing Support tick its box expand it and tick all applicable boxes SMB 1 0 CIFS Client and SMB 1 0 CIFS Server and then press OK Please note that in order for the setting to become effective you will need to restart your computer ...

Page 84: ...path manually Step 1 Open your VBox Setup menu go to Streaming and then to Program Guide Under program Guide Source select External XML TV Beta and click Submit Under External XML TV Source Beta select Network URL Manual and enter the path manually in the following ordered PC name or NAS name folder path xml tv file name see example in the red box below and then click Set ...

Page 85: ...XTi VBox Android TV Gateway User Manual 14 Frequently Asked Questions Troubleshooting 14 4 How to set an External XML TV path manually 79 Step 2 You should receive a success message and then click Ok ...

Page 86: ...set an External XML TV path manually 80 Step 3 under Channel Matching select a matching option Auto Match or Manual Match Please note that the Auto Match option works on crossing channels names existing vs new When the process is done click Sync Guide Now wait for a success message and you are done ...

Page 87: ...quently Asked Questions Troubleshooting 14 5 How to set a Recording Path manually 81 14 5 How to set a Recording Path manually Step 1 Open the VBox Setup menu go to Streaming and then to Manage Recordings Under Recording Path select Network Manual ...

Page 88: ...eshooting 14 5 How to set a Recording Path manually 82 Step 2 Once you will select it a pop up message will appear click Continue Step 3 Enter the path under Network manual according to the examples in the red box below and click Set wait for a success message and you are done ...

Reviews: