background image


38

38


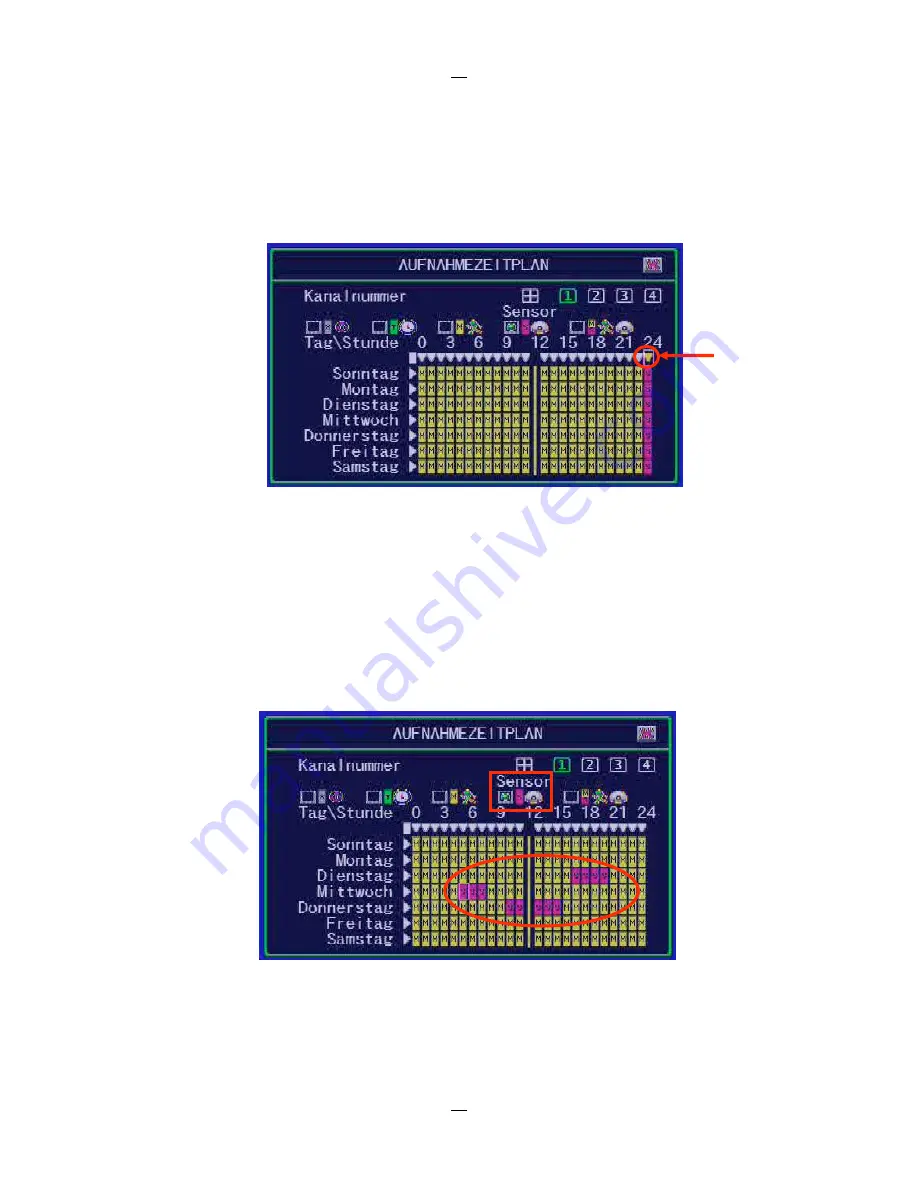
Select  “

” to set the same mode for a specified time every day. Confirm with 

” 


The following example shows that from  23:00 – 24:00) every day there is no recording 
( set to „NONE“ recording mode) Confirm with 

” 

.  


You can also specifically set the recording mode for a particular time and day. 
 
Select the recording mode first. Move the cursor and click the icon “x”, “T”, “M”, “X” or “M” 
to change mode on the timetable. 
 
Select “Time” recording mode, move the cursor and click the peris of icons”M” change to 
“T” and press ENTER 


Summary of Contents for 12544-SF

Page 1: ...essional device which guarantees highest possible quality and reliability Please read the following instructions carefully before comissioning the product in order to be able to take full advantage of all quality features regarding this product line GERMANY R C Mounting and Operating Manual Streamserver All contents of this document may change without prior notice MO_12544 SF 16 04 2012 Art No 125...

Page 2: ......

Page 3: ...17 3 a 3 Main menu 17 3 a 4 Authentication settings 19 3 a 5 Network Setup 20 3 a 6 Configuration for access via PC 22 3b Getting Started as a DVR 26 3 b 1 Switch on the DVR 27 3 b 2 Live pictures 28 3 b 2 1 State Bar Information 28 3 b 2 2 Control Bar Information 29 3 b 2 3 Drag and drop Channel Swap 30 3 b 3 Main menu 31 3 b 4 Channel Setup 32 3 b 4 1 Channel Number 32 3 b 4 2 Basic Settings 33 ...

Page 4: ... Environmental Setting 58 3 b 13 Exit Main Menu 58 3 b 13 1 Save Changes Exit 59 3 b 13 2 Save and discard Changes 59 4 Playback and data Backup 60 4 1 Calendar menu 61 4 2 Play Menu 62 4 3 Event Search 66 4 4 Data transfer 68 5 System Information 70 5 1 Record information 71 5 2 HD Information 72 5 3 Network Information 73 6 LAN Online Viewing Setup 74 6 1 PC Connections via LAN 75 6 2 DynDNS Ser...

Page 5: ...lation 84 7 1 1 Overview 84 7 1 2 Connect PC Client 85 7 1 3 Playback pause 87 7 1 4 Record a freeze frame 87 7 1 5 Remote Playback 88 7 1 6 Remote Configuration 93 7 2 Web Browser Viewer 93 7 2 1 Switching of the display 95 7 2 2 Web Browser Viewer control 96 ...

Page 6: ......

Page 7: ...4 4 Chapter 1 1 Overview ...

Page 8: ...5 5 ...

Page 9: ...6 6 ...

Page 10: ...7 7 ...

Page 11: ...C Start or stop the backup recording 7 Power LED green The LED shows green light when the unit is turned on 8 MODE Display mode Frame Quad 8 Pictures 9 MENU Open End the menu 10 UP Select a menu item or change the value 11 DOWN Select a menu item or change the value 12 SELECT ENTER Confirm 13 Hard disk active red Blink when the Hard Disk is working 14 IR Receiver red IR Remote control receiver 1 2...

Page 12: ... 2 USB MOUSE USB mouse port 3 LAN RJ45 for network connection 4 VGA OUT VGA Output 5 VIDEO OUT Video Output 6 AUDIO OUT Audio Output 7 SENSOR Alarm input 1 4 and common connection G no Function 8 RS 485 RS 485 connection no Function 9 AUDIO IN Audio input 10 VIDEO IN BNC Video input CH1 CH4 12544 SF CH1 CH8 12588 SF CH1 CH16 12566 SF 6 7 8 9 10 1 2 3 4 5 6 1 2 3 4 5 7 8 9 10 ...

Page 13: ...ward 8 PLAY Play 9 MENU Open close menu 10 UP DOWN LEFT RIGHT Moves up down left right through the list of menus Or use it to select change the configuration values 11 Enter Select Confirm the value 12 AUTO Press AUTO button to start screen auto sequence 13 MODE Display mode switch Picture x4 x8 display 14 ZOOM OUT N C 15 ZOOM IN N C 16 1 2 16 Select the camera 1 4 Art No 12544 SF 1 8 Art No 12588...

Page 14: ...11 11 Chapter 2 2 Installation ...

Page 15: ...ardware Setup from the automatic NTSC PAL detection 2 2 Connection Overvierw Make all connections to the peripheral devices before turning on the Video Sreamserver 2 2 1 Preparing of connections The pictures below advided instructions for connecting to the Video Sreamserver 4 Channel BNC Video Stream Server Power Supply Network cablel Mouse Video Monitor LCD Monitor Cameras Alarm inputs and RS 485...

Page 16: ...nnel BNC Video Stream Server Mouse LCD Monitor Alarm inputs and RS 485 interface optional Power Supply Network cable Video Monitor Cameras Mouse LCD Monitor Alarm inputs and RS 485 interface optional Power Supply Network cable Video Monitor Cameras ...

Page 17: ...r Network connectivity Connect the network port of the Video Sreamserver with a network cable to a Switch or router of your LAN network to control the Video Stream Server with a PC USB Mouse connection Connect the USB Mouse port to the Video Stream Server This port is enable just for VGA Monitor connection Connect the video output VGA OUT of the Video Streamserver to a VGA Input of the monitor Pow...

Page 18: ...15 Chapter 3a Getting Started of the Video Streamserver ...

Page 19: ...ieved by access is using the browser Mozilla Firefox The video sequence of the camera you selected will be displayed in a separate window Thereby it is possible to embed the video stream to other software However the compatibility has to be tested due to the variety of the software options ...

Page 20: ...The first setting Confirm the Button or the Button and enter the password to access the menu The administrator password is by default DVR function 123456 Confirm with the Button to leave the password menu By default the Video Streamserver the users are disabled this means no password is needed to open the menu The Video streamserver only works if the user settings are disabled in all users Release...

Page 21: ...tup Settings of Language time date sequence key sounds and other system relevant functions Hardware Setup Settings of networking functions Utility Tools Firmware Update die USB Formatting Export of events and loading system settings via USB Exit Exit of main menu Click of the Button Menu opens to start settings Click of the Button Menu will be closed To the stream server up and running select the ...

Page 22: ...ers password Click on button Option to indicate the validity Account is permanently valid Here you can specify an expiration date for the account validity Click on buttom Option for the channel release 4Ch 8 Ch Select this option to allow the account to access to the video channels Enter special channels free Activated channels are indicated by green icons Disabled channels are indicated by white ...

Page 23: ...ess is an IP address to be permanently assigned by the network administrator DHCP By DHCP is the automatic inclusion of a new recorder to an existing network without the manual configuration Only the automatic acquisition of the IP address must be set on the DVR normally PPPoE PPP over Ethernet PPPoE is the use of the network protocol point to Point Protocol PPP over an Ethernet connection GATEWAY...

Page 24: ...this device in its own network and what it is trying to achieve through routers on other networks Normally the address of the subnet mask is 255 255 255 0 MAC Address The MAC address is the hardware address of each network adapter that is used to uniquely identify the device on the network The DVR is connected to a network without a router Enter please as a gateway the IP address of the PC to whic...

Page 25: ...i Including live stream on Website or Software Acces via Firefox Website If you choose the access via Browser will be displayed single picture on a monitor screen For a new picture display you need to open a Browser The enclosed CD is a Site mask that can represent either 4 8 or 16 simultaneous streams Indication ...

Page 26: ...f data occurs with the protocol http ie Access via Mozilla Firefox Browser To display an image on a PC connected to a LAN or WAN and accessed via browser it is to be taken into account that certain components and accessories of this like IP ID Address System Connection port Video compression method resolution Refresch rate number of channels etc 1 I IP address of the stream server Local external o...

Page 27: ...ng video signals on a PC up to 16 is possible the browser has to be configurated as follows Enter in the first Browser address bar about config Confirm this request Enter the line filter connections The menu gives the information about all relevant items for the right connection Enter the value 32 in the lines network http max connections per server and network http max persistent connections per ...

Page 28: ...ame every 1 2 5 10 seconds PC Access via Internet Explorer and Safari Browser The access to the stream server via an Internet Explorer even with IE on Windows Mobile and Safari This requires a different address format By adding an address extension behind the IP and the port address Port m m html the streaming connection will be achieved The following settings can be made on the surface Channel se...

Page 29: ...26 26 Chapter 3b 3 DVR function 4 Getting Started ...

Page 30: ...l be deleted to start up the formatting process Following the successful format the Live View home screen opens NOTE Do not format the hard drive when the hard drive has been formatted by DVR and not formated by other devices If the hard drive has been used by the DVR the start screen will typically shown the firmware version installed the release date of the said firmware and the video format for...

Page 31: ...s notification icons of the surveillance system Icon Function Icon Function Camera is working No signal from camera Recording Recording Stop Force Record Start Network connected USB disk is connected Network disconnected Hard drive overwrite enable Hard drive status Channel display rotation enable XX Percentage of hard drive already used 2010 06 03 Current date 15 37 47 Current time 1 2010 06 06 1...

Page 32: ...cation 4 channel Split View 1 7 Split View for 8 Ch 16 Ch 9 channel Split View 1 12 Split View for 16 Ch 1 14 Split View for 16 Ch 16 channel Split View for 16 Ch Sequence View Main Menu Enter main menu Recording Start recording Stop Aufnahme gestoppt Start force recording Stop force recording Suche und Wiedergabe von Videodaten Playback menu Calender menu Event search Pan Tilt Zoom control screen...

Page 33: ...s left button of the mouse a hand icon will appear and drag the channel square to the new position Release the mouse button to drop the channel square into new position System will keep the new channel display arrangement even if you reboot the DVR system Original display mode Enter the button to back to the original display 1 2010 06 06 15 37 47 1 2010 06 06 15 37 47 1 2010 06 06 15 37 47 ...

Page 34: ...wer Supply Opens menu to reboot or shutdown the DVR system Channel Setup Set the channel display record channel name and video color adjustment Record Setup Set the record schedule video performance and quality Authentication Setup Set the login account password and the authorisation for each user System Setup Set the status icons display languages date time rotation time button beep tone input de...

Page 35: ...irmware to export event logs and to restore system settings Exit Exit the main menu 3 b 4 Channel setup Click the channel setup on the Main menu The screen will display the menu in the following illustration 3 b 4 1 Channel Nummer The channel Number is used to designate to wich channel or channels the settings will apply Press the icon for 4 Ch the icon for 8 Ch and for 16 Ch This icon will turn o...

Page 36: ...en Channel Set whether or not display one or all channels on screen The channel will continue to record regardless of being hidden or not ON Hide the channel on screen The channel square turns to black and channel number icon turns to white OFF Unhide the channel or channel is visible 3 b 4 2 4 Channel name Designate a name for each channel The channel name is limited to 24 characters Press the ic...

Page 37: ...lt is 16 Press the button to adjust the contrast from 1 to 32 Schärfe Default is 8 Press the button to adjust the contrast from 1 to 16 3 b 5 Record Setup Click Record Setup on the Main Menu 3 b 5 1 Auto Record Auto Record is utilized to set the period OFF 10 sec 20 sec 30 sec 40 sec 50 sec or 60 sec within wich the DVR will automatically start recording Default value is 30 sec This future is part...

Page 38: ...ecord Schedule is a menu charting the recording schdule of a particular channel or all channels fort he wohole day 24 hours and entire week 7 days Default setting is time Record 3 b 5 3 1 Channel Number Select the icon for 4 channels the icon for 8 channels to setup for all channels at one time Select the icon Sie 1 4 for 4 channels 1 8 for 8 channels 1 16 for 16 channels to individually setup of ...

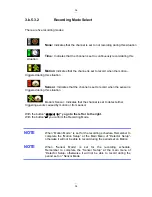
Page 39: ...uation Motion Sensor Indicates that the channel is set to detect either triggering events caused by motion or from sensor With the button yo go to the left or to the right With the button you confirm the Recording Mode NOTE When Motion Mode is set for the recording schedule Remember to complete the Motion Setup at the Main Menu of Detector Setup otherwise it will not be able to record during the p...

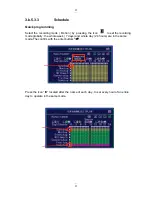
Page 40: ...tion by pressing the Icon to set the recording mode globally the whole week 7 days and whole day 24 hours are in the same mode The confirm with the enter buttom Press the icon located after the name of each day to set every hour of an entire day to operate in the same mode ...

Page 41: ...s no recording set to NONE recording mode Confirm with You can also specifically set the recording mode for a particular time and day Select the recording mode first Move the cursor and click the icon x T M X or M to change mode on the timetable Select Time recording mode move the cursor and click the peris of icons M change to T and press ENTER ...

Page 42: ...k the total power as indicate as above Video Resolution Quality and Frame Rate Setting for each channel Resolution Press the buttom to adjust the resolution from CIF Half D1 and D1 for individual channel Quality Press the button to adjust the resolution from Lowest Low Standard High and Highest for individual channel Frame rate Press the button to adjust the frame rate from 0 to max value for indi...

Page 43: ...52 240 120fps NTSC 352 288 PAL 3 b 7 3 Video Quality Video image quality settings can be Highest High Standard Low and Lowest Default is Standard Higher video quality provides a much clearer image for playback but can utilize a much larger hard drive sapce with a larger file size 3 b 7 4 Record Frame Rate The recording frame rate for each or all channels may be set from 0 30 fps for NTSC or 0 25 f...

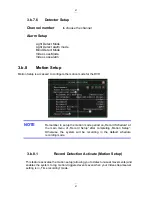
Page 44: ... NOTE Remember to setup the motion mode period on Record Schedule at the main menu of Record Setup after completing Motion Setup Otherwise the system will be recording in the default schedule recording mode 3 b 8 1 Record Detection Activate Motion Setup This feature activates the motion setup allowing you to detect unusual movements and enables the system to log motion triggered events even when y...

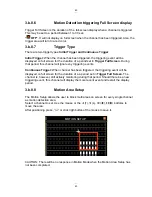
Page 45: ...ivity level Sensitivity Highest The highest sensitivity level 3 b 8 3 Recording Time Set the recording time when the Motion Mode is triggered The recording time is 5sec 10sec 15sec 20sec 25sec 30sec 45sec 60sec 90sec 120sec 150sec und 180sec 3 b 8 4 Alarm Mode Select the alarm mode when Motion Mode is triggered Mute No beep whatever Motion is detected or not Buzzer short Slow beeping sound from bu...

Page 46: ...od this channel will ignore any triggering events Continuous Trigger When channel has been triggered the triggering event will be displayed on full screen fort he duration of a a period set in Trigger Full Screen The channel is however still actively monitoring during that period Should there be a new triggering event this channel will display the more recent event and restart the display period 3...

Page 47: ... ID Enter characters as the account ID Password By entering six 6 characters or numbers as password Password Click Option for expire date setup No expiration date Set the expiration date Click Option for channel monitoring setup 4Kanal 8Kanal 16 channels Enables the account to monitor the specific channels The icon turns green when enabled 16 Desabled accounts are indicated by white icons NOTE Dis...

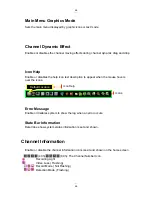
Page 48: ...m Setup or System Setup on the Main Menu Language Selection Language Selection is used to select the language fort he on screen display Menu OSD View Setup View Setup is for choosing whether to display certain illustrations and information or not ...

Page 49: ...to appear when the mouse hovers over the icons Error Message Enable or disables system to show the log when an error occurs State Bar Information Determines how system status information is set and shown Channel Information Enable or disable the channel information icons iss et and shown on the home screen 4Ch 8Ch The Channel Number Icon Recording Light Video Loss Flashing Record Mode Not Flashing...

Page 50: ...umber Move left right to the character that needs to be changed Exit after confirmed setting Time Zone Time Zone is for adjusting time zone and location Daylight Saving Time Activate Daylight Saving Activate Daylight Saving enables or disables the daylight saving mode Time Start Time Starts indicates the start date of daylight saving time The user can set the month week number day and hour Time En...

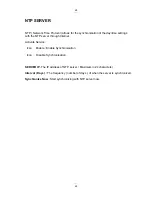
Page 51: ...e NTP server through Internet Activate Service Icon Enable Enable Synchronisation Icon Disable Synchronisation SERVER IP The IP address of NTP server Maximum in 24 characters Interval Days The frequency number of days of when the server is synchronized Synchronize Now Start synchronizing with NTP server now ...

Page 52: ...d 1 12 Split Sequence Enables or disable the 1 12 split display rotation period 1 14 Split Sequence Enables or disable the 1 14 split display rotation period 16 Split Sequence Enables or disable the 16 split display rotation period Button Beep Setup The Button Beep Setup configures the type of beeping sound for the IR remote control The sound type can be either Mute TypeA TypeB or TypeC Input Devi...

Page 53: ... Normal Schnell IR Geschwindigkeit OFF Slow Normal Fast Auto Exit Menu The Auto exit Menu configures the menu to automatically revert back to the main display screen after a specified period The period can be selected between 10 20 30 40 50 or 60 Seconds ...

Page 54: ...51 51 3 b 11 Hardware Setup 3 b 11 1 Query Error Message The Query Error Message window shows the all error messages Sort error messages by time of occurrence Clear Message Clear all error logs ...

Page 55: ...ify the days of recording data which is retained in the hard drive It will be required to format the hard drive once you change the limited days Those expired recording data will be found during event search Once you have selected the number of days click on Format Hard Drive You can set the maximum recording days as from 1 to 30 or None not limit CAUTION If you decide to move or re assign your VI...

Page 56: ...ße Die erste Zahl zeigt den Anteil an aufgezeichneten Daten an die zweite Zahl zeigt die Gesamtkapazität an und die Prozentzahl zeigt an wie viel Kapazität der HDD benutzt ist Standard Ereignismenge Die erste Zahl zeigt die Datenmenge an Ereignisaufzeichnungen an die zweite Zahl zeigt an wie viel Kapazität für Ereignisaufzeichnungen zur Verfügung steht 3 b 11 3 Network connection Use this menu to ...

Page 57: ...BNET MASK The subnet mask specifies how many IP addresses the computer network includes In conjunction with the IP address of a device it determines which IP addresses looking for this device in its own network and what it is trying to achieve through routers on other networksIn conjunction with the IP address of a device it determines which IP addresses looking for this device in its own network ...

Page 58: ...ewer Monitoring Service Activate Service Enables or disables the monitoring service for allowing remote viewing from IE or PC Port The default port nimber is 8000 for video and audio transmission Video Transmission Quality Selects the remote video transmission Quality from Lowest Low Standard High and Highest NOTE You must plan on network structure if the MIS or Network Administrator managest he n...

Page 59: ...uto Detection function is disabled Screen Border ON To show the border OFF Not to show the screen border VGA Resolution Sets the resolution as 640x480 800x600 1024x768 oder 1280x1024 Video Adjustment Adjust the position of main display screen to BNC port Labeled as VIDEO OUT Adjust the image position by using the mouse right click button to follow the directions change cursor and Press 16 default ...

Page 60: ...device 3b 12 2 Firmware Update The firmware is updated by using a USB pen drive that contains the latest firmware file Attach the external USB disk into the USB port on DVR front After the USB disk is attached to the port the message Read file Information will appear on the bottom line If there is a mistake or missing file on the pen drive it will show File not found or Disk Error on the bottom li...

Page 61: ...on from USB device Click File select to select the file you would like to load Click Load file to load the selected file from USB device It will show the following mesagge Restore Default Setting Select YES to load the default setting After which the system will reboot 3 b 13 Exit Main Menu The Exit Main Menu window provides options to save or discard changes before exiting Click on the icon if yo...

Page 62: ...l changes are saved before exiting from the menu 3b 13 2 Exit Discard Changes All changes are ignored The changes will not be saved and will take no effect before exiting from menu Confirm with YES or go back to the menu by choosing No ...

Page 63: ...Chapter 4 Playback and Data Backup ...

Page 64: ... selector will start blinking when your mouse is hovering over it Click on the year or he arrows beside the year or to choose Choosing the month of video to play back The month selector willl satart blinking when your mouse is hovering over it Click on the month or arrows beside the month or to choose Choosing the day of the video to play back The dates with recorded videos will be in vivid white ...

Page 65: ...e Wed Thu Fri Sat 1 2 3 4 5 6 7 8 9 10 11 12 13 14 15 16 17 18 19 20 21 22 23 24 25 27 28 29 30 31 0 1 2 3 4 5 6 7 8 9 10 11 12 13 14 15 16 18 19 20 21 22 23 Play Backup In the example above the date is July 26 2010 Monday and the time is 17 00 The illustration also shows that recordered video of that day are available from 09 00 to 18 00 Starts to play the event that has been selected Creates a b...

Page 66: ...elect the channel to playback Play Begin Time Specify the beginning of the playback Play End Time Specify the end time of the playback Click Option to switching the window as follows Click Play Start playing the recordered data After the data has been played it will show After the data has been palyed it will show PLAY MENU 2121 2010 07 14 06 18 31 2120 2010 07 14 06 17 12 2119 2010 07 14 05 57 38...

Page 67: ... number of recorded data provide by system Recording Status Shows the begin or end of recording data in the hard drive Shows the recording mode Data can be played This icon doesn t show if no video recording is available Recording time The date time of recorded data Status The recorded video data has been played Power ON OFF event occur Searching The vertical scroll bar for search the recorded dat...

Page 68: ...iew 1 14 Split View Displays playback video in 1 14 split view 16 Split View Displays playback video in 16 split view Previous Segment Plays the recorder video by one hour Rewind Plays backwards faster Stop Stops the video playback Pause Pauses the video playback Play Starts the video playback Fast Forwards Plays forward faster Next Segment Plays forward the recorded video by one hour Calender Men...

Page 69: ... 40 05 Filter End Time 2010 07 14 07 06 22 Time Reset Range Active Filter Time Enables disables filter time of event Filter Begin Time Specifies the beginning time of event filter Filter End Time Specifies the end time of event filter Time Reset Range Resets the event search time period according to all effective events as recorded SEARCH MENU Channel Number Filter Type All Events Filter Time Setu...

Page 70: ...that has been Option Switches the top frame of the Search Menu into an event content display The display depends on the type of event being referenced SEARCH MENU Event Type Time Record Trigger Channel Record End Time 2010 07 14 06 20 31 2121 2010 07 14 06 18 31 2120 2010 07 14 06 17 12 2119 2010 07 14 05 57 38 2118 2010 07 14 04 20 11 2117 2010 07 14 02 18 42 Option Play Backup Event Type Shows t...

Page 71: ... 2010 07 14 06 18 31 2120 2010 07 14 06 17 12 2119 2010 07 14 05 57 38 2118 2010 07 14 04 20 11 2117 2010 07 14 02 18 42 Option Play Backup Use the buttons to select which data to backup Press Backup Start to entert the Backup Menu BACKUP MENU Backup Device Generic Flash Disk Free Capacity 1029352 1029380 KB Backup Channel Estimate Time 30Sec Start Time 2010 07 14 06 18 31 End Time 2010 07 14 06 1...

Page 72: ... by setting the Start Time and End Time BACKUP MENU Backup Device Generic Flash Disk Free Capacity 1029352 1029380 KB Backup Channel Estimate Time 30Sec Start Time 2010 07 14 06 18 31 Backup Period 00Min 06Sec Backup Size 1152KB Backup Start The Free Capacity Estimate Time Backup Period and Backup size will be changed automatically The Start Time and End Time of the selected video record data will...

Page 73: ...70 Chapter 5 5 System Information ...

Page 74: ...hannel Number Videoverlust Recording Resolution Recording Mode Calender Recording Time Buzzer Alarm Latest Recording Frame Rate Externer Alarm Possible corresponding values for the parameters Channel Number Video Loss CIF Recording Resolution Half D1 Recording Resolution D1 Recording Resolution No Recording Motion Record Mode Time Record Mode Sensorrecord Sensor Motionrecord 10 Record Time Count D...

Page 75: ...e 2438 715351 MB 35 Standard number of event 396 357376 20 Model Displays the hard drive model number HDD Size Displays the hard drive size Record Start Time Displays the day and time when the hard drive starts storing recorded data Record End Time Displays the day and time of the last recording on the hard drive Standard Record Size Displays the total hard drive capacity in Megabyte MB and the ra...

Page 76: ...c DNS X Disable Network information IP Type shows the network connection type IP Address shows the current IP address IP Status shows the network is connected or not connected Login Count shows how many connections from remote site Management Service schows enable or disable the management service for allowing remote control from IE or PC viewer Monitoring Service shows enable or disable the manag...

Page 77: ...74 Chapter 6 6 Network Connectivity ...

Page 78: ...e basic network information from the local area network hub Search Router IP Adress Please click Start and then Run option under Windows Please enter CMD and then OK Please enter ipconfig on DOS prompt and then record the Adresse Number of Default Gateway as shown It is the Router s IP Address ...

Page 79: ...ss Please enter ping 192 168 11 189 on DOS prompt as shown in the folowing figure When Reply from 192 168 11 189 bytes 32 time 10ms TTL 128 appears as in the folowing illustration that means this IP Address Please try to find another available IP Address Enter ping 192 168 11 188 on DOS prompt If Rrequest timed out appears it means this IP Address is not being used now and can be used ...

Page 80: ...rk setup 6 2 DynDNS Service Overview For the DVR you can only set a static IP addresse It does not support the dynamic IP If you have to prefer to use dynamic IP then is recommended to use a DYNDNS service DYNDNS is a service the maps internet domain names to IP Adress and works with dynamic IP Address assigned by ISP server Remark A router is needed as the interface between PC and DVR when the DV...

Page 81: ...o create your own DynDNS Account and fill out all the blanks for account s application as following Please refer below for the maximum number of characters acceptable for the DVR Server Name Maximum of 24 Zeichen Account Maximum of 20 Zeichen Passwort Maximum of 12 Zeichen ...

Page 82: ... the account DynDNS will create a new account for you and send you an e mail to the addresse you provided It needs to confirm your account within 48 hours after receiving the e mail or it automatically detele your account Just click the first link to confirm the account ...

Page 83: ...80 6 2 3 Login and Host Service Log in by entering the Username and Password of your account Then go to My Service to get a host name Double click Add New Hostname as following ...

Page 84: ...ostname for DYNDNS IP which will be applied to the DVR DYNDNS setting We take dvr host tw homelinux net as an example and click Add to Cart The Dynamic DNS Host Service is sufficient and is provided for free Press Next ...

Page 85: ...rvice provider DnyDNS org dynamic Specify DYNDNS IP by DYNDNS Account user name account Specify Video Stream Server as private IP setting Specify one pair of connection port Control Port Streaming Port like 80 6 2 5 Setup DynDNS Setting on DVR After completing the DYNDNS account application go to the Video Stream Server setup menu and input the DYNDNS information for network connection ...

Page 86: ...83 Chapter 7 7 PC Viewer Web Browser Viewer ...

Page 87: ... administrator user System Requirement OS Windows XP SP2 VISTA 7 CPU 2 6 Ghz or above RAM 2 GB or above ADSL 2M 512 Byte Note It is suggested that you install the DirectX software It provides a smoother display of the PC Viewer video on computer 7 1 1 Overview Click on PC desktop icon PC Viewer to execute the PC Viewer at the Windows platform computer The PC Viewer support remote viewing and contr...

Page 88: ...to create a DVR connection Step 4 Input or modify the name IP Address Port No Default port number is 80 or 8000 Password and number of DVR channels Nr Function 1 DVR Connection window 2 Delete the connection 3 Modify the connection 4 Add new connection 5 Close the connection window 6 Open the connection window 7 Connection status and switch button 8 Exit the PC viewer 9 Capture the still images ...

Page 89: ... 5 The list will show the new connections after setup Step 6 Select the DVR you would like to connect viewing and control from the list of available DVR A check mark will indicate your choices New Connections ...

Page 90: ...the icon to capture still image of the view that is currently displayed on the sceen Save the image to specific location in your computer For Web Browser Viewer the still image will be stored ei Betrachtung über den Web Browser Viewer wird das Bild automatisch im Ordner C Viewer auf ihrem Computer gespeichert ...

Page 91: ...the normal speed 2 Fast Backward 1x Plays backward faster by 1x the normal speed 3 Playback Starts the video playback 4 Fast Forward 1 x Plays forward faster by 1x the normal speed 5 Fast Forward 2 x Plays forward faster by twice the normal speed 6 Pause Pauses the video playback 7 Stop Stops the video playback 8 Time Bar Adjust the playback 9 Volume 1 2 3 4 5 6 7 8 9 Control bar Playback control ...

Page 92: ...layback mode supports playback by the specific time Select the Begin Date and Begin Time then press the button Play to start video playback You will see the search result table as following figure Click on the icon back to Time Search control window ...

Page 93: ...ress the buttom Backup satrt to backup tjhe video data Select the start date and time and end of date and time the file size will show on the file size column Then press start to satrt backup to a PVF file ...

Page 94: ... Search playback mode supprts playback by the specific event Select the Event Begin Date Event Begin Time Event End Date Event End Time and Event Event Type Then press the button Search You will see the search result table as following figure ...

Page 95: ... You will see the video playback as following figure Click on the icon back to Event search control window Select the satrt date and time and end of date and time the file size will show on the file size column Then press Start to backup to a PVF file ...

Page 96: ...perations if you use other browsers Install the Active X directly from the webpage For initial installations Refer to the following example to entert he Web Browser Viewing Sie zunächst die dazu nötigen Active X Steuerelemente Hier sehen Sie ein Beispiel für die Installation Step 1 Start up IE Explorer and entert he DVR IP Addresse bar Step 2 An alert message occurring Install ActiveX control on t...

Page 97: ...94 Step 6 Select Security Trusted Sites Step 7 FEnter the address into the blancks shown in picture and click add ...

Page 98: ...he Web Browser Viewer login page Entert he designated user name and password Entert he default user name admin and password 123456 if you did not change the Video Sream Server Authentication settings Then press the icon to connect to the DVR from the remote site 7 2 1 Switching the Channel Displays Displays single channel in full view Doble click the channel to display single channel in full view ...

Page 99: ...96 7 2 2 Web Browser Viewer Operation The Web Browser Interface is consistent with PC Viewer Please rfer to the PC Viewer operation guide ...

Page 100: ...Installations und Betriebsanleitung GERMANY R C Änderungen inTechnik Design undAusstattung vorbehalten C All contents of this document may change without prior notice All rights are reserved Your local distributor ...

Reviews: