0
Futura FHD2/FMD2 E6
PAINT TREATMENT
2 - 5
Anticorrosion/antichip coating
7
DD1020_01
2.3.2
REPAIRS TO SEALANT SEAMS
Follow the procedure given below to repair sealant seams:
Preparing the surface
1. Remove the old sealant.
2. Repair the damaged layer of paint:
• Apply a layer of wash primer (Sigma 86DV - 30 mm) to the
damaged surface.
• Drying time of the wash primer: minimum of 24 hours at 20
°C.
3. Clean the surface with Sika Cleaner-205 using a clean,
lint-free cloth or tissue.
Drying time of at least 10 minutes and no more than 2
hours at 20 °C.
4. The surfaces must be clean, dry and free of all traces of
grease, oil and dust.
Sealing
Do not apply sealant at a temperature below 5 °C or above
40 °C. The optimal application temperature is between 15 °C
and 25 °C.
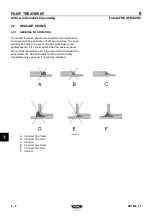
5. Apply sealant (Sikaflex-221) and smooth out the joins
using Sika Tooling Agent N as shown in the diagrams
above.
The seam must be smoothed out before a skin forms.
Clean the sealant seam with water after they have been
smoothed out.
The sealant seam must be continuous and must not have
any gaps (where moisture can penetrate).
6. Use Sika Remover-208 to remove any excess sealant
which has not yet hardened. Sealant that has hardened
can only be removed mechanically.
Spraying
7. Sikaflex-221 can be sprayed after a skin has formed. If
desired, apply a layer of Sigmadur HB chassis coating to
the sealant seam.
Baking finishes may only be applied after the sealant has
fully hardened.
Always read the manufacturer's
instructions before use.
Summary of Contents for Futura FHD2 E6
Page 1: ...Futura FHD2 FMD2 E6 1525 DD1020_01 Main Group 0 WORKSHOP MANUAL...
Page 6: ...0 Futura FHD2 FMD2 E6 2 4 DD1020_01...
Page 7: ...0 Futura FHD2 FMD2 E6 GENERAL INFORMATION 0 DD1020_01 GENERAL INFORMATION...
Page 8: ...0 Futura FHD2 FMD2 E6 GENERAL INFORMATION 0 DD1020_01...
Page 23: ...0 Futura FHD2 FMD2 E6 SAFETY REGULATIONS 1 DD1020_01 SAFETY REGULATIONS...
Page 24: ...0 Futura FHD2 FMD2 E6 SAFETY REGULATIONS 1 DD1020_01...
Page 42: ...0 Futura FHD2 FMD2 E6 SAFETY REGULATIONS General information 1 18 1 DD1020_01...
Page 43: ...0 Futura FHD2 FMD2 E6 DIAGNOSIS 2 DD1020_01 DIAGNOSIS...
Page 44: ...0 Futura FHD2 FMD2 E6 DIAGNOSIS 2 DD1020_01...
Page 94: ...0 Futura FHD2 FMD2 E6 DIAGNOSIS Systems 2 26 2 DD1020_01...
Page 111: ...0 Futura FHD2 FMD2 E6 REPAIR GUIDELINES 3 DD1020_01 REPAIR GUIDELINES...
Page 112: ...0 Futura FHD2 FMD2 E6 REPAIR GUIDELINES 3 DD1020_01...
Page 122: ...0 Futura FHD2 FMD2 E6 REPAIR GUIDELINES General information 1 10 3 DD1020_01...
Page 132: ...0 Futura FHD2 FMD2 E6 LIQUID AND LUBRICANT GUIDELINES 4 DD1020_01...
Page 139: ...0 Futura FHD2 FMD2 E6 CLEANING INSTRUCTIONS 5 DD1020_01 CLEANING INSTRUCTIONS...
Page 140: ...0 Futura FHD2 FMD2 E6 CLEANING INSTRUCTIONS 5 DD1020_01...
Page 149: ...0 Futura FHD2 FMD2 E6 STORAGE AND PRESERVATION 6 DD1020_01 STORAGE AND PRESERVATION...
Page 150: ...0 Futura FHD2 FMD2 E6 STORAGE AND PRESERVATION 6 DD1020_01...
Page 155: ...0 Futura FHD2 FMD2 E6 PAINT TREATMENT 7 DD1020_01 PAINT TREATMENT...
Page 156: ...0 Futura FHD2 FMD2 E6 PAINT TREATMENT 7 DD1020_01...
Page 162: ...0 Futura FHD2 FMD2 E6 PAINT TREATMENT Paint treatment 1 6 7 DD1020_01...
Page 168: ...0 Futura FHD2 FMD2 E6 PAINT TREATMENT Anticorrosion antichip coating 2 6 7 DD1020_01...
Page 170: ...0 Futura FHD2 FMD2 E6 INSTRUCTIONS FOR JACKING UP AND SUPPORTING THE VEHICLE 8 DD1020_01...


