background image

30

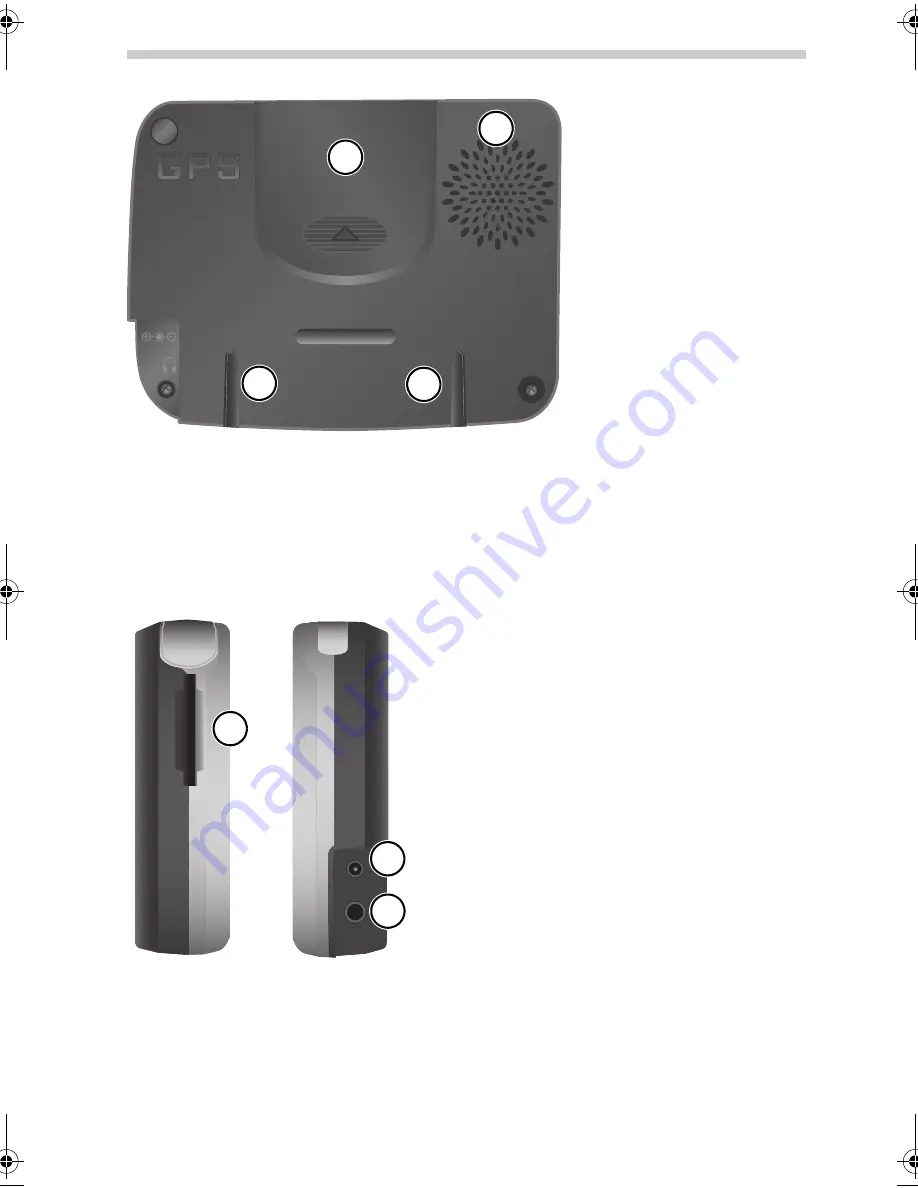
Back

4

Compartment for lithium ion battery (cover)

5

Loud speaker

6

Grooves for cradle fixation

7

Slot for SD card

8

Headphone socket or TMC-antenna

9

Connection for 100V-240V power adapter (optional) or 12V/24V cigarette lighter cable

4

5

6

6

PN 1000

left side

right side

PN 1000

7

9

8

Overview of Device

QSG-ADD.book  Seite 30  Mittwoch, 9. Mai 2007  1:13 13

Summary of Contents for PN 1000 -

Page 1: ......

Page 2: ...on 26 Maintenance and Cleaning 27 Overview of Device 28 What s Included 28 Controls and Connection Ports 29 Setup and Mounting 32 Initial Setup 32 Assembly and Mounting 32 Configuration 33 Settings 34 GPS and TMC 39 Navigation 42 Troubleshooting 46 Technical Data 47 Contents ...

Page 3: ...ent of emergency braking or a collision Only look at the screen when it is safe to do so If you need to look at the screen for a longer period of time stop the vehicle at an appropriate and safe place The values in the status bar are calculated for the current speed remaining travel time and remaining travel distance However the accuracy of these values cannot be guar anteed in every case The actu...

Page 4: ...nformation all around the world The system is operated and con trolled by the United States of America The USA is also responsible for the availability and accuracy of this system All changes to the GPS availability and accuracy as well as other factors from the surrounding environment can influence the operation of the navigation system The supplier of this system does not accept any liability wh...

Page 5: ...2V 24V to power the navigation system from within the vehicle adapter for cigarette lighter You should not use any cables other than the AC optional and DC cables provided to power the device and to charge the battery 4 Quick Start Guide 5 TMC antenna 6 SD Card with map data and navigation voices What you can get as an option Additional battery pack 100 240 V power adaptor 1 2 3 5 4 6 Overview of ...

Page 6: ...itch the device back on again quick tap the power button The navigation system will be completely restarted Front 2 Display touchscreen 3 Charging symbol This status LED can display the following Green Device gets power from external supply and battery is charged by 95 of total capacity Red Device gets power from external supply and will be charged Off Device is not powered by external power suppl...

Page 7: ... 5 Loud speaker 6 Grooves for cradle fixation 7 Slot for SD card 8 Headphone socket or TMC antenna 9 Connection for 100V 240V power adapter optional or 12V 24V cigarette lighter cable 4 5 6 6 PN 1000 left side right side PN 1000 7 9 8 Overview of Device ...

Page 8: ... can reset the system by pressing this button e g with a straightened out paper clip or a pencil The data you have saved will not be lost Mount 11 Base 12 Suction cup 13 Locking lever Mount with suction cup could vary from the picture 14 Passive cradle 10 PN 1000 11 12 13 14 Overview of Device ...

Page 9: ...prox 3 hours depending on application and adjusted display bright ness Assembly and Mounting To mount the device in the vehicle proceed as follows Find a suitable place in the vehicle for mounting the mount The screen be must be clearly visible from the driver s seat but the device should not obscure the driver s view Position the mounting plate passive cradle on the mount ing in such a way that t...

Page 10: ...guide you from your present location to a specific destination Home Short cut After you defined Home you can navi gate to this address simply by tapping the Home button in the main selection menu Work Short cut After you defined Work you can navigate to this address simply by tapping the Work button in the main selection menu Map Display page 34 Tap the Map Display button if you want to view the n...

Page 11: ...the map faces the direction of travel When it is switched Off the map is shown with north up the car travels in all directions POI Icons Choose the icons that should be displayed in the map Alert point icons visible in the map Alert point locations can be made visible in the map only available for countries for which this information is provided Alert point icons can be enabled in the Points of In...

Page 12: ...etween the day and night colour can be done with the Night day button in the Screen settings menu Main Menu Settings Screen or in the toolbar If Automatic Brightness is disabled the display brightness will be switched as well Regional This opens a list of regional settings e g Language Select your preferred language Voice Select the desired type of voice additional voice files are stored on the SD...

Page 13: ...ported address book is available on the SD card it will replace the existing address book in the PND The PND will ask for confirmation before replacing the existing address book Secure Digital card and the Secure Digital logo are legal trademarks of the SD card association Sound Choose this option if you want to change sound settings e g mute set volume or set button click Change route You can cha...

Page 14: ...our Map display options Brightness settings Menu language Voice language Volume levels Route criteria Simulation mode settings Time zone and daylight saving option Visual and audible alert point options When no users have been configured before the system will store the settings at a default location in the system As soon as the first account is created settings are copied to this new user account...

Page 15: ... of the currently active user is available on the inserted SD card Show the user selection screen at system startup This function is very handy if the PND is often used by two or more users Route criteria This item indicates which route criteria are currently active To select this item tap on one of the status bar labels at the bottom of the screen and select Route criteria from the list The icons...

Page 16: ...restaurants as well as the high density housing areas Fur thermore it may take longer to establish the GPS reception if you have just driven out of an underground car park or another type of building where GPS signals are blocked The GPS reception can be checked by doing the following Check the GPS status in the status bar In case the status bar does not show the GPS status tap on a status bar ele...

Page 17: ...n you set TMC On and there is no reception a red checkmark is shown When you re ceive TMC the name of the provider is shown green in the status bar If TMC is switched Off no provider is shown and a narrow line is visible When TMC is switched On and you receive traffic information the status bar also vis ualises the delay time For example caused by traffic jam or road works This is indicat ed by th...

Page 18: ...e quality of reception of each listed TMC radio station When a traffic event screen pops up the name of the TMC station that broadcasted the traf fic event is shown in the top right corner of the screen Traffic Info On Route bar The Traffic Info On Route route overview shows all traffic events on the route between the current position and the destination When the Traffic Info On Route function is ...

Page 19: ...ou can enter an address Address or select an ad dress from your address list Address book from the list with your previous destinations History or from the list with special destinations POI e g res taurant petrol station and car dealer You can also set co ordinates Geographical co ordinates If you want to stop navigation guid ance tap Stop guidance Address Tap the Address button on the screen Tap...

Page 20: ...hen you want to select POI tap the button Point of interest When you want to select a POI you must know where you want to search around Current Position or around Destination For example you want to find a hotel near current position Tapping POI opens the POI menu Here you can tap Current position The navigation system shows you a list with all known POI categories After selecting Hotel the naviga...

Page 21: ...d displayed on the map You can now start driving and the navigation system will guide you to your specified destination By tapping the Map Display button in the Main Menu you directly enter the map display Zoom in out with the map Using these two buttons and you can adjust the scale of the displayed map These buttons are not visible if the automatic scale is activated To zoom out of the map repeat...

Page 22: ...ortcut to different functions and information Example Information When you tap this icon the sub menu Information in Settings will be visible Simulation It is possible to simulate routes When you have en tered a destination this mode enables you to see the route at forehand It is possible to simulate your route from a different point of departure instead of you current position You enter Simulatio...

Page 23: ...er a certain time in opera tion In the case of extremely low or high temperatures the sys tem will temporarily shut down to prevent itself from being damaged It will switch itself on again once the temperature has returned to normal A sudden shutdown is also possible when the battery is empty The voice alerts for naviga tion cannot be heard Check whether the volume is set to an audible level in th...

Page 24: ... This documentation is protected by copyright Subject to technical and optical changes as well as printing errors The information contained in this document is subject to change at any time without prior notification Siemens VDO Trading GmbH reserves the right to modify or improve its prod ucts and modify the contents without being obliged to inform any particular persons or or ganisations The dev...

Page 25: ...48 ...

Reviews: