background image

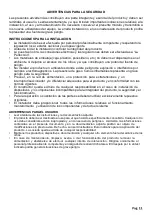
SAFETY PRECAUTIONS

These warnings are an essential, integral part of the product and must be given to

the  user.  They  provide  important  indications  on  the  installation,  use  and
maintenance and must be read carefully. This form must be preserved and passed
on to subsequent users of the system. The incorrect  installation or improper use of
the product may be dangerous.

INSTALLATION INSTRUCTIONS

•   The installation must be performed by professionally skilled personnel and in compliance with
 

current local, state, national and European legislation.

•   Before beginning the installation, check the integrity of the product.
•   The laying of cables, electrical connections and adjustments must be workmanlike performed.
•   The packing materials (cardboard, plastic, polystyrene, etc.) are a potential hazard and should
 

be disposed of correctly and not left within reach of children.

•   Do not install the product in potentially explosive environments or environments disturbed by
 

electromagnetic fields. The presence of inflammable gases or fumes is a grave danger to


safety.

•   Set up a safety device for overvoltage, a disconnecting and/or differential switch suitable for
 

the product and conforming to current standards.

•   The manufacturer declines any and all responsibility for product integrity, safety and operation
 

in the event incompatible devices and/or components are installed.

•   Solely original spare parts should be used for repairs and replacements.
•   The installer must provide all the information relating to the operation, maintenance and use of
 

the individual parts, components and system as a whole.

WARNINGS FOR THE USER

•   Read the instructions and enclosed documentation carefully.
•   The product must be used for the express purpose for which it was designed. Any other use is
 

considered improper and therefore hazardous. In addition, the information given in this


document and in the enclosed documentation may be subject to modifications without prior


notice. It is given as an indication only for product application. The company declines any


responsibility for the above.

•   Keep products, devices, documentation and anything else provided out of reach of children.
 

In the event of maintenance, cleaning, breakdown or faulty operation of the product, cut off the


power and do not attempt to operate on the product. Contact solely the professionally skilled


personnel responsible for these operations. Failure to adhere to the above indications may be


dangerous.

Summary of Contents for BASIC 09 24

Page 1: ......

Page 2: ...ggere attentamente questo manuale che parte integrante di questa confezione Il marchio CE conforme alla direttiva europea CEE 89 336 92 31 93 68 D L 04 12 1992 N 476 I nostri prodotti se installati da...

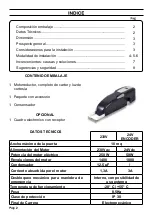
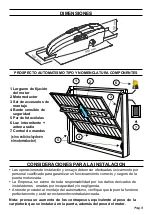
Page 3: ...ura di funzionamento 20 C 55 C Peso 8 5Kg Grado di protezione IP 30 Finecorsa Elettromeccanico Composizione dell imballo 2 Dati tecnici 2 Dimensioni 3 Prospetto generale 3 Considerazione per l install...

Page 4: ...ite solo da personale qualificato ai fini di garantire la corretta e sicura funzionalit della porta automatizzata La casa costruttrice declina ogni responsabilit per i danni derivati da eventuali erra...

Page 5: ...rapponga al braccetto di tenuta esistente Verificare che vi siano almeno 20 mm di spazio tra il telo della porta e il cassonetto dei contrappesi Nota Se non si riesce ad utilizzare il braccio telescop...

Page 6: ...del braccetto esistente Posizionare il motore M sul longherone in modo che sia in linea con i supporti dei tubi e bloccarlo con le due viti inserendo in quella superiore i due spessori Bloccare con I...

Page 7: ...nserire nell albero del motore e nelle boccole dei bracci dritti o curvi i tubi di trasmissione e effettuare dei dei fori da 8mm Inserire le spine elastiche per bloccare I tubi fig6 Chiudere la porta...

Page 8: ...a 2000 mm 1000mm Centro porta Porta 890 mm 2000 mm Centro porta 110 mm 1000mm 890 mm ESEMPIO MOTORIZZAZIONE CON PORTA NON DEBORDANTE Posizionare e fissare in modo ben saldo il supporto tubo al telo de...

Page 9: ...ula o non funziona Verificare il collegamento togliere eventuale ostacolo Ad un comando con il radiocomando non apre ma funzione con il comando a chiave Il radiocomando non e stato memorizzato o la ba...

Page 10: ...NOTE...

Page 11: ...NOTE...

Page 12: ...onatore e o differenziale adeguati al prodotto e in conformit alle normative vigenti Il costruttore declina ogni e qualsiasi responsabilit qualora vengano installati dei dispositivi e o componenti inc...

Page 13: ...diritto di modificare in qualsiasi momento le caratteristiche dei prodotti descritti a suo insindacabile giudizio senza alcun preavviso Via Circolare p i p N 10 65010 Santa Teresa di Spoltore PE ITAL...

Page 14: ...lling thoroughly read this manual that is an integral part of the pack The CE mark conforms to European directive EEC 89 336 92 31 93 68 D L 04 12 1992 N 476 Our products if installed by qualified per...

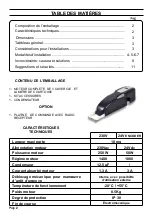
Page 15: ...r use Working temperature 20 C 55 C Weight 8 5Kg Protection rating IP 30 Limit switch Electromechanical PACKING CONTENTS 2 TECHNICAL DATA 2 DIMENSIONS 3 VIEW OF TYPICAL AUTOMATION AND NAMES OF COMPONE...

Page 16: ...lines all responsibility for damages caused by incorrect installations due to incompetence and or negligence Before installing the automation check that the door is perfectly working and balanced Note...

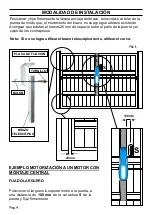
Page 17: ...sting arm of the door Make sure there are at least 20 mm of space between the door frame and the box of the counterweights Note If you are not able to use the straight telescopic arm use the curved on...

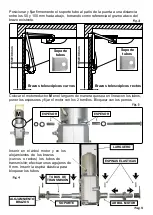
Page 18: ...the existing arm Place the motor M on the fixing plate so that it is in line with the tube supports and lock it with the two screws by inserting into the upper one the two spacers Lock with the nuts I...

Page 19: ...fig 3 Insert the transmission tubes in the motor shaft and in the broaching arms straight or curved and make 8mm holes Insert the elastic plug to block the tubes Insert the elastic plug to block the...

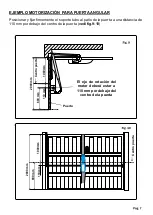
Page 20: ...m 890 mm EXAMPLE AUTOMATION WITH NON PROJECTING DOOR Place and securely fix the tube support to the door frame at a distance of 110 mm under the center of the door look at fig 9 10 The rotation axis o...

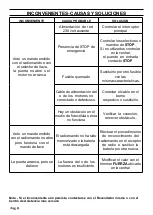
Page 21: ...ioning or the beam is interrupted Check the connection remove any obstacle across the beam On giving a command with the remote control the door doesn t open but works with the key command The remote c...

Page 22: ...NOTE...

Page 23: ...NOTE...

Page 24: ...rential switch suitable for the product and conforming to current standards The manufacturer declines any and all responsibility for product integrity safety and operation in the event incompatible de...

Page 25: ...Spoltore PE ITALY Tel 39 085 4971946 FAX 39 085 4973849 www vdsconsorzio it vds vdsconsorzio it The data and images are for guidance only VDS reserves the right to change at any time characteristics o...

Page 26: ...a instalaci n leer atentamente el presente manual que es parte integrante de esto producto Nuestros productos si instalados por personal cualificado capaz de la evaluaccion de riesgos cumplen con la n...

Page 27: ...motor 1400 1800 Condensador 12 5 F Corriente absorbida por el motor 1 3A 3A Desbloqueo mec nico para maniobra de emergencia Interno con posibilidad de uso externo Temperatura de funcionamiento 20 C 5...

Page 28: ...aci n y ensayo deben ser efectuadas nicamente por personal cualificado para garantizar un funcionamiento correcto y seguro de la puerta motorizada La Empresa se exime de toda responsabilidad por los d...

Page 29: ...os 20 mm de espacio entre el pa o de la puerta y el cajon de los contrapesos Nota Si no se logra utilizar el brazo telesc pico recto utilizar el curvo 100mm 20mm EJEMPLO MOTORIZACI N A UN MOTOR CON MO...

Page 30: ...os espesores y fijar el motor con los 2 tornillos Bloquear con los pernos LARGUERO ESPINAS ELASTICAS TUBOS DE TRANSMISI N SOPORTE ARBOL MOTOR ALOJAMNIENTO BRAZOS M ESPESOR ESPESOR Inserir en el rbol m...

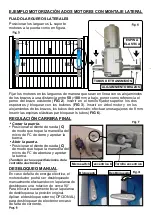
Page 31: ...N CARRERA FINAL DESBLOQUEO MANUAL En caso de falta de energ a el ctrica el motoreductor podr ser desbloqueado manualmente efectuando con la palanca de desbloqueo una rotacion de cerca 90 Para blocarlo...

Page 32: ...e la puerta 2000 mm 1000mm Centro puerta Puerta 890 mm 2000 mm Centro puerta 110 mm 1000mm 890 mm EJEMPLO MOTORIZACI N PARA PUERTA ANGULAR Posicionar y fijar firmemente el soporte tubo al pa o de la p...

Page 33: ...P Fusible quemado Sustituirlo por otro fusible con las mismas caracter sticas Cable de alimentaci n del o de los motores no conectado o defectuoso Conectar el cable en el borne respectivo o sustituirl...

Page 34: ...NOTE...

Page 35: ...NOTE...

Page 36: ...al adecuados para el producto y en conformidad con las normas vigentes El constructor queda eximido de cualquier responsabilidad en el caso de instalaci n de dispositivos y o componentes incompatibles...

Page 37: ...ificar en cualquier momento de las caracter sticas de los productos descritos en su nica discreci n sin previo aviso Via Circolare p i p N 10 65010 Santa Teresa di Spoltore PE ITALY Tel 39 085 4971946...

Page 38: ...nstallation lire attentivement le pr sent manuel qui fait partie int grante de cet emballage Le marquage CE est conforme la directive europ enne CEE 89 336 92 31 93 68 Nos produits si install s par pe...

Page 39: ...C Poids moteur 8 5Kg Degr de protection IP 30 Fin de course lectrom canique TABLE DES MATI RES Composition de l emballage 2 Caract ristiques techniques 2 Dimensions 3 Tabbleau g n ral 3 Consid ration...

Page 40: ...lation et de contr le doivent tre effectu es uniquement par du personnel qualifi en vue d assurer le fonctionnement correct et s r de la porte motoris e La soci t d cline toute responsabilit concernan...

Page 41: ...ur la porte une distance de 100 mm de la serrure S et fixer solidement Placer et attacher solidement la plaque d ancrage du bras t lescopique sur le ch ssis de la porte le mouvement du bras ne recoupe...

Page 42: ...moteur M sur le longeron afin que soit parfaitement en ligne avec les Supports des tuyaux et fixer le moteur m me avec le deux vis en ins rant dans la sup rieure les deux paisseurs Serrer les boulons...

Page 43: ...les boucles des bras droits ou courbes les tuyaux de transmission et effectuer des trous de 8 mm Ins rer les pines lastiques pour bloquer les tuyaux m me illustration 6 En cas de manque d lectricit l...

Page 44: ...a porte 2000 mm 1000mm Centre de la porte Porte 890 mm 2000 mm Centre de la porte 110 mm 1000mm 890 mm EXEMPLE MOTEUR AVEC PORTE PAS D BORDANTE Placer et fixer solidement le support tube au panneau de...

Page 45: ...fectueux Brancher les c bles dans les bornes pr vue cet effet ou les remplacer Il y a un obstacle au milieu de la cellule photo lectrique ou elle ne fonctionne pas Contr ler le branchement enlever l o...

Page 46: ...NOTE...

Page 47: ...NOTE...

Page 48: ...ur sectionneur et ou diff rentiel appropri s au produit et conforme aux normes en vigueur Le fabricant d cline toute responsabilit dans le cas d installation de dispositifs et ou com posants incompati...

Page 49: ...ore PE ITALY Tel 39 085 4971946 FAX 39 085 4973849 www vdsconsorzio it vds vdsconsorzio it Les donn es et les images sont titre indicatif seulement VDS r serve le droit de modifier tout moment les car...

Reviews: