background image

9.1.


LVP909 can put two common sending cards inside, normally common sending 

card only has two RJ45 ports;   


10.  Setting language   
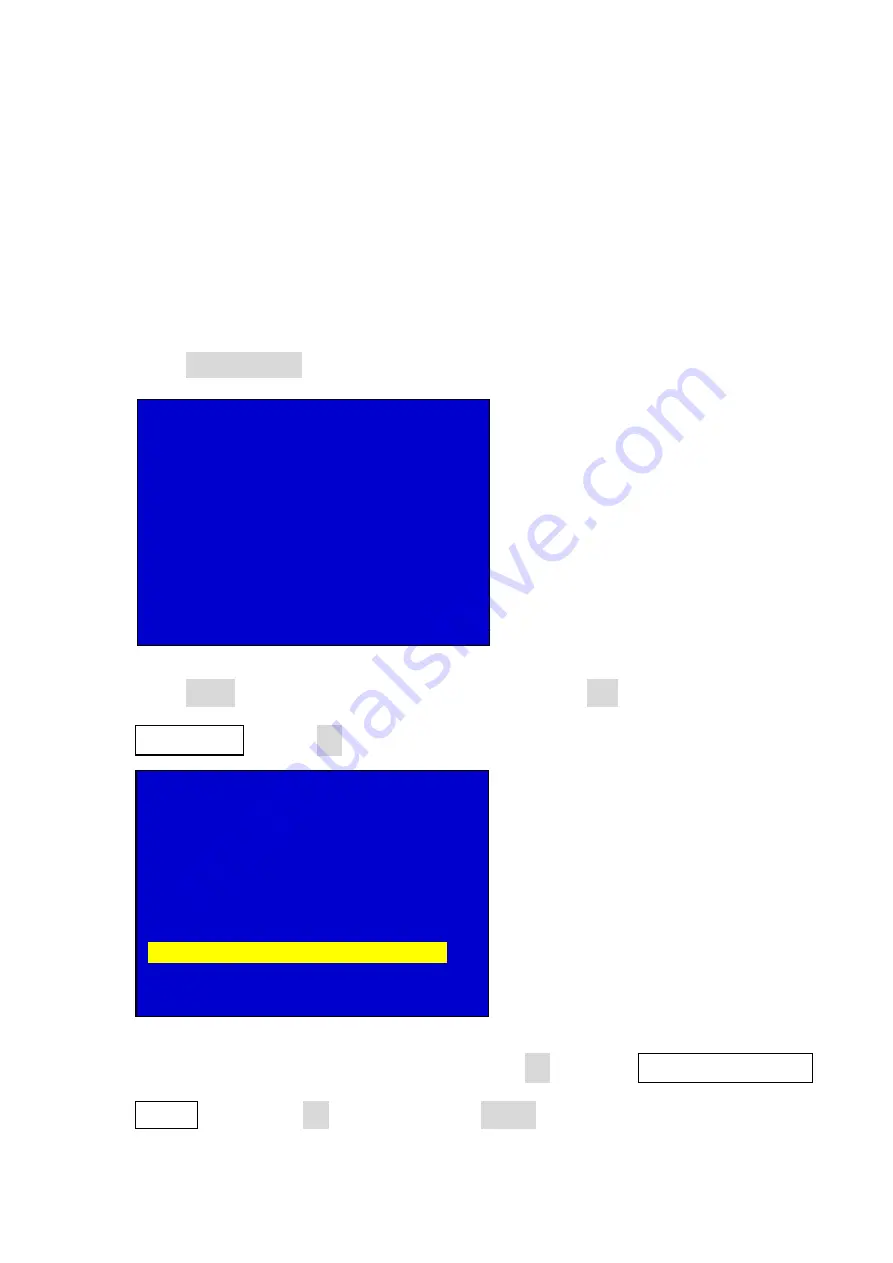
10.1.


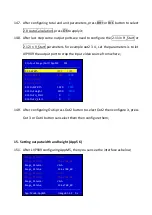
Press power switch to open processor, then you can see the interface as below; 


10.2.


Press Setup button to enter user setup menu, press Brt- button to select 6. 

/language

press OK to enter language setup menu; 
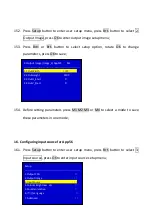


10.3.


After entering language setup menu, rotate  OK to select  6.1. 

语言

/Language     

English, then press OK to confirm, press return button to exit user setup menu; 
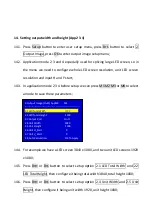
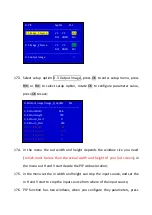
输入:

                            VGA 

输入状态:

                    1366x768_60 

-------------------------------------------------------------------- 

输出位置大小:


0

0

1920

1080


-------------------------------------------------------------------- 

切换方式:


一键直接切换


切换效果:


无缝直切


应用模式:

                    AppM1(

切换器


设置


-------------------------------------------------------------------- 

1.

输出端口配置


>>


2.

输出图像


>>


3.

输入信号


>>


4.

图像画质


>>


5.

通讯


>>


6.

语言

/Language                                           

>>


7.

高级


>>


Summary of Contents for LVP909 Series

Page 1: ...on instruction Contents 1 Signalswitch buttons 2 Outputchannelselection buttons 3 User setup buttons 4 Function buttons 5 Power switch and socket 6 Softwarecontrolport 7 Outputports 8 Inputports 9 Sen...

Page 2: ...ration 13 Setting outputwidth and height App 1 14 Setting outputwidth and height App 2 3 4 15 Setting outputwidth and height App 5 6 16 Configuring inputsourcefor App5 6 17 Setting PIP POP 1 Signal sw...

Page 3: ...course you have connected HDMI sourceto the input port 2 Output channel selectionbuttons 2 1 LVP909 has 4 output ports Out1 Out2 Out3 Out4 when configure output port parameters in user menu press rela...

Page 4: ...ange or increase and decreaseparameter value 3 2 Brt after entering user setup menu press it to select next setup option when not in setup configuration statepress it to increase brightness 3 3 Brt af...

Page 5: ...h 4 2 M1 M2 M3 M4 memory buttons LVP909 can save 4 modes in advanced when in application mode 1 save 4 mode for PIP when in another mode can save 4 modes for output port parameters 4 3 Take quick swit...

Page 6: ...o on LED screen not in the correct location and has some display problem press the button to adjustVGA input sourcelet it OK 4 6 Lock press the button to open lock function after opening all the butto...

Page 7: ...port on PC for example we connect control cable to PC s COM1 port in controlsoftwareyou mustselect COM1 port 6 3 Wifi antenna LVP909F has Wifi control function first install APP on mobile phone then...

Page 8: ...at so you can use DVI to VGA cable to connect the port to a monitor with VGA input port 8 Input ports 8 1 LVP909 has 6 channels of input port SDI DVI HDMI VGA V1 V2 connect relative format video sourc...

Page 9: ...n you can see the interfaceas below 10 2 Press Setup button to enter user setup menu press Brt button to select 6 language press OK to enter languagesetup menu 10 3 After entering language setup menu...

Page 10: ...menu 11 2 Press Brt button to select 1 1 Resolution 1920 x 1080_60 rotate OK to select destination output resolution after selectin resolution press Brt button to select 1 3 Setup press OK to confirm...

Page 11: ...elect 1 Output CFG press OK to enter configuration menu 12 2 Press Brt button to select 1 2 App Mode rotate OK to select the proper application mode you need after selectin resolution press Brt button...

Page 12: ...12 3 Application mode 1 Out1 Out2 1 program switcher Out3 No Output Out4 Pre Sync Monitor 12 4 Application mode 2 Out1 Out2 2 program 2 Mosaic Out3 No output Out4 Pre Sync Monitor...

Page 13: ...12 5 Application mode 3 Out1 Out2 Out3 3 program 3 Mosaic Out4 Sync Monitor 12 6 Application mode 4...

Page 14: ...Out1 Out2 Out3 Out4 4 program 4 Mosaic No Monitor Output 12 7 Application mode 5 Out1 Out2 1 program 4 image Out3 No Output Out4 Sync Monitor...

Page 15: ...12 8 Application mode 6 Out1 Out2 1 program 3 image Out3 No Output Out4 InputSync Monitor...

Page 16: ...idth and height must be as same as the width and height of your actual LED screen 13 3 In the setup menu In width and height In H start and V Start used to crop the area of input video sourcethen outp...

Page 17: ...to select a mode to savethese parameters 14 4 For example we have a LED screen 3840 x 1080 and two unit LED screens 1920 x 1080 14 5 Press Brt or Brt button to select setup option 2 1 LED Total Width...

Page 18: ...onfigure it press Out 3 or Out4 button can select them then configurethem 15 Setting output widthand height App5 6 15 1 After LVP909 configuring App M5 then you can see the interface as below 2 Output...

Page 19: ...press M1 M2 M3 or M4 to select a mode to save these parameters in one mode 16 Configuring input source for App5 6 16 1 Press Setup button to enter user setup menu press Brt button to select 3 Inputso...

Page 20: ...p option D 1 Image_1 source or D 2 Image_2 source rotate OK to configureinput video source press OK to save 3 ImageSource AppM5 M1 3 1 Image_1Source V1 V2 VGA DVI HDMI SDI 3 2 Image_2Source V1 V2 VGA...

Page 21: ...he PIP widow location 17 5 In the menu set the In width and height can crop the input source and set the In H and V startto crop the input sourcefromwhereof the input source 17 6 PIP function has two...

Page 22: ...Out1 to select main widow press Out2 to select PIP window...

Reviews: