6
CAUTIONS:
• The unit takes about 2 hours to reach its maximum cool temperature (approx.
40°F below ambient temperature). It is recommended that items to be placed
in the unit be pre-chilled. This will assist the unit in reaching the lowest
temperature as quickly as possible
• The unit will continue to operate as long as the vehicle's battery
provides power
• If the vehicle engine is turned off, the unit will continue to draw power (a
nominal 3.6 amps or 44 watts) from the vehicle battery
• If the engine is switched off for a long period (overnight) it is important
to disconnect the unit from the accessory outlet to avoid draining the
vehicle’s battery
WARNINGS:
• Food will stay cool for some time after the unit is disconnected or turned off,
but temperature will rise to that of the surrounding air
• Observe common sense hygiene rules, as with any cooling unit. Do not
eat or drink perishable items that may have spoiled or become
contaminated from lack of proper temperature control
USING THE UNIT AS A WARMER
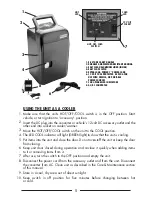
1. Make sure that the unit’s HOT/OFF/COOL switch is in the OFF position.
2. Insert the DC plug into the converter or vehicle 12 volt DC accessory outlet
and the other end into socket on unit. Start vehicle, or turn ignition to
“accessory” position.
3. Move the HOT/OFF/COOL switch on the unit to the WARM position.
4. The LED WARM indicator will light (RED light) to show that the unit is warming.
5. Put items into the unit and close the lid. Do not overstuff the unit. The unit’s warming
system is monitored by an automatic switch that turns the heating system on and
off when excessively high temperatures are reached.
6. Keep unit's lid closed during operation, and re-close it quickly when adding items
to it, or removing items from it.
7. After use, turn the switch back to the OFF position. Remove any food items.
8. Disconnect the power cord from the power supply socket and from the unit. Clean
unit as described in the Care & Maintenance section of this manual.
9. Store in a cool, dry area out of direct sunlight.


