background image

Data transfer

PLRF10/15-2.0en

28

Data transfer

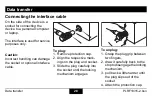
Connecting the interface cable

On the side of the device is a 
socket for connecting the 
device to a personal computer 
or laptop.

The interface is used for service 
purposes only.

Caution:

Incorrect handling can damage 
the socket or optional interface 
cable.

To plug:

1. Remove protection cap.
2. Align the respective mark-

ings on the plug and socket.

3. Slide the plug carefully into 

the socket until the locking 
mechanism engages

To unplug:

1. Grasp the plug grip between 

two fingers,

2. draw it carefully back to the 

stop to disengage the locking 
mechanism,

3. pull back a little harder until 

the plug slips out of the 
socket

4. Attach the protection cap.

Summary of Contents for PLRF10

Page 1: ...PLRF10 PLRF15 User Manual English Version 2 0 XI 2007 Pocket Laser Range Finder...

Page 2: ...e Finder Purpose of Equipment The PLRF10 15 is a pocket size handheld button operated laser rangefinder with an internal sighting optic and range display For safe use of the device please note the saf...

Page 3: ...ng started 11 Changing the batteries 11 Diopter adjustment 12 Reticle 13 General Operations 14 Distance Measurements 15 Factors affecting measurement range 15 Slope distance 16 Multiple object measure...

Page 4: ...ration Remove 21 Settings 22 Measurement units 22 Distance gate 23 Set Factory Settings Reset to default 24 Built in Test 25 Troubleshooting 26 Data transfer 28 Connecting the interface cable 28 Equip...

Page 5: ...eter Aided 7 x 50 binocular 0 meter Inappropriate use Device deployment without prior knowledge of the operating instructions and safety notices Changes and modifications to the device by the customer...

Page 6: ...e The built in laser can cause eye injuries Explosion hazard The battery must not be short circuited recharged mechanically modified placed in fire or heated above 85 C with the device Caution Use of...

Page 7: ...care or cleansers Therefore do not use any kind of impregnated cloth intended for cleaning spectacle lenses do not use any solvent except water e g no alcohol or cleansers Lens cleaning Particles of d...

Page 8: ...Technical Data PLRF10 15 2 0en 8 Technical Data Optics Configuration monocular Magnification 6x Objective diameter 27 mm Field of view 106mil 6 Focus fixed Dioptric setting 2dpt to 4dpt...

Page 9: ...PLRF15 Laser type IR diode 905 nm 1550 nm Eye safety Class 1 Class 1 Standard IEC60825 1 Ed 1 2 2001 08 IEC60825 1 Ed 1 2 2001 08 Range Performance 5m 2500m 5m 3000m Specified Performance 1800m 2500m...

Page 10: ...nts Immersion 1m 30min Operational temperature range 35 C to 63 C 31 F to 145 F Storage temperature range without battery 40 C to 85 C 40 F to 185 F Weight with batteries and rubberized cover 620g 1 4...

Page 11: ...y cover Tighten it completely until it stops The device monitors the condition of the batteries If the display shows LobA this indicates that the batteries are used up You can still get readings but t...

Page 12: ...2 0en 12 Diopter adjustment Sight on an object farther than 100 m away and rotate the eyepiece to obtain a sharp image Standard setting 0 L If the device is being used by different people remember you...

Page 13: ...reticle can be used in place of the electronic aiming mark Line spacing 10 mils Line point spacing 5 mils L 1 mil corresponds to 1 m spacing at a distance of 1 km Electronic reticle An illuminated aim...

Page 14: ...ration is indicated by the following symbols press and hold key release key press and release key click L You can prolong the display period by holding down the range key while the result is displayed...

Page 15: ...nce Measurements PLRF10 15 2 0en 15 Distance Measurements Factors affecting measurement range Reflective properties Size of the target Oblique surfaces Atmospheric conditions Vibration Lighting condit...

Page 16: ...tance Press and hold the distance key Sight the object with the aiming mark Hold the instrument steady as you release the key The slope distance appears If is displayed the object lies outside the mea...

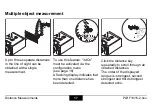
Page 17: ...ngle measurement To use this feature 3dOn must be activated via the configuration menu see page 18 A flashing display indicates that more than one distance has been detected Click the distance key rep...

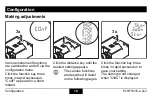
Page 18: ...lick the function key three times in rapid succession ConF appears for a short instant Click the distance key until the desired setting appears L The various functions are described in detail on the f...

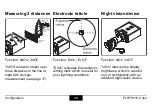
Page 19: ...e of sight with a single measurement see page 17 Electronic reticle Function ErOn Er OF ErOn activates the electronic aiming mark which is useful for poor lightning conditions Night vision device Func...

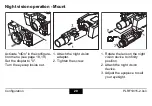
Page 20: ...e configura tion menu see page 18 19 Set the diopter to 0 Turn the eyecup inside out 1 Attach the night vision adapter 2 Tighten the screw 1 Rotate the lens on the night vision device to infinity posi...

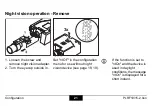
Page 21: ...w and remove night vision adapter 2 Turn the eyecup outside in Set ntOF in the configuration menu for use without night vision device see page 18 19 L If the function is set to ntOn and the device is...

Page 22: ...rement unit Click the function key two times in rapid succession Unit appears briefly Click the distance key until the desired unit appears Click the function key two times in rapid succession to stor...

Page 23: ...E appears briefly followed by the current setting e g OFF Click the function key until the desired minimum distance appears e g 300m Setting OFF disables the distance gate Click the distance key three...

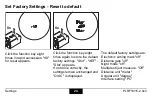
Page 24: ...function key eight times again to store the default factory settings Stor dEF Stor appears If not done correctly the settings remain unchanged and Old C is displayed The default factory settings are E...

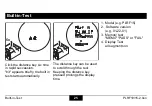
Page 25: ...ion bit appears briefly the built in test starts automatically The distance key can be used to scroll through the test Keeping the distance key pressed prolongs the display time 1 Model e g PLRF15 2 S...

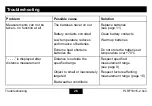
Page 26: ...an battery contacts Low temperature reduces performance of batteries Warm up batteries Extreme heat shortens batteries life Do not store the batteries at temperature over 70 C is displayed after dista...

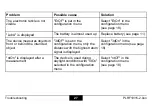
Page 27: ...e 11 The device measures objects in front or behind the intended object 3dOF is set in the configuration menu only the distance with the highest return signal is displayed Select 3dOn in the configura...

Page 28: ...ndling can damage the socket or optional interface cable To plug 1 Remove protection cap 2 Align the respective mark ings on the plug and socket 3 Slide the plug carefully into the socket until the lo...

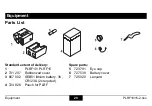
Page 29: ...nt Parts List Standard extent of delivery Spare parts 1 PLRF10 PLRF15 5 723 791 Eye cap 2 731 207 Rubberized cover 6 727 539 Battery cover 3 667 002 SEB51 lithium battery 3V CR123A 2x required 7 725 0...

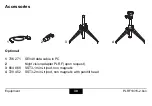
Page 30: ...15 2 0en 30 Accessories 4 3 2 1 Optional 1 706 271 SEV48 data cable to PC 2 Night vision adapter PLRF upon request 3 664 868 SST3 1 mini tripod non magnetic 4 729 452 SST3 2 mini tripod non magnetic w...

Page 31: ...one 41 71 726 72 00 Fax 41 71 726 72 01 Internet www vectronix ch Copyright Without the prior written permission of Vectronix this document may neither be copied in part or whole by mechanical photogr...

Page 32: ...nagement system that complies with international standards for quality and quality management systems ISO 9001 and environmental management systems ISO 14001 Total Quality Management our commitment to...

Page 33: ...Customer service PLRF10 15 2 0en 33...

Page 34: ...Code 902131 2 0en Printed in Switzerland Copyright by Vectronix AG Heerbrugg Switzerland XI 2007 Vectronix AG CH 9435 Heerbrugg Switzerland Telephone 41 71 726 72 00 Fax 41 71 726 72 01 www vectronix...

Reviews: