10
EMR
3
- Truck Installations
EMR4 Truck Installation
3-Way Safety Valve for Truck LP Gas Systems
3.
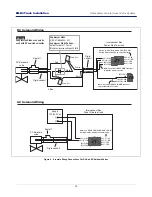
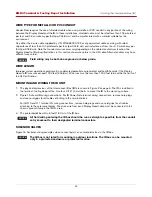
Using the wire nuts, connect the stripped wires from the IB box to the 3-way valve wires (see Figure 5). There
is no polarity to the 3-way valve’s wiring. Seal the wire nuts with epoxy sealant using one bag for both wire nut
connections and place bag in junction box (see Figure 5).
Epoxy sealant is irritating to eyes, respiratory system, and skin. Can cause allergic skin
reaction. Contains: epoxy resin and cycloaliphatic epoxycarboxylate. Precautions: Wear
suitable protective clothing, gloves, eye, and face protection. Use only in well ventilated
areas. Wash thoroughly before eating, drinking, or smoking.
Figure 5. Connecting 3-Way Valve To Neptune Meter - Truck LP Gas Installations
4.
Tighten the cable bushing nuts on the cord grip to ensure a watertight seal at the cable’s entry.
5.
Remove the protective closures from the 3-way valve ports.
Neptune meters:
Connect a hose from line pressure to port 3 (normally open port) of the 3-way valve (see Figure 5). On some
systems, line pressure is available at an opening in the vapor eliminator housing. Connect another hose from
the 3-way valve’s port 1 (normally closed port) to the air eliminator. Connect a third hose from the 3-way
valve’s port 2 (common port) to the differential valve.
L.C./TCS Meters:
Connect a hose from the air eliminator to port 3 (normally open port) of the 3-way valve (see Figure 6). Con-
nect another hose from the 3-way valve’s port 1 (normally closed port) to the strainer cover. Connect a third
hose from the 3-way valve’s port 2 (common port) to the differential valve.
CAUTION
Rigid Met
a
l
J
u
nction Box
S
hrink wr
a
pped diode
S
hielded 2-Wire C
ab
le
V-R PN
8
4
8
100-250
Cord Grip
V-R PN
33
102
8
-001
Port 1
(N.C.)
Port
3
(N.O.)
Port 2
(COM)
Ho
s
e Connection
s
are 1/4'' NPT
Connect to Line
Pre
ssu
re
Connect to
Differenti
a
l
V
a
lve
12 Vdc 10 W
a
tt
s
3
-W
a
y
S
olenoid V
a
lve
Connect to
Air Elimin
a
tor
Connect wire
s
in IB
u
nit
1/2'' NPT
Nipple or Cond
u
it
75
8
-2
3
.ep
s
Bl
a
ck
White (+)
To
3
-W
a
y
v
a
lve
To
IB
u
nit
Red
Red
Wire n
u
t
s
In
s
truction
s
:
NOTE: When temper
a
t
u
re i
s
b
elow 50°F (10°C), keep
re
s
in in
a
w
a
rm pl
a
ce prior to mixing (e.g., in
a
n in
s
ide
pocket next to
b
ody).
1. Att
a
ch red wire
s
from
3
-w
a
y v
a
lve to
b
l
a
ck
a
nd white
(+) wire from IB
u
nit with wire n
u
t
s
as
s
hown in A.
Connect diode white wire to red/white (+) p
a
ir.
Connect diode
b
l
a
ck wire to red/
b
l
a
ck p
a
ir.
2. Open epoxy p
a
ck
a
ge,
a
nd remove re
s
in p
a
k.
3
. Holding
re
s
in p
a
k
as
s
hown in B,
b
end p
a
k
a
long long
length.
4. A
s
s
hown in C, firmly
squ
eeze the RED
S
IDE of the
re
s
in, forcing it thro
u
gh the center
s
e
a
l
a
nd into
BLACK
S
IDE.
5. Mix thoro
u
ghly to
a
u
niform color
b
y
squ
eezing
content
s
ba
ck
a
nd forth 25-
3
0 time
s
.
6.
Squ
eeze mixed, w
a
rm re
s
in into one end of
ba
g
a
nd
c
u
toff other end.
7.
S
lowly in
s
ert wiring connection
s
into
s
e
a
ling p
a
ck
u
ntil
they fit
s
n
u
gly
a
g
a
in
s
t the oppo
s
ite end.
8
. Twi
s
t open end of
ba
g
a
nd
us
e tie wr
a
p to clo
s
e it off,
or wr
a
p open end of
ba
g with vinyl electric
a
l t
a
pe (not
incl
u
ded)
a
nd po
s
ition the t
a
ped end
u
p
u
ntil the re
s
in
jell
s
.
9. Pl
a
ce epoxy p
a
ck into j
u
nction
b
ox
a
nd
s
crew on
cover
as
s
hown in D.
C
A
D
B
Diode
(+)


