Interfacing ProtoNode to Devices
Device Connections to ProtoNode
8
TERMINATION RESISTOR
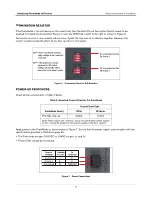
If the ProtoNode is the last device on the serial trunk, then the End-Of-Line Termination Switch needs to be
enabled. To enable the Termination Resistor, move the TERM dip switch to the right as shown in Figure 6.
Termination resistor is also used to reduce noise. It pulls the two lines of an idle bus together. However, the
resistor would override the effect of any bias resistors if connected.
Figure 6. Termination Resistor DIP Switches
POWER-UP PROTONODE
Check power requirements in Table 4 below.
Apply power to the ProtoNode as shown below in Figure 7. Ensure that the power supply used complies with the
specifications provided in Table 6 on page 35.
•
The ProtoNode accepts 9-30VDC or 24VAC on pins L+ and N-.
•
Frame GND should be connected.
Figure 7. Power Connections
Table 4. Required Current Draw for the ProtoNode
ProtoNode Family
Current Draw Type
12Vdc
24Vdc/ac
FPC-N54 (Typical)
250mA
125mA
Note: These values are ‘nominal’ and a recommended safety margin
of 25% should be added to the power supply of the host system.
R1 Termination Resistor
DIP Switch 1
R2 Termination Resistor
DIP Switch 1
NOTE: The R1 and R2 DIP Switches
apply settings to the respective
serial port.
NOTE: If the gateway is already
powered on, DIP switch
settings will not take effect
unless the unit is power cycled.
Power In (+)
Power In (-)
Frame Ground
L+
N-
FG
V+
V-
FRAME GND
ProtoNode
Pin Label
Power to
ProtoNode
Pin
Assignment


