background image

3

1 About this document

VEGACAP 98 • Relay (DPDT)

33760-EN-230510

1  About this document

1.1 Function

This instruction provides all the information you need for mounting, 

connection and setup as well as important instructions for mainte-

nance, fault rectification, the exchange of parts and the safety of the 

user. Please read this information before putting the instrument into 

operation and keep this manual accessible in the immediate vicinity 

of the device.

1.2  Target group

This operating instructions manual is directed to trained personnel. 

The contents of this manual must be made available to the qualified 

personnel and implemented.

1.3  Symbols used

Document ID

This symbol on the front page of this instruction refers to the Docu-

ment ID. By entering the Document ID on www.vega.com you will 

reach the document download. 

Information, note, tip:

 This symbol indicates helpful additional infor-

mation and tips for successful work. 

Note:

 This symbol indicates notes to prevent failures, malfunctions, 

damage to devices or plants. 

Caution:

 Non-observance of the information marked with this symbol 

may result in personal injury. 

Warning:

 Non-observance of the information marked with this symbol 

may result in serious or fatal personal injury. 

Danger: 

Non-observance of the information marked with this symbol 

results in serious or fatal personal injury. 

Ex applications

This symbol indicates special instructions for Ex applications.

• 

List

The dot set in front indicates a list with no implied sequence.

1  Sequence of actions

Numbers set in front indicate successive steps in a procedure.

Disposal

This symbol indicates special instructions for disposal.

Summary of Contents for VEGACAP 98

Page 1: ...Operating Instructions Capacitive rod electrode for level detection VEGACAP 98 Relay DPDT Document ID 33760...

Page 2: ...operation 7 3 3 Adjustment 7 3 4 Packaging transport and storage 8 4 Mounting 9 4 1 General instructions 9 4 2 Mounting instructions 10 5 Connecting to power supply 12 5 1 Preparing the connection 12...

Page 3: ...s to the Docu ment ID By entering the Document ID on www vega com you will reach the document download Information note tip This symbol indicates helpful additional infor mation and tips for successfu...

Page 4: ...ect mounting or adjustment Damage to property and persons or environmental contamination can result Also the protective characteristics of the instrument can be impaired 2 4 General safety instruction...

Page 5: ...ly with the relevant requirements of the Canadian Electrical Code CEC Par I Canada 2 7 Safety instructions for Ex areas For applications in explosion proof areas Ex only devices with cor responding Ex...

Page 6: ...the order specification The VEGACAP 98 consists of the components Process fitting with probe Housing with electronics Housing lid 1 2 3 Fig 1 VEGACAP 98 1 Housing lid 2 Housing with electronics 3 Pro...

Page 7: ...ic constant of the product compared to air the capacitance increases as the probe is gradually covered The capacitance change is converted by the electronics module into a switching command VEGACAP 98...

Page 8: ...be checked for completeness and possible transit damage immediately at receipt Ascertained transit damage or con cealed defects must be appropriately dealt with Up to the time of installation the pack...

Page 9: ...ny position The instru ment must be mounted in such a way that the probe is at the height of the requested switching point Before beginning the welding work remove the electronics module from the sens...

Page 10: ...move these plugs before electrical connection NPT thread In the case of instrument housings with self sealing NPT threads it is not possible to have the cable entries screwed in at the factory The fre...

Page 11: ...11 4 Mounting VEGACAP 98 Relay DPDT 33760 EN 230510 Fig 4 Inflowing medium...

Page 12: ...three wire cable without shielding If electromagnetic interference is expected which is above the test values of EN 61326 for industrial areas shielded cable should be used Make sure that the cable us...

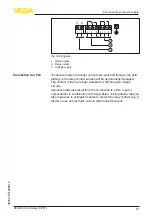
Page 13: ...old plating on the relay contact surface will be permanently damaged The contact is then no longer suitable for switching low voltage circuits Inductive loads also result from the connection to a PLC...

Page 14: ...output will change if you set the mode switch 5 afterwards This could possibly trigger other con nected instruments or devices 6 2 Adjustment elements 3 4 5 6 1 2 Fig 6 Electronics module with relay...

Page 15: ...mainly compensated As a default setting the electronics module is adjusted to the basic capacitance of the probe The relay output switching when the active tip is covered active tip 90 mm 3 5 in of t...

Page 16: ...6 The probe is now ready for operation Sensitivity Standard very sensitive additional turns Dielectric constant 2 2 turns Dielectric constant 1 5 1 turn Tab 1 Number of additional turns for the potent...

Page 17: ...760 EN 230510 Level Switching status Control lamp Mode B Dry run protection 5 3 4 8 6 7 Relay energized Mode B Dry run protection 5 3 4 8 6 7 Relay deener gized Failure of the sup ply voltage mode A B...

Page 18: ...check the output signal In many cases the causes can be determined this way and the faults quickly rectified Depending on the reason for the fault and the measures taken the steps described in chapter...

Page 19: ...odule Check the resistance between the marked plug connections See the follow ing instructions Electronics defective Press the mode switch A B If the instrument then changes the mode the instrument ma...

Page 20: ...insulation A possible reason could be also a non insu lated electrode which is used in a conductive humid medium If the resistor is higher or if the connection is interrupted the reason is mostly a c...

Page 21: ...exchange the electronics module by a similar replacement electronics if available If the fault is eliminated after inserting the new electronics module then you have to carry out a fresh adjustment w...

Page 22: ...hten cable gland and check on tightness The seal ring must completely encircle the cable 15 Carry out a fresh adjustment See chapter Set up new adjust ment 16 Screw the housing lid back on The electro...

Page 23: ...o voltage sup ply and carry out the listed steps in reverse order 8 2 Disposal Pass the instrument on to a specialised recycling company and do not use the municipal collecting points Remove any batte...

Page 24: ...rocess fittings Pipe thread cylindrical DIN 3852 A G1 Weight Instrument weight 0 8 4 kg 0 18 8 82 lbs Rod weight 33 mm 1 3 in approx 560 g m 6 oz ft Sensor length L 150 2000 mm 5 91 78 74 ft Active ti...

Page 25: ...onditions Ambient temperature on the housing 40 80 C 40 176 F Storage and transport temperature 40 80 C 40 176 F Process conditions Process pressure unpressurized Process temperature VEGACAP 98 of PP...

Page 26: ...nical specifications depending on the version For that reason the associated approval documents of these instruments have to be carefully noted They are part of the delivery or can be downloaded by en...

Page 27: ...nter www vega com Les lignes de produits VEGA sont globalement prot g es par des droits de propri t intellec tuelle Pour plus d informations on pourra se r f rer au site www vega com VEGA lineas de pr...

Page 28: ...28 Notes VEGACAP 98 Relay DPDT 33760 EN 230510...

Page 29: ...29 Notes VEGACAP 98 Relay DPDT 33760 EN 230510...

Page 30: ...30 Notes VEGACAP 98 Relay DPDT 33760 EN 230510...

Page 31: ...31 Notes VEGACAP 98 Relay DPDT 33760 EN 230510...

Page 32: ...ing scope of delivery application practical use and operat ing conditions of the sensors and processing systems correspond to the information available at the time of printing Subject to change withou...

Reviews: