background image

10

11

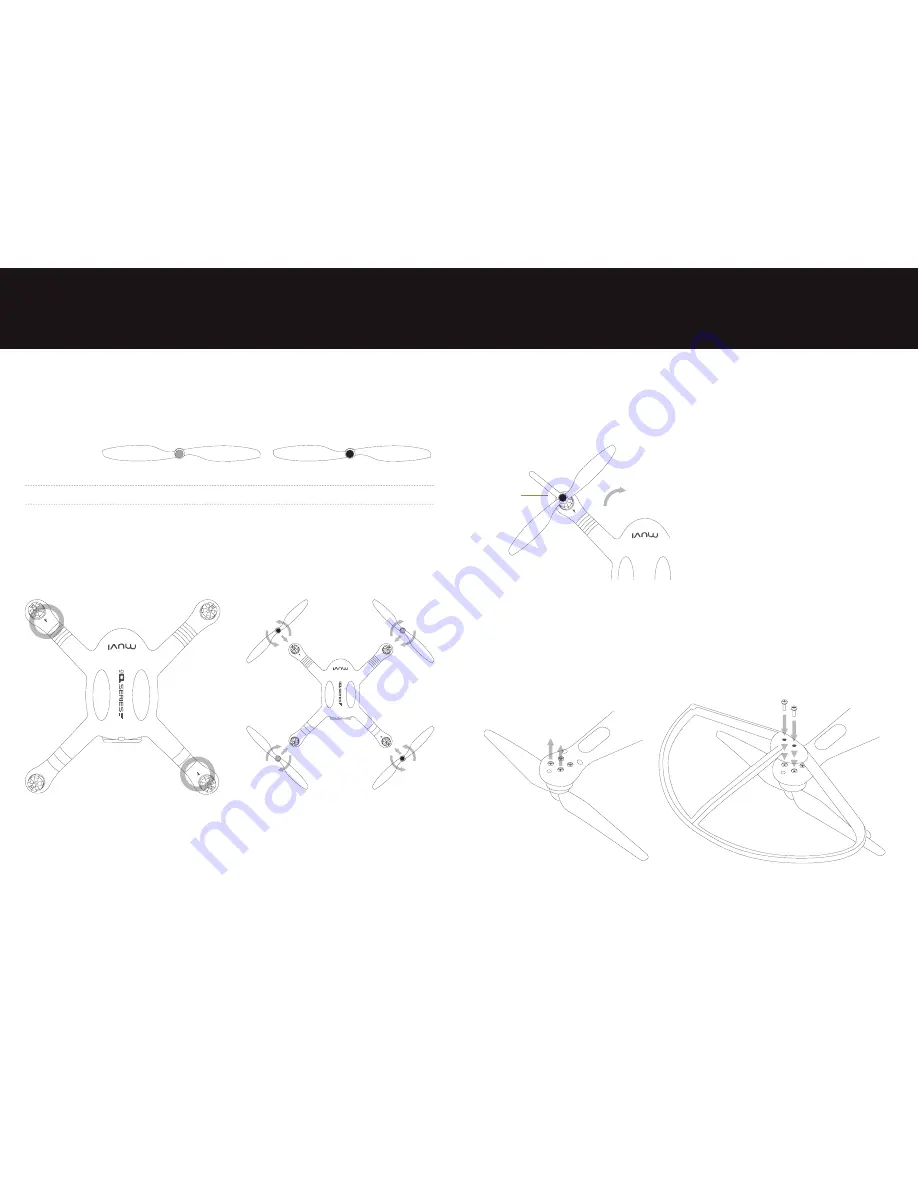
The Q-1 Drone uses 10 inch propellers, two with grey rotor blade caps and two with black 
rotor blade caps.

Propeller 

Grey 

Black

Lock


Turn clockwise to lock 

Turn anticlockwise to lock

Unlock


Turn anticlockwise to unlock 

Turn clockwise to unlock

4.1 Installing the propellers

Attach the propellers with the grey caps to the motor shafts without 

“P”

 marks and attach 

the propellers with the black caps to the motor shafts with 

“P”

 marks (circled below). 

Tighten the propellers as per the lock direction (see above).

PLEASE NOTE: 

the propellers are designed for automatic turning; therefore do not tighten 

excessively during installation.

4.2 Removing the propellers

Whilst holding the motor with your hand or the supplied wrench, hold and rotate the 
propeller in the unlocking direction (see below).  

4.3 Precautions

   Before each flight, check that the propellers  

are correctly and firmly installed.

   Ensure all propellers are intact before each 

flight.

   Keep your distance from rotating propellers  

and the motors to avoid cuts and injury.

   Only use propellers that have been provided  

by Veho to ensure optimal performance.

4.4 Propeller Guards

You can protect your Q-1 Drone’s propellers from being damaged during flights by installing 
the propeller guards. To install a propeller guard remove the two M3x8 screws at the end of 
each motor, then place the propeller guard in position and attach using the M3x12 screws 
provided. Tighten the screws as required. Please keep the M3x8 screws in a safe place and 
replace when not using the propeller guards.

4. Q-1 Drone propellers

Unlock direction

Wrench

Summary of Contents for MUVI Q-1

Page 1: ...User Manual VQD 002 Q1...

Page 2: ...ons 5 2 Return to home button 5 3 Switching on the controller 5 4 Controller antenna 5 5 Controller operating instructions 5 6 Pairing the controller and the Q 1 Drone s receiver 6 Flying the Q 1 Seri...

Page 3: ...rds x4 4 Controller x1 5 Camera Clip x1 6 Smartphone Mount x1 7 Q 1 Drone Battery x1 8 Q 1 Drone Battery Charger x1 9 Tool Set Screwdriver and Wrench x1 10 Follow Me Watch Charger x1 11 M3x12 Screws x...

Page 4: ...one is switched off insert the battery into the battery compartment on the Q 1 Drone and lock the battery into position If the battery lock is not fastened the battery may not connect correctly which...

Page 5: ...ndicator Low battery alarm level 1 Slow flash 1s on 1s off Slow flash 1s on 1s off N A Low battery alarm level 2 Flash twice every second Flash twice every second N A Barometer abnormal state Solid on...

Page 6: ...your hand or the supplied wrench hold and rotate the propeller in the unlocking direction see below 4 3 Precautions Before each flight check that the propellers are correctly and firmly installed Ensu...

Page 7: ...Switching on the controller Insert 4 AA batteries not provided into the battery compartment as per positive and negative directions Ensure that the two joysticks are in the centre position Push switc...

Page 8: ...na and the Q 1 Drone receiver antenna please keep the controller antenna pointing towards the sky and ensure that there are no obstacles between the controller antenna and the Q 1 Drone receiver You m...

Page 9: ...tacles in its path while it is in failsafe mode 17 In GPS mode when both joysticks are in the neutral centre position the Q 1 Drone will hover at a fixed point In normal mode when all joysticks are in...

Page 10: ...even flight failure Regular calibration is required for optimum performance Do not calibrate the compass in a strong magnetic field Do not carry ferromagnetic material such as keys mobile phones etc...

Page 11: ...or IMPORTANT Do not stop the motor during flight or else the Q 1 Drone will crash 6 3 Basic flight 1 Place the Q 1 Drone on flat open ground and ensure that the tail indicator faces toward you 2 Turn...

Page 12: ...n automatically land PLEASE NOTE The Q 1 Drone cannot automatically avoid obstacles in its path while it is in failsafe mode 23 6 5 How to regain control on the controller If the Q 1 Drone is out of c...

Page 13: ...ush the tracker out of the silicone watch and place it in the charging cradle Charge the tracker until the red indicator turns solid 7 2 Indicators on the tracker Status Red Indicator Green Indicator...

Page 14: ...the subject 27 8 1 Remote control The remote control may need calibrating if you cannot start the motor using the CJC 1 Put switch two S2 in the down position and then turn on the remote control 2 Th...

Page 15: ...h the joysticks inwards and down as shown until the 4 LEDs under the drone turn off then return the joysticks to their centre positions When the four arm lights on the Q 1 Drone turn on again place th...

Page 16: ...n When the four arm lights on the Q 1 Drone turn on again lean the four arms of the Q 1 Drone against a wall with the nose facing upwards to make it perpendicular to the ground Toggle both joysticks o...

Page 17: ...lashes quickly Put switch 4 to the NRM position Toggle both joysticks together moving them up and outwards as show until the rear lights the Q 1 Drone start flashing slowly and then return the joystic...

Page 18: ...Descend 4 m s 13 12ft s Maximum flight speed 20m s 65 62ft s not recommended Wheelbase 450mm 1 48ft Flight time 20 minutes Controller Data transfer distance 700m 2296ft Battery life 20 hours Operating...

Page 19: ...veho muvi com...

Reviews: