background image

7

1.5. SAFETY

This chair is CE marked and com-
plies with applicable EU regulations. 
The chair is manufactured by: 
VELA, Gøteborgvej 8-12, 
9200 Aalborg SV, Denmark.

The VELA Tango 500/510 with 
electrical functions meets all safe-
ty requirements according to IEC 
60601-1, including requirements for 
EMC according to IEC60601-1-2.

1.5.1. APPLICATION

This chair is an indoor chair 
intended for sitting and private use.

::

  The chair is not built to stand on

::

  The wheel brake must always be 

activated when sitting down or 
standing up

All variants of this chair are tested 
and approved for a maximum load 
of 160 kg.

IN GENERAL

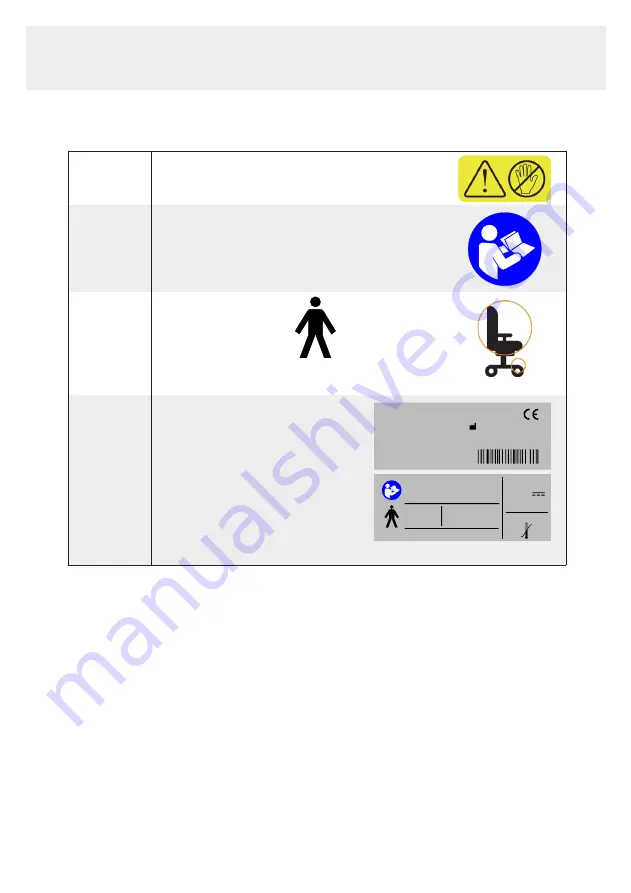
1.4. LABELS USED ON THE CHAIR

Warning 

Risk of shear and squeeze:
Keep hands and fingers away from moving parts

Icon 

Read ”Instruction For Use” before use

Icon 

Part used: 
Type B cf. IEC60601-1 
covering the following areas of the chair: 

Labels 

60 x 22.5 mm

This label only  applies to 
chairs with electrical functions:
The chair is IP21 approved, 
which corresponds to protection against 
water droplets as well as against touching dangerous parts with a finger.

Labels on the chair should be read at a distance of approx. 40 cm under normal 
daylight conditions. 
For labels related to the operation of the chair, please refer to section 2.0.

IdentNo.:

<Model name>

<Model ref no.>
<Manufacturer>
<Adress>
<Webpage>

<IdentNo.>

<Safe Working load>

<Production date/order no.>

<ME Equipment mass>

Follow instructions

for use

IP21

EN60601-1

Blade fuse: 10A/32V,  

0.5A

Input:
24V

Duty cycle: 10%, 
max. 2min/18min Storage limits 

-20°C 

60°C 

Summary of Contents for Tango 500

Page 1: ...VELA Tango VELA Tango 500 VELA Tango 500El VELA Tango 510El VELA Tango 510 500 500EL 510 510EL VERSION I N S T R U C T I O N F O R U S E E N Manual no 105234...

Page 2: ...ckrest 10 2 0 2 Height adjustment VELA Tango El 10 2 0 3 Height adjustment VELA Tango 10 2 0 4 Setting angle of seat 11 2 0 5 Setting angle of backrest 11 2 0 6 Adjusting lumbar support ALB back 11 2...

Page 3: ...g your chair Important Please read this user manual carefully and keep it safe for when you need to refer to it This manual is also available on VELA s website www vela eu where you can also find othe...

Page 4: ...n it Use Never use the electric height adjustment for more than two minutes at a time Use In the event of an electrical error or unintentional height adjustment push both of the buttons for height adj...

Page 5: ...If this does not work the gas cartridge is defective and should be replaced Contact your VELA supplier The brake function does not work The brake is not activated See section 2 0 13 2 0 18 or 2 0 21 T...

Page 6: ...d to the following specifications Emission class CISPR 11 Group 1 Class B See more details at www vela eu 1 3 3 SURGE PROTECTION A fuse is installed on the chair which secures the chair against power...

Page 7: ...sk of shear and squeeze Keep hands and fingers away from moving parts Icon Read Instruction For Use before use Icon Part used Type B cf IEC60601 1 covering the following areas of the chair Labels 60 x...

Page 8: ...has been made directly with VELA this applies VELA assumes no liability for damages to the product or the user caused by Transportation Misuse Normal wear and tear Wrong use Use of spare parts and acc...

Page 9: ...parts 1 9 RECYCLING AND DISPOSAL This product contains recyclable materials Therefore the product must be disposed of in accord ance with local regulations and not together with ordinary household was...

Page 10: ...d continuously for one minute then a nine minute break should follow 2 0 3 HEIGHT ADJUSTMENT VELA TANGO Adjusted by pulling up the front handle on the right hand side 2 0 SETTINGS The gas spring and t...

Page 11: ...5 SETTING ANGLE OF BACKREST Adjusted by pulling up the rear handle on the right hand side The handle is pressed down to lock the desired back angle 2 0 6 ADJUSTING LUMBAR SUPPORT ALB BACK The backrest...

Page 12: ...USTING THE ARMREST WIDTH Adjusted by loosening the screw under the seat on the seat support and adjusting the armrest width by pulling out the armrest Remember to tighten the screw when done 2 0 9 ADJ...

Page 13: ...soon as possible Note The chair should not be used during charging 2 0 12 ROTATION The seat is rotated by pushing back on the front handle on the left hand side Rotation can be turned and locked in t...

Page 14: ...ews This is also where the depth is adjusted The height is adjusted by pressing the two buttons on the side of the bracket while the handle is positioned at the desired height 2 0 19 ANGLE SWITCH OPTI...

Page 15: ...g in hand box to operate functions 2 0 21 ELECTRIC BRAKING OPTIONAL On a VELA Tango with electric brake the brake is activated and deactivated using the hand box or angle switch The brake is hydraulic...

Page 16: ...701 338 3 Vermund Larsen A S VELA G teborgvej 8 12 DK 9200 Aalborg SV Tlf 45 96 34 76 00 mail vela dk www vela eu...

Reviews: