background image

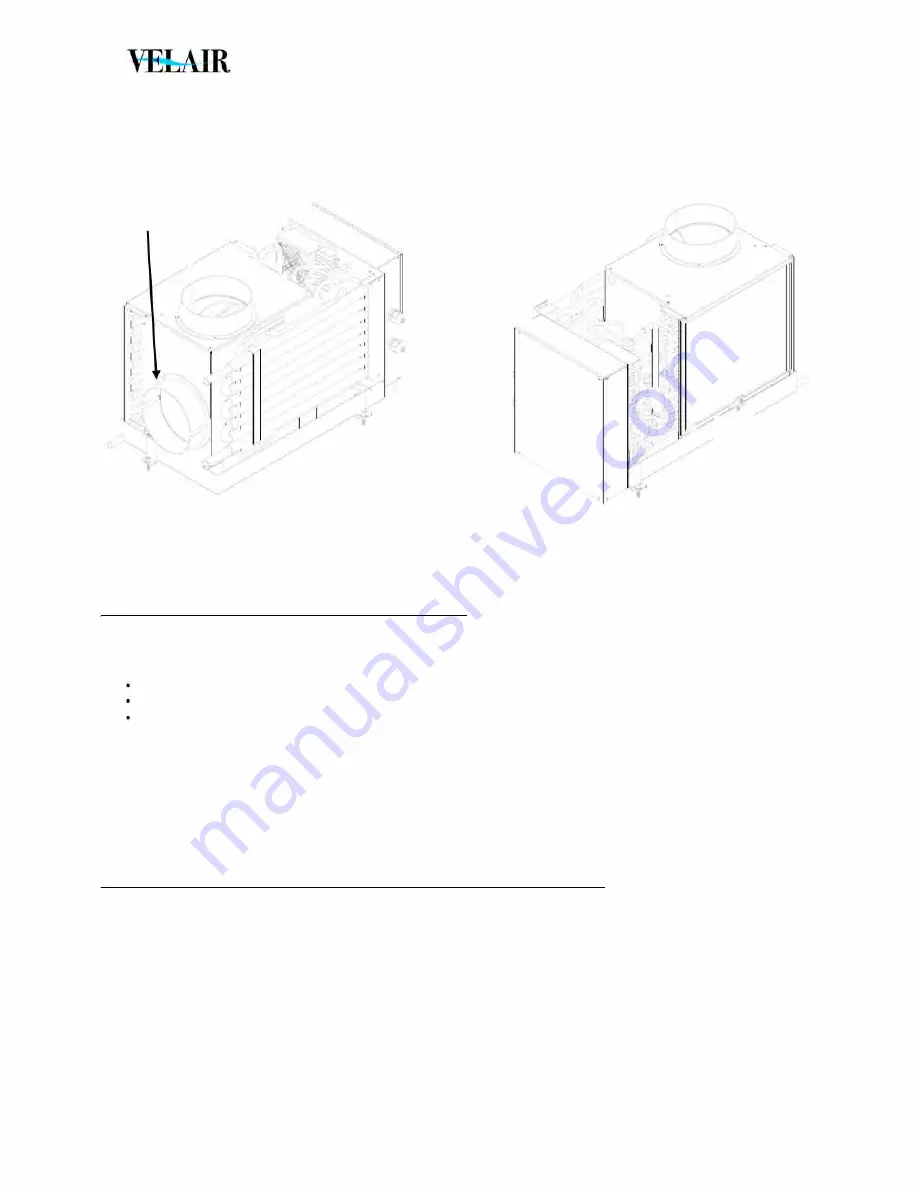
5.1.2  AIRDUCTS  CONNECTION 

Outlets 

,

/

\

I

• 

:'4,1 

11 

1

1

I

1

LIII

11

Il 

I ..

I

I '

I

1

1

.. 

-

l

1: 

.

� 

• 

I

• 

,

·

· 

I. 

. , 1 

l

./ 

., 

-�,I

-

1, 

/.1 

1

1

JI 

11,-

I' 

./ 

1

1  I 

l

'I 

1\J

11

li 

� 

Electrical box 

I

1

11, 

I

l

1111 

i

j[ 

. '  I 

I • 

'.

1

.

1

11

1

· 

:\ ;i 

1· 

I. 

I  .,. 

1: 

ti'. 

I/  1'···. 

11  '' 

\. 

.

I

� 

<I 

11 

I.. 

� 

(, 

Air suction 

Air filter 

IMPORTANTI  Both outlet fittings can be ducted allowing the highest air flow rate, however in case of 
restricted  space for installation,  only one outlet can be ducted while the other shall be closed. 
For Compact i27 VSD at least two outlets must be used. 

The diameter of the ducts should not be less than the diameter of the outlet nozzles. 

SELF CONTAINED  Compact il O VSD  (up to  10.000 BTU/h)  ducts diameter  125mm 

SELF CONTAINED  Compact il 6 VSD (up to  16.000 BTU/h)  ducts diameter  150mm 

SELF CONTAINED  Compact i27 VSD (up to 27.000 BTU/h)  ducts diameter  150mm 

Compact il O VSD: 125 => 150 mm flange subsHtution 

The  Compact  il0  VSD  can work at its maximum  performance with one  duct  only using  the  size  150mm,  to  do 
that  the  horizontal  125  mm  flange  must  be  dismounted  and  substituted  with  the  150mm  flange  supplied  with 
the unit. The top outlet can be closed with the supplied  120mm stopper. 

In case of use with a  120mm duct only,  the unit has a  10% performance loss. 

lnstruction manual 

Pag. 13 of 28 

Date 2019-12-20 

Summary of Contents for Compact i10 VSD

Page 1: ...VEb AIR INSTRUCTION MANUAL Air Conditioning System SELF CONTAlNED UNIT INVERTER VSD Technology ID DICI 111 VII ID DICI 118 VII ID IICI 121 VII ID DICI 121 VII I...

Page 2: ...1 3 RESPONSIBILITY 8 5 0 INSTALLATION 8 5 1 1 HYDRAULIC CONNECTIONS 10 5 1 2 AIR DUCTS CONNECTION 13 5 1 3 ELECTRICAL CONNECTION 16 5 1 4 THERMOSTAT BULBS 17 6 0 OPERATING 18 6 1 1 ALARMS and troubles...

Page 3: ...essential features described in this manual r1 I 1 0 INTRODUCTION This manual has been prepared with the aim to give you all the explanations to be able to properly install the unit SELF CONTAINED Com...

Page 4: ...g and installation of the unit the lifting handles must be used in order to avoid possible damages to the gas piping circuit Any damage to the gas piping circuit due to a wrong handling of the unit wi...

Page 5: ...an the one necessary tor operating a traditional ON OFF air conditioning Energy Savlng 40 50 reduction in electrical demand As the air temperature approaches the set point value the inverter contrai r...

Page 6: ...s the compressor capacity adapting to changes in the thermal load and it allows to keep the air temperature stable always near the Set Point value w ithout sharp fluctuations Thanks to the Brushless D...

Page 7: ...ng equipment may be dangerous because within these devices there are pressurized refrigerant gas and electrical devices Therefore the installation initial start up and subsequent maintenance must be c...

Page 8: ...t dispose abandon or leave within the reach of children the packaging materiai because it can be a potential source of danger lt is forbidden to use refrigerant and w ater pipes far grounding the unit...

Page 9: ...of guarantee and liability for damage caused to people animals or things IMPORTANTI The appliance must be installed in a protected area and in such a way that the accessibility to the unit is possible...

Page 10: ...T The minimum nominai diameter of the connecting pipes should be 1 2 lf the pump is not self priming the through hull inlet must be oriented forw ard in order to have the boot speed helping the primin...

Page 11: ...MPED SEA WATER OUTLET SEA WATER OUTLET The sea water electric pump is needed to circuiate the amount of water required in the heat exchanger This pump is normally centrifugai type and not self priming...

Page 12: ...each hydraulic connection is provided w ith the respective shut off valve DRAIN The air treatment involves the separation of condensate w ater from humidity of air treated This condensate must be disc...

Page 13: ...e ducts should not be less than the diameter of the outlet nozzles SELF CONTAINED Compact ilO VSD up to 10 000 BTU h ducts diameter 125mm SELF CONTAINED Compact il6 VSD up to 16 000 BTU h ducts diamet...

Page 14: ...tem need a correct air flow in order to work efficiently lt 1s therefore important to get the correct distribution without bottlenecks by maintaining the originai nozzle diameter and not exceeding the...

Page 15: ...O F i C c uv wl OJ d l NO A v OSTACtl ATA NO N WDID d wiN tod I I I NO ASAAAZOE MA OSTACCLATA N0 1 tteobstnded I I I NO Tl 8AZDE IRA FLESSBLE SENZA ISQ NENTO NO Flo1t M cit hOlo wltoJ i eJclbl NO TUBf...

Page 16: ...n the self contained unit however in case of limited space during installation it can be detached by 3 screws and fixed elsewhere at a max distance of 0 6 m lt must be installed inside a space provide...

Page 17: ...5 1 4 THERMOSTA T BULBS A thermostat bulb is fixed to the drain pan through a bracket and locateci near the unit air suction o lnstruction manual Pag 17 of 28 Date 2019 12 20...

Page 18: ...at source The set point temperature and real value are shown on the thermostat display ON OFF dlil il DISPLAY oo lllll I 111 r 1 l 1 111 The room thermostat has to be connected with the PCB through th...

Page 19: ...LIMITS The unit operates correctly within the following ranges Summer cooling mode 15 C sea water temperature 40 C Winter heating mode 5 C sea water temperature 20 C Should working conditions be out o...

Page 20: ...from defects for 90 days after repair replace or the remainder of the originai warranty whichever is longer 8 1 1 lnstallation Validation Commissioning The Uflex Marine Air Conditioning Products have...

Page 21: ...tor service 4 Check and reset circuit breakers and fuses before calling tor service 5 Keep the unit clean and free of dirt 6 Keep the condenser coil free of sediment and scale 7 Keep clean the air fi...

Page 22: ......

Page 23: ......

Page 24: ......

Page 25: ...ols that appear if heating or cooling is active When heating the symbol displays when the set point is higher than ambient temperature both are off when the set point is lower Whencooling thesymboldis...

Page 26: ......

Page 27: ......

Reviews: