background image

- 16 - 

Only push buttons connected to the Velbus via a push button interface or a control panel are appropriate for the procedure below. 
Each command can accept up to 14 different push buttons. Memorize he unique address of the module.  
 
The lamp will be switched off and the operation mode LED will blink very rapidly to indicate the learning mode. The LEDs of the 
learned push buttons will also blink very rapidly.  
 

You can add a specific push button 

by maintaining it pressed until the lamp lights up. When releasing the push button the lamp 

will switch off and the push button indication LED will blink very rapidly as a confirmation. If this does not work then the maximum 
amount of push buttons has been reached. 
 

To delete a learned push button

, maintain it pressed. When releasing the push button the indication LED will be turned off. You 

can delete all learned push buttons for a specific control group by maintaining the manual control on the dimmer module pressed 
until the lamp lights up. When releasing the manual control push button the lamp and the indication LEDs of all corresponding push 
buttons will turn off.  
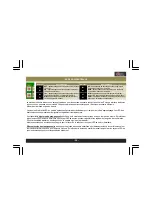
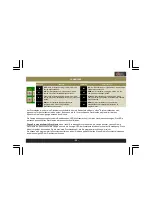
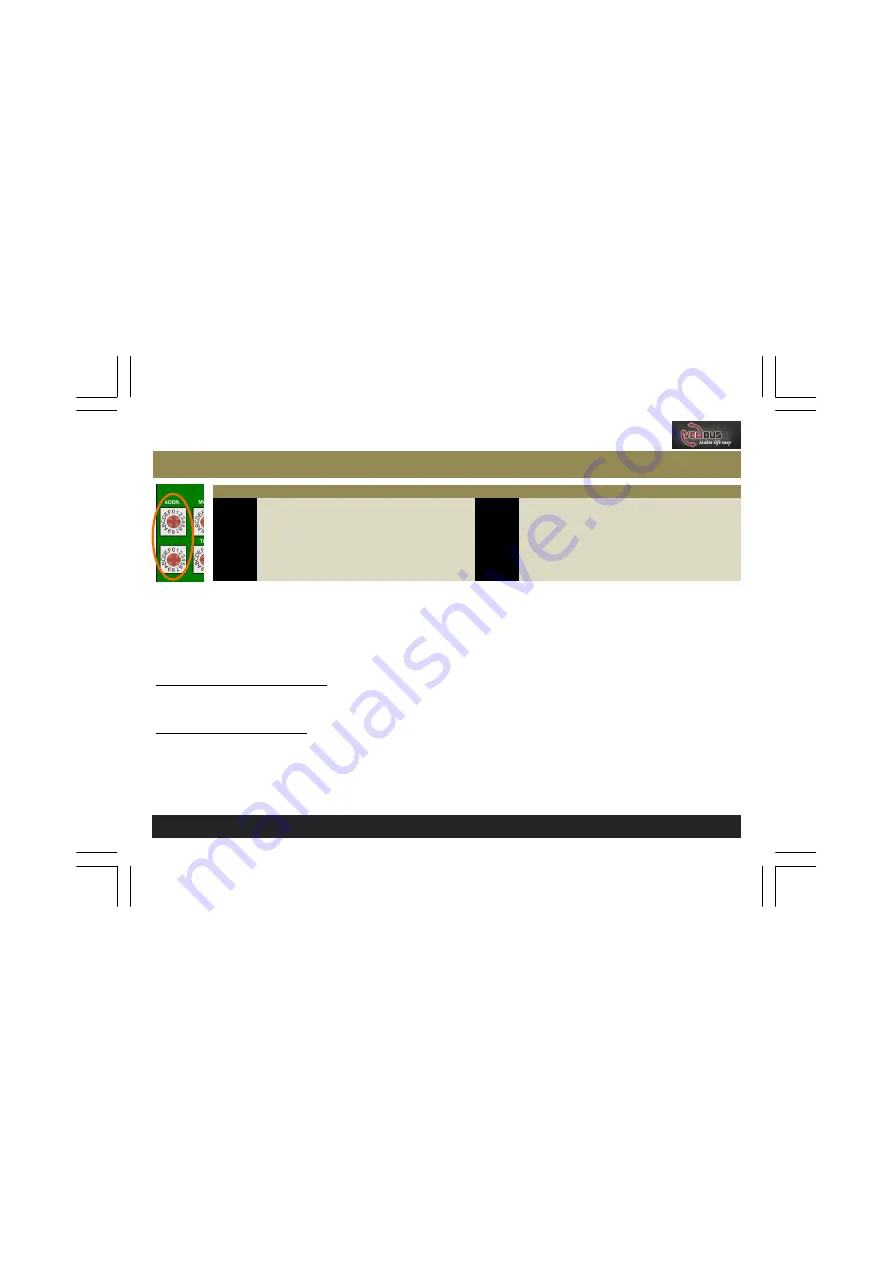
 

LEARNING MODE 

Address


Command


Address


Command


F1 

OFF: 

Learning push buttons switching off the lamp 

B1 

UP: 

Learning push buttons increasing the lamp’s 

intensity 

E1 

ON: 

Learning push buttons turning on the lamp to full 

intensity 

A1 

DWN: 

Learning push buttons decreasing the lamp’s 

intensity 

D1 

TGL: 

Learning push buttons turning on the lamp to 

full intensity or turning the lamp off 

91 

ATM: 

Learning push buttons turning on the lamp to  

a specific light intensity (atmosphere) 

C1 

DIM: 

Learning push buttons/sliders activating the set 

mode on the module 

81 

ADM: 

Lamp’s light intensity for corresponding  

atmosphere push buttons 

Summary of Contents for VMBDME

Page 1: ...0Hz Maximum load 200W 230V or 100W 115V 9 different operation modes 16 possible time settings Required power supply 12 18VDC Consumption 40mA Velbus Home Automation Choosing Velbus is choosing comfort...

Page 2: ...l control 12 Address 13 Mode 14 Time 15 Termination 0 7 Resistive capacitive load 8 F Inductive load Aansluitingen 1 Velbusvoeding 2 Velbus 3 Directe drukknopbediening 4 Aansluitpunt voor belasting 5...

Page 3: ...elastung 5 115VAC Anschluss 6 230VAC Anschluss LED Anzeige 7 Stromversorgung 8 Velbus Daten empfangen 9 Velbus Daten senden 10 Betriebsmodus DEUTSCH Einstellungen 11 manuelle Bedienung 12 Adresseneins...

Page 4: ...A1 B1 C1 D1 E1 F1 en FF R glage d adresse Attribuez une adresse unique de 00 FF except 81 91 A1 B1 C1 D1 E1 F1 et FF pour chaque module Adresseneinstellung Stellen Sie eine einzigartige Adresse f r j...

Page 5: ...son Placez le cavalier TERM uniquement dans un module connect au d but ou en fin de connexion Velbus Effacez le cavalier dans tous les autres modu les Remarque Placez uniquement un cavalier sur le der...

Page 6: ...6 USE WITH RESISTIVE LOAD GEBRUIK MET RESISTIEVE BELASTING UTILISATION AVEC CHARGE R SISTIVE ANWENDUNG MIT OHMSCHE BELASTUNG USO CON CARGA RESISTIVA H L VELBUS 12 18Vdc H L VELBUS 12 18Vdc N L 230VAC...

Page 7: ...c un variateur contr le de phase invers e Achtung Der elektronische Transformator muss thermisch gesch tzt kurzschlussgesch tzt sein und geeignet ist um die Lichtst rke ber einen Phasenabschnittdimmer...

Page 8: ...nsformateur sans charge peut endommager le variateur Achtung Der Transformator muss thermisch gesch tzt und kurzschlussgesch tzt sein Sorgen Sie daf r dass schon eine Lampe an den Transformator angesc...

Page 9: ...enung Control moment neo 1 5s 2 10s 3 15s 4 30s 5 1 6 2 7 5 8 10 9 15 A 30 B 1h C 2h D 5h E 1day 1dag 1jour 1 Tag 1d a F On Off Aan Uit Marche arr t Ein Aus Control arranque parada TIMESETTING TIJDSIN...

Page 10: ...a LED clignote rapidement tant que l intensit lumineuse de l ampoule change La LED clignote lentement lors du d lai de coupure La LED clignote tr s rapidement si le module variateur est en mode d appr...

Page 11: ...has elapsed the lamp will gradually turn off and will be completely switched off after 30 seconds Operating the push button while the lamp is on will restart the timer Bedienen van de drukknop doet de...

Page 12: ...irection After the set time has elapsed the lamp will turn off Kort drukken zal de lamp doen branden op de laatst gebruikte lichtsterkte Kort drukken wanneer de lamp reeds brandt zal de lamp uitschake...

Page 13: ...dimmer Variation allumage lent Langsam ein Dimmer Dimmer con encendido lento Operating the push button will turn on the lamp gradually The time needed for the lamp to burn at full intensity depends o...

Page 14: ...e Lampe sofort auf voller Lichtst rke brennen lassen 7 F Slow on off dimmer Langzaam aan uit dimmer Variateur allumage extinction lent Langsam ein aus Dimmer Dimmer con encendido apagado lento Operati...

Page 15: ...sitionn sur 0 et ceci malgr le mode de fonctionnement utilis Bref l ampoule est allum e aussi longtemps que le bouton poussoir est actionn Lorsque l interrupteur rotatif TIME est positionn sur F le mo...

Page 16: ...releasing the push button the indication LED will be turned off You can delete all learned push buttons for a specific control group by maintaining the manual control on the dimmer module pressed unt...

Page 17: ...ic setting to full intensity maintain the manual control on the dimmer module pressed until the lamp burns at full intensity When releasing the manual control push button the lamp and the indication L...

Page 18: ...n tot 14 verschillende drukknoppen aangeleerd worden per bedieningsfunctie Onthoud het unieke adres van de module De lamp wordt uitgeschakeld en de werkingsmode led zal nu zeer snel knipperen ter indi...

Page 19: ...laatsen houdt men de manuele bediening op de dimmermodule lang ingedrukt tot de lamp op volle lichtsterkte gaat branden Bij het loslaten van de manuele bedieningsdrukknop zullen de lamp en de indicati...

Page 20: ...ir ou un panneau de commande Chaque commande peut accepter jusqu 14 boutons poussoirs diff rents M morisez l adresse unique du module L ampoule s teint et la LED du mode d op ration clignotera tr s ra...

Page 21: ...au maximum maintenez enfonc le contr le manuel sur le module variateur jusqu ce que l ampoule br le au maximum En rel chant le bouton poussoir du contr le manuel l ampoule et les voyant LEDs de tous...

Page 22: ...en zu programmieren Nur Drucktasten die ber eine Drucktastenschnittstelle oder ein Bedienfeld mit dem Velbus System verbunden sind eignen sich f r das Verfahren siehe unten Es k nnen bis zu 14 verschi...

Page 23: ...m ssen Sie die entsprechende Drucktaste bet tigen bis die gew nschte Lichtst rke erreicht ist Um alle programmierten Einstellungen in Bezug auf Atmosph re auf das h chste Beleuchtungsniveau einzustel...

Page 24: ...ncionamiento introducido 81 ADM intensidad luminosa de la bombilla para los pulsadores de ambiente correspondientes El siguiente procedimiento s lo es apto para los pulsadores conectados al Velbus por...

Page 25: ...n bot n de ambiente maneje el pulsador correspondiente hasta que alcance la intensidad luminosa deseada Para poner el nivel de la intensidad luminosa de todos los ambientes en la posici n m x mantenga...

Page 26: ......

Page 27: ...VELLEMAN NV Legen Heirweg 33 9890 Gavere Belgium Europe www velbus eu...

Page 28: ...Modifications and typographical errors reserved Velleman nv HVMBDME 2010 ED1 5 4 1 0 3 2 9 4 4 2 7 0 5...

Reviews: