background image

INSTRUCTIONS - INSTRUCTIES - ANWEISUNGEN - INSTRUCCIONES

3i

PP090217

NL

  Lees de instructies aandachtig door voordat u 

verdergaat! Alle afbeeldingen zijn uitsluitend bedoeld 

ter illustratie en vormen mogelijk geen exacte 

weergave van het daadwerkelijke product.

FR

  Lire attentivement la totalité de la notice avant 

l’installation! L’appareil présenté sur cette image n’est 

qu’une simple illustration et n’est pas nécessairement 

une représentation fidèle du produit concerné.

EN

  Read installation instructions carefully before 

proceeding! The device used in this illustration is for 

illustration purposes only and may not accurately 

depict the actual product used.

DE

  Vor Montagebeginn bitte sorgfältig die gesamte 

Einbauanleitung lesen! Alle Abbildungen dienen 

ausschließlich der Illustration und zeigen nicht immer 

exakte Darstellungen Ihres Produkt.

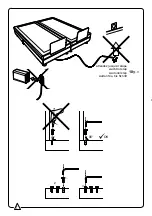
Indicatie: “richting hoofdzijde”

Een gaatje markeert de hoofdzijde van het bed.

Indication: « direction tête de lit »

Le petit trou marque la tête du lit.

Indication: “head side direction”

A small hole marks the head side of the bed.

“Richtung Kopfseite”

Ein kleines Loch markiert die Kopfseite.

!

Summary of Contents for 3i

Page 1: ...cern EN Read installation instructions carefully before proceeding The device used in this illustration is for illustration purposes only and may not accurately depict the actual product used DE Vor M...

Page 2: ...90 OK 1 3 2 attendez jusqu l tape wacht tot stap wait until step warten Sie bis Schritt 18 1 3...

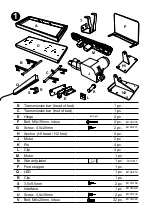
Page 3: ...otor 1 pc N Waranty label 1 pc T01CE11 P Foot stopper 1 pc Q LED 1 pc M13EP16 R Clip 1 pc S 3 5x9 5mm 2 pc M13SF09 T Interface 1 pc M13BH20 U Screw 4 5x30mm 2 pc M13SF30 V Bolt M6x20mm inbus 32 pc M13...

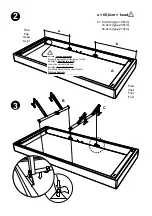
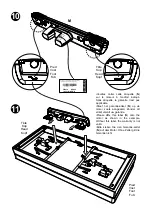
Page 4: ...pf Pied Voet Foot Fu Indicatie richting hoofdzijde Een gaatje markeert de hoofdzijde van het bed Indication direction t te de lit Le petit trou marque la t te du lit Indication head side direction A s...

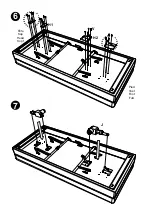
Page 5: ...D F G V E E V 4 5 T te Kop Head Kopf Pied Voet Foot Fu...

Page 6: ...6 7 J H2 H1 T te Kop Head Kopf Pied Voet Foot Fu V...

Page 7: ...8 suggestion de montage montage suggestie mounting suggestion Einbauvorschlag V K L 2 3 1...

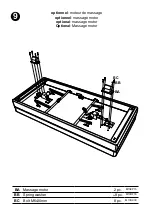
Page 8: ...9 BA BC BB optionnel moteur de massage optioneel massage motor optional massage motor Optional Massage motor BA Massage motor 2 pc M13EP15 BB Spring washer 2x8 pc M13RF18 BC Bolt M6x30mm 8 pc M13SC30...

Page 9: ...w garantie Please affix this label N onto the motor as shown in the example Without this label the warranty is not valid Bitte kleben Sie den Garantie zettel N auf dem Motor Ohne Zettel gilt die Garan...

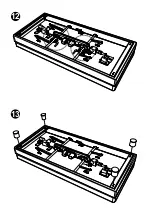
Page 10: ...12 13...

Page 11: ...14 R S Q Q T te Kop Head Kopf Q Q...

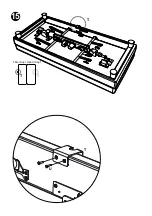
Page 12: ...15 T T U T te Kop Head Kopf T T...

Page 13: ...16 Pied Voet Foot Fu T te Kop Head Kopf...

Page 14: ...16 P T te Kop Head Kopf Pied Voet Foot Fu ou of or oder P V...

Page 15: ...ie de s curit 2x 9V 6R61 Entretien la batterie doit tre remplac e annuellement Noodbatterij 2x 9V 6R61 Onderhoud vervang jaarlijks de batterijen Emergency power supply 2x 9V 6R61 Maintenance replace b...

Page 16: ...s le contact avec un moteur 1 3 Branchez le moteur au courant dans les 15 secondes 1 4 Un Bip vous confirmera le branchement du de la commande distance au moteur Sur l cran appara t le petit message M...

Page 17: ...ken met een motor 1 3 Sluit nu de motor binnen de 15 seconden aan op het stroomnet 1 4 Een pieptoon bevestigt zodra de handbediening gekoppeld is aan de motor Op het scherm verschijnt kort de tekst MA...

Page 18: ...contact with an engine 1 3 Connect the motor to the mains within 15 seconds 1 4 A signal confirms the control is connected to the engine On the screen the letters MA appear 1 5 Repeat this procedure f...

Page 19: ...fzunehmen 1 3 Schlie en Sie innerhalb von 15 Sekunden den Motor am Stromnetz an 1 4 Mit einem Beepton best tigt die Handbedienung die Verbindung mit dem Motor Auf dem Display erscheint kurz den Text M...

Page 20: ...M1 M2 M3 S A D G H I J K R X S T U V W L M N O P Q B E C F...

Page 21: ...our allumer la lampe led de la commande distance Vous trouverez une description d taill e des diff rentes fonctions sur notre site web http download velda net manual g05if3i BEKNOPTE UITLEG HANDBEDIEN...

Page 22: ...M1 M2 M3 S A D G H I J K R X S T U V W L M N O P Q B E C F...

Page 23: ...e Taste zum Dimmen eingedr ckt halten I Taschenlampe Eingedr ckt halten damit das Led der Handbedienung einschaltet Eine ausf hrliche Funktionsbeschreibung finden Sie auf der Website http download vel...

Page 24: ......

Reviews: