CAMCOLVC11
21.09.2010
4
©Velleman
nv
•
comes
with
USB
cable
4.
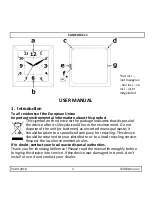
Overview
Refer
to
the
illustration
on
page
2
of
this
manual.
CAMCOLVC11
d
snapshot/status/motion
button
a
camera
lens
e
clock
adjustment
knob
b
status
LEDs
f
micro
SD
card
slot
c
on/off/record button
g
Mini
‐
B
USB
port
5.
Operation
Charging
•
Charge
the
battery
completely
before
using
the
camera.
To
do
this,
connect
the
USB
port
[g]
to
a
powered
USB
port
using
the
included
cable.
The
status
LED
[b]
turns
green
and
red
(red
LED
flashes
slowly).
•
When
the
battery
is
full,
only
the
green
LED
remains
on.
Note:
to
properly
condition
the
battery,
make
sure
the
first
5
cycles
the
battery
is
completely
depleted
and
fully
charged
again.
Maintain
charging
for
another
hour
after
red
LED
stopped
flashing.
After
these
5
full
cycles,
the
battery
may
be
used
and
charged
at
any
time.
Setting
the
time/date
•
Set
the
right
time
on
the
clock
using
the
clock
adjustment
knob
[e]
.
Gently
pull
the
knob
out
(±1mm)
and
rotate
to
move
the
hands.
Push
the
knob
back
in
the
housing
when
the
hands
indicate
the
current
time.
•
Set
the
internal
system
date
and
time.
This
is
the
time/date
stamp
that
will
be
used
on
the
recorded
files.
To
do
this,
connect
the
USB
port
[g]
to
a
running
PC
using
the
included
cable.
The
PC
will
recognize
the
CAMCOLVC11
as
a
removable
disk.
On
the
main
directory,
create
a
text
document
(right
click
Ö
new
Ö
Text
Document).
Set
the
name
to:
time.txt
(lowercase!).
Open
the
new
document
and
enter
date
and
time.
Format:
2010.07.23
09:14:33
(year.month.date{space}hour:minutes:seconds)


