background image

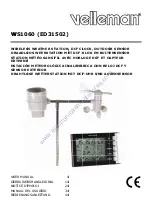
 WS1060 

V. 02 – 24/05/2012 

©Velleman nv 

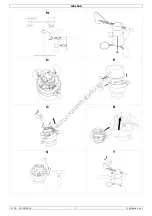
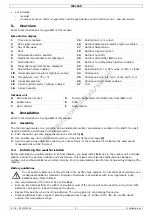
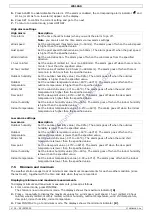
Installing batteries in the outdoor unit 
1.


At the bottom side of the rain collector, loosen the screw and slide the metal catch sideways to free the 
battery compartment [G]

2.


Pull out the battery compartment [H]

3.


Insert 2 x AA 1.5V LR6 batteries according to the polarity markings in the compartment [I]

4.


Push the battery compartment back into the rain collector base [J]

The LED located at the back of the rain collector lights during 4 seconds. If not, check if the batteries are 

inserted properly. 

5.


Slide the metal catch back in position to secure the battery compartment, and fasten the catch with the 

screw. 

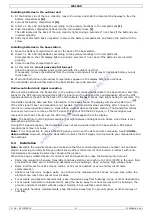
Installing batteries in the base station 
1.


Open the battery compartment cover at the back of the base station. 

2.


Insert 3 x AA 1.5V LR6 batteries according to the polarity markings in the compartment. 

All segments on the LCD display light up during 2 seconds. If not, check if the batteries are inserted 

properly. 

3.


Close the battery compartment cover. 

4.


At this moment, do not press any buttons yet.  

Allow the device to initialise and synchronise with the outdoor unit first. 
If necessary, remove the batteries from the indoor unit and wait for at least 10 seconds before you put 

them back in. 

5.


Wait until both indoor and outdoor temperatures appear on the display before you continue. 

The transmitter sends weather data to the base station every 48 seconds. 

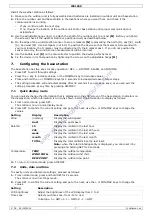
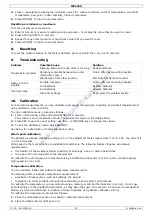
Radio-controlled clock signal reception 
After inserting batteries, the transmitter in the outdoor unit sends weather data to the base station, and then 

scans for the DCF radio-controlled clock (RCC) signal to set the date and time automatically. When the DCF 
signal is detected, the LED at the back of the rain collector flashes 5 times, then lights during 20 seconds. The 

transmitter sends the date and time information to the base station. The display will show the RCC icon 

.  

If the DCF signal is poor and reception is not possible, the transmitter stops searching after 1 minute, and 

returns to normal operating mode (= transmitting weather data to the base station). The transmitter retries 

once every two hours to receive the DCF signal. If it cannot find the DCF signal, or if the last signal was 

received more than 12 hours ago, the RCC icon 

 will disappear from the display. 

Note: The best time for DCF signal reception is at night between midnight and 6:00am, when there is less 

atmospheric interference. 
During DCF signal reception, the transmitter does not send weather data to the base station. DCF signal 

reception lasts max. 5 minutes. 
Note: if it is not possible to receive the DCF signal, you can set the date and time manually. See 7.2 Units, 
date and time
. However, when the transmitter receives the DCF signal, it will overwrite your manual date and 

time settings. 

6.3


Installation 

Note: Assemble the weather station and make sure that the communication between outdoor unit and base 

station is working correctly before you install the weather station into its final location. Problems with radio 

transmission can usually be solved by changing the location. 
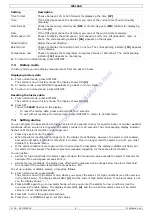
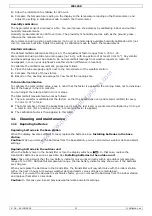
When choosing a suitable location for outdoor unit and base station, take the following into account: 


Radio communication between transmitter and base station can reach up to 100m (330ft) in the open field, 

provided that there are no interfering obstacles such as buildings, trees, vehicles, high voltage lines… 


Radio interference from PC screens, radios, or TV sets can disturb or even entirely cut off radio 
communication. 


Shelters such as trees, hedges, walls… can influence the measurements. Choose an open area where the 

elements can reach the sensors from all sides. 


For accurate wind speed measurements, keep the device away from buildings, trees, or other obstructions. 


For accurate temperature measurements, keep the device away from heat sources such as buildings, the 

ground, and direct sunlight without proper shielding in hot weather environments. 


For accurate humidity measurements, keep the device away from the ground, grass, or other sources of 
humidity. 

www.electronicaembajadores.com

Summary of Contents for ED31502

Page 1: ...WET UAL RSHANDL EMPLOI EL USUAR GSANLEIT THER ST ERSTAT O SANS F OROLÓG OR TTERSTA LEIDING RIO TUNG TATION TION ME FIL AVE GICA IN ATION M 4 14 24 34 44 DCF CL ET DCF EC HORL NALÁMB MIT DCF 4 4 4 4 4 LOCK O KLOK E LOGE DC BRICA CO F UHR U OUTDOO N BUITE CF ET CA ON REL UND AU OR SENS ENSENS APTEUR OJ DCF ßENSEN SOR SOR R Y NSOR w w w e l e c t r o n i c a e m b a j a d o r e s c o m ...

Page 2: ...2 2 Velleman nv Base station Basistation Station de base Estación de base Basisstation Outdoor unit Buitenstation Station extérieure Unidad exterior Außengerät G H I J w w w e l e c t r o n i c a e m b a j a d o r e s c o m ...

Page 3: ...WS1060 V 02 24 05 2012 3 Velleman nv M O P Q R S T w w w e l e c t r o n i c a e m b a j a d o r e s c o m ...

Page 4: ... splay tanding eception USE nion tion about t r the packag ot dispose o zed compan cling service ocal waste ase read the on t install or children and d Quality W Keep the dis way from du from shocks ions of the d forbidden fo warranty ed purpose U ertain guidel y for any en nce measuring y RF receptio fall RF recep s 1 hour 2 s along with ots Beaufort tions ature humid rolled time a WS1060 4 R MAN...

Page 5: ... a typical op ure range grometer w of this manu splayed played low enabled enabled D E F of this manu r and wind d anemometer mometer s ste the screw o e they can m station n its final loc nd synchron ng correctly r throw them line Dispos n ize and volta door and out mage the de g batteries perating tem WS1060 5 wind speed se ual 15 16 17 18 19 20 21 22 23 24 25 26 27 Thermo h Shaft Anemome ual di...

Page 6: ... the transmitter stops searching after 1 minute and returns to normal operating mode transmitting weather data to the base station The transmitter retries once every two hours to receive the DCF signal If it cannot find the DCF signal or if the last signal was received more than 12 hours ago the RCC icon will disappear from the display Note The best time for DCF signal reception is at night betwee...

Page 7: ...ps The setting procedure will end automatically after 30 seconds if you press no keys or you can exit the setting procedure at any time by pressing HISTORY 7 1 Quick display mode You can quickly change the information that is displayed on the LCD screen of the base station Indicators on the display show which information is currently shown Select the information to display as follows 1 From normal...

Page 8: ...ogram the base station to trigger an alarm at a specific time or for specific indoor or outdoor weather conditions When an alarm is triggered the alarm sounds for 120 seconds The corresponding display indicator flashes until the alarm condition is no longer met Press any key to mute the alarm When the alarm condition is no longer met the display stops flashing However the alarm is still enabled an...

Page 9: ...r humidity value 1 99 The alarm goes off when the indoor humidity is higher than the specified value Indoor temperature Set the indoor temperature value 9 9 C 60 C The alarm goes off when the indoor temperature is higher than the specified value Low alarm settings Low alarm Description Outdoor humidity Set the outdoor humidity value 1 99 The alarm goes off when the outdoor humidity is lower than t...

Page 10: ... station is now in calibration mode The wind factor digits on the display flash 2 Press SET to go to the next setting use the or MIN MAX keys to change the values 3 To exit the calibration mode press HISTORY See below for a description of each calibration setting Wind speed calibration The default wind speed calibration setting is 1 0 The adjustment factor ranges from 0 75 to 1 25 You can set it i...

Page 11: ...n the rain collector You can adjust the total rainfall in 0 3 mm steps The total rainfall measurement works as follows 1 The rain collector is calibrated at the factory so that the bucket tips over and records rainfall for every 0 3 mm 0 01 of rain 2 The total number of times the bucket tips over since the last reset is counted and multiplied by 0 3 to get a total in mm For a reading in inches a c...

Page 12: ...tly off the shaft 3 Slide the new sensor unit on the shaft and fix it with the screw 4 Reconnect the data cable 5 On the edge of the wind direction sensor there are markers N representing the north N east E south S and west W Use a compass not incl to position the device so that the markers correspond with your real location the N marker must be directed north the E marker east If you do not posit...

Page 13: ...s only Velleman nv cannot be held responsible in the event of damage or injury resulted from incorrect use of this device For more info concerning this product and the latest version of this manual please visit our website www velleman eu The information in this manual is subject to change without prior notice COPYRIGHT NOTICE The copyright to this manual is owned by Velleman nv All worldwide righ...

Page 14: ...nd RUIKER pese Unie reffende dit f de verpakk hade kan toe ne huishoud e U moet di atselijke milie plaatselijke handleiding g alleer het da s kinderen en n n kwaliteit enkel binn of en extrem hokken Ver stel kennen n wijziginge rantie or het gemaa e door het ne d afwijzen vo dere raadple htigheidsgra igheid via RF en neerslag week maa met tijdstip nopen of Bea htingen chtigheid ge uurde tijd WS106...

Page 15: ...ingestel D E F 2 3 van dez ndrichtingme stang van d ev om de m voor dat ze v arde van de en tieve plaats t n om een go mmunicatie v boren of in h aatselijke m uiste formaa nen en buite nnen lekken WS1060 15 nemometer ze handleidin 15 16 17 18 19 20 21 22 23 eld 24 25 26 d 27 Thermo h Metalen s Anemome ze handleidin eter zijn al g de anemome moer aan de vrij kunnen b windsnelhei te installeren oede...

Page 16: ...et DCF signaal knippert de led aan de achterzijde van de regencollector 5 keer en licht daarna gedurende 20 seconden op De zender stuurt de tijdsgegevens naar het basisstation Op het scherm verschijnt het RCC icoontje Wanneer er een zwak of geen DCF signaal gevonden is dan stopt de zender met zoeken na 1 minuut en keert terug naar een normale werkingsmodus weersinformatie doorsturen naar het basis...

Page 17: ... M 7 Het basisstation programmeren Het basisstation is voorzien van 5 toetsen voor een gemakkelijke bediening SET HISTORY ALARM en MIN MAX Druk op SET om door de instellingen te scrollen Druk op om waarden te verhogen of druk op MIN MAX om de waarden te verlagen Houd of MIN MAX ingedrukt gedurende 2 seconden om met grotere intervallen te verhogen verlagen De instellingprocedure stopt automatisch n...

Page 18: ...iekmodus In historiekmodus worden metingen van de voorbije 24u weergegeven Historiek weergeven 1 In normale weergavemodus druk op HISTORY Het station is nu in historiekmodus Op het scherm verschijnt HIS 3 2 In historiekmodus druk meermaals op MIN MAX om terug te keren in intervallen van 3u 3 Om terug te keren naar de normale weergavemodus druk op HISTORY Historiek resetten 1 In normale weergavemod...

Page 19: ...oger is dan de ingestelde waarde Windrichting Stel de windrichting in Het alarm gaat af wanneer de wind komt van de ingestelde windrichting 1u neerslag Stel de waarde in van 1u neerslag 0 999 9mm Het alarm gaat af waneer er meer neerslag valt in 1u dan de ingestelde waarde 24u neerslag Stel de waarde in van 24u neerslag 0 999 9mm Het alarm gaat af wanneer er meer neerslag valt in 24u dan de ingest...

Page 20: ...nimum of maximumwaarde te resetten 1 Ga in minimum en maximummodus en druk op om de waarde die u wilt resetten weer te geven 2 Houd SET ingedrukt gedurende 3 seconden 3 Herhaal deze stappen voor andere minimum of maximumwaarden die u wilt resetten 4 Druk op HISTORY om terug te keren naar de normale weergavemodus 8 Resetten Om het weerstation terug te zetten naar de fabrieksinstellingen houd ingedr...

Page 21: ...wkeurigheid kan verhoogd worden door het kalibreren van vochtigheidsmetingen binnen en buitenshuis Vochtigheidsmetingen kunnen afwijken na een bepaalde tijd De nabijheid van bronnen met hoge vochtigheid zoals de grond gras enz beïnvloedt de meting Het is aangeraden om een slingerpsychrometer niet meegeleverd te gebruiken of een kalibreerkit in de handel verkrijgbaar niet meegeleverd om de vochtigh...

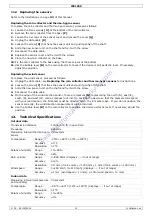
Page 22: ...ie schroeven O los aan de onderkant van de regencollector 2 Neem de regencollector van de basis P 3 Draai de 4 schroeven van het sensordeksel los en verwijder het deksel Q 4 Ontkoppel de datakabel R 5 Draai de schroef S los die de sensorunit vasthoudt en trek de unit voorzichtig los van de metalen stang 6 Schuif de nieuwe sensorunit op de stang en bevestig met de schroef 7 Sluit de datakabel opnie...

Page 23: ...gelev Basisstation 3 x AA 1 5V LR6 alkalinebatterijen niet meegelev Geschatte batterijduur 12 maanden voor het basisstation 24 maanden voor de thermo hygrosensor Opmerking dit is een schatting en is enkel bruikbaar als richtlijn De werkelijke batterijduur is afhankelijk van verschillende factoren zoals de omgevingstemperatuur Gebruik dit toestel enkel met originele accessoires Velleman nv is niet ...

Page 24: ...un x non sujets sagés à votre ocale relativ autorités l Lire la prés agé pendant té s enfants et et de qualité l uniqueme poussière P chocs et le ment avant l our des raiso bent pas sou Un usage im dommages esponsabilité érence ultér et taux d hu res avec RF olienne et p F heure jour vec indicatio noeuds et B 8 directions ature humid date radiogu WS1060 24 CE D EM antes conce indique que appareil ...

Page 25: ...e piles en resp Garder les s du format e e et immédi thermo hyg 3 de cette n ctivée s érature intér F umidité D E F 3 de cette n pluie et le ca e er de l anémo errer la vis d nent libreme era incorrect éorologiqu manière défin s appareils p eut souvent et ne pas les pectant la ré piles hors de et du voltag WS1060 25 ate ro anémom notice 15 16 17 18 19 20 21 22 23 ieure 24 25 26 27 Thermo h Tige An...

Page 26: ...e et l heure automatiquement Quand le signal DCF est détecté la LED au dos du collecteur de pluie clignote 5 fois et puis s allume durant 20 secondes Le transmetteur envoie la date et l heure vers la station de base L icône RCC s affiche Si le signal DCF est faible et l appareil ne reçoit pas de signal DCF le transmetteur arrêtera la recherche après 1 minute et reviendra au mode de fonctionnement ...

Page 27: ... sur les anneaux de fixation M 7 Configurer la station de base La station de base est équipée de cinq boutons pour une opération facile SET HISTORY ALARM et MIN MAX Appuyez sur SET pour naviguer dans les réglages Appuyez sur pour augmenter les valeurs ou sur MIN MAX pour réduire les valeurs Appuyez et maintenez enfoncé le bouton ou MIN MAX pendant 2 secondes pour un défilement plus rapide La procé...

Page 28: ...ppuyez sur HISTORY 7 3 Mode historique En mode historique les mesures des 24 heures passées sont affichées Afficher l historique 1 En mode d affichage normal appuyez sur HISTORY La station est désormais en mode historique L afficheur visualise HIS 3 2 En mode historique appuyez plusieurs fois sur MIN MAX pour retourner avec des intervalles de 3 heures 3 Pour revenir au mode d affichage normal appu...

Page 29: ...écifié Direction du vent Réglez la direction du vent L alarme s enclenche quand le vent vient de la direction spécifiée Pluviosité 1h Réglez le seuil de la pluviosité en 1 heure 0 999 9mm L alarme s enclenche quand le volume de pluviosité en une heure dépasse le seuil spécifié Pluviosité 24h Réglez le seuil de la pluviosité en 24 heures 0 999 9mm L alarme s enclenche quand le volume de de la pluvi...

Page 30: ...o des valeurs min max Pour remettre les valeurs min max à zéro 1 Accédez au mode d affichage min max et appuyez sur pour afficher la valeur que vous souhaitez remettre à zéro 2 Appuyez et maintenez enfoncé SET pendant 3 secondes 3 Répétez cette procédure pour toute autre valeur min max que vous souhaitez remettre à zéro 4 Appuyez sur HISTORY pour revenir au mode d affichage normal 8 Remise à zéro ...

Page 31: ...mètre à une précision de 5 La précision peut être augmentée en calibrant les mesures d humidité intérieure et extérieure Les mesures d humidité peuvent dévier après un certain temps La proximité directe de sources d humidité comme le sol l herbe influencent le mesurage Il est recommandé d utiliser un psychromètre fronde not incl ou un kit de calibrage non incl disponible en vente pour mesurer l hu...

Page 32: ...dez comme suit 1 Desserrez les 3 vis O en bas du collecteur de pluie 2 Enlevez le collecteur de pluie de la base P 3 Desserrez les 4 vis du couvercle du capteur et enlevez le couvercle Q 4 Déconnectez le câble de données R 5 Desserrez les vis S qui fixent le capteur et retirez prudemment de la tige 6 Glissez le nouveau capteur sur la tige et fixez le avec la vis 7 Reconnectez le câble de données 8...

Page 33: ... 5V type LR6 non incl durée de vie des piles estimée 12 mois pour la station de base 24 mois pour le capteur thermo hygro Remarque Ceci est une estimation et ne peut qu être utilisée comme directive La durée de vie des piles actuelle dépend de plusieurs facteurs comme la température ambiante N employer cet appareil qu avec des accessoires d origine SA Velleman ne sera aucunement responsable de dom...

Page 34: ...h evuelva este relación con utoridades 060 Lea ate ansporte no guridad el alcance de dad Vellem ólo en inter o goteo quipo a polv o Evite usar to del aparat dificaciones n utorizadas n icaciones de de las instru ble de ningú ara cuando n or y la hume s por el sens del viento y p n C o F ad mm y pu n y máx co m h nudos ento 8 direc atura la hum o fecha nable WS1060 34 L DEL U mbiente co aje indica ...

Page 35: ...el me ismo tipo nidad interio r fugas y da ra sobremesa a metro higróm este manua ctivada das activada alta baja baja activa D E F este manua de lluvia y e anemómetr ro del anemó atornillar el que puedan r libremente eteorológi rior y la esta te antes de c tener proble las eche al f edio ambient r y exterior ñar el apara WS1060 35 a metro anem l del usuario 15 16 17 18 19 20 21 22 23 24 25 26 da 2...

Page 36: ...deará 5 veces Luego se ilumina durante 20 segundos El transmisor envía los datos y la hora exacta a la estación de base La pantalla visualiza el icono En caso de una señal DCF débil y si la recepción no es posible el transmisor terminará la búsqueda después de 1 minuto y volverá al modo de funcionamiento normal transmitir datos meteorológicos a la estación de base El transmisor tratará de consegui...

Page 37: ...aumentar los valores Pulse la tecla MIN MAX para disminuir los valores Mantenga pulsada la tecla o la tecla MIN MAX durante 2 segundos para que el valor aumente disminuya más rápida Pulse HISTORY para salir del modo de configuración Si no pulse ninguna tecla la estación de base saldrá automáticamente del modo al cabo de 30 segundos 7 1 Modo de visualización rápida Es posible seleccionar la informa...

Page 38: ...r HIS 3 2 Pulse SET La palabra CLEAR parpadea o Para borrar el historial de datos mantenga pulsada la tecla SET durante 2 segundos o Para salir y volver al modo normal sin reinicializar los datos pulse HISTORY 7 4 Ajustar las alarmas Es posible programar una alarma de tiempo o una alarma meteorológica para avisar de ciertas condiciones meteorológicas Una vez activada la alarma sonará durante 120 s...

Page 39: ...24 horas sobrepasa el valor umbral introducido Humedad exterior Introduzca el valor umbral para la humedad exterior 1 99 La alarma suena si la humedad exterior sobrepasa el valor umbral introducido Temperatura exterior Introduzca el valor umbral para la temperatura exterior 40 C 60 C La alarma suena si la temperatura exterior sobrepasa el valor umbral introducido Factor de enfriamiento Introduzca ...

Page 40: ...lver al modo normal Reinicializar las mediciones mínimas y máximas Para reinicializar las mediciones 1 Entre en el modo de mediciones mínimas o máximas y Pulse la tecla para visualizar el valor que quiere reinicializar 2 Mantenga pulsada SET durante 3 segundos 3 Repita estos pasos para cualquier otro valor que quiere reinicializar 4 Pulse HISTORY para volver al modo normal 8 Reinicialización Para ...

Page 41: ... 5 Puede mejorar la precisión al calibrar las mediciones de humedad interior y exterior Es posible que las mediciones de humedad se desvíen a lo largo del tiempo La proximidad de fuentes de humedad como la tierra la hierba etc influye las mediciones Utilice un psicómetro giratorio no incl o un juego disponible en el mercado para calibrar la humedad no incl Modifique el valor en el modo de calibrac...

Page 42: ... 1 Desatornille los tres tornillos O de la parte inferior del colector de lluvia 2 Saque el colector de lluvia de la base P 3 Desatornille los cuatro tornillos de la tapa y quítela Q 4 Desconecte el cable de datos R 5 Desatornille el tornillo S que fija el sensor al mástil 6 Fije el nuevo sensor al mástil y vuelva a atornillar el tornillo 7 Vuelva a conectar el cable de datos 8 Reemplace la tapa d...

Page 43: ... 2 pilas alcalinas AA de 1 5V no incl Estación de base 3 pilas alcalinas AA de 1 5V no incl Duración de vida estimada 12 meses para la estación de base 24 meses para el termómetro higrómetro Observación Esto sólo sirve de directriz La duración de vida efectiva depende de diferentes factores p ej temperatura ambiente Utilice este aparato sólo con los accesorios originales Velleman NV no será respon...

Page 44: ...ich für E WS1060 Les ransportschä hren Händler fugte vom Ge en alitätsgaran s Gerät nur i Gerät vor Sta chütterungen ätes rieb nachde d aus Sicher ht der Garan Anwendunge d erlischt de htung der Be ultierende Fo leitung für k d der Feucht eit über den g und Regen 1 Stunde Ta Höchstwerte oten oder Be tungen hte gefühlte empfang WS1060 44 NGSAN Produkt Verpackung chaden zufüg ertes Hausm wecks Recyc...

Page 45: ... 26 Alarm für hohe Windgeschwindigkeit ist eingeschaltet 13 Alarm für Min Max Innenluftfeuchte ist eingeschaltet 27 Uhrzeit 14 Innenluftfeuchte Außensensor A Windrichtungssensor D Thermo Hygrometer geschützt und Sender B Wasserwaage E Mast C Regensensor F Anemometer 6 Installation Siehe Abbildungen Seite 2 3 dieser Bedienungsanleitung 6 1 Montage Das Thermo Hygrometer der Regensensor und der Windr...

Page 46: ...en die schen Bereic chs einlegen Unterseite d zu befreien heraus ien ein Acht J wieder gensensors l ngelegt word urück um da inlegen auf der Rüc ien polungsr chten 2 Sek worden sind kel wieder asten dem Signal terien aus de Außentempe Wetterdaten haben starte Signal der f CF Signal det ach 20 Seku rscheint die er Empfang u us zurück h dem DCF S Stunden alt hronisation e ist geringer endet der Se e...

Page 47: ...Außensensors und oder der Basisstation bis alles richtig funktioniert 3 Verwenden Sie die verstellbaren Ringe mitgeliefert um den Außensensor am Mast zu befestigen M Stellen Sie sicher dass die Wetterstation gut installiert ist bevor Sie die Schrauben festschrauben siehe unten 4 An der Kante des Windrichtungssensors befinden sich Markierungen N für die Himmelsrichtungen N Norden E Osten S Süden un...

Page 48: ...en Sie zwischen Tag Monat Jahr DM oder Monat Tag Jahr MD um das Datum 4 anzuzeigen Datum Kann das DCF Signal nicht empfangen werden so stellen Sie das Datum manuell ein Windgeschwindigkeit Wählen Sie für die Anzeige der Windgeschwindigkeit Böengeschwindigkeit zwischen km h m s bft Beaufort mph oder knots Knoten Die entsprechende Ikone 25 erscheint im Display Windrichtung Regeln Sie die Windrichtun...

Page 49: ...en Ist der Alarm eingeschaltet dann erscheint die entsprechende Alarmikone und HI AL oder LO AL für einen NIEDRIG Alarm im Display 6 Drücken Sie SET um die aktuelle Einstellung zu bestätigen und zur nächsten Einstellung zu gehen 7 Um zum normalen Modus zurückzukehren drücken Sie HISTORY Einstellung der hohen Alarmwerte HI Hoch Alarm Beschreibung Zeitalarm Stellen Sie die Uhrzeit Stunden Minuten fü...

Page 50: ...die Höchstwerte anzuzeigen Windgeschwindigkeit Böengeschwindigkeit 1 Stunde Regenfall 24 Stunden Regenfall wöchentlicher Regenfall monatlicher Regenfall Außenluftfeuchte Außentemperatur gefühlte Temperatur Taupunkt Innenluftfeuchte Innentemperatur 3 Drücken Sie MIN MAX um in den MIN Modus zu gelangen Die entsprechende MIN Ikone 8 erscheint im Display 4 Drücken Sie wiederholt um die Mindestwerte an...

Page 51: ...etall noch digitale Thermometer weil diese eine eigene Fehlermarge haben Gebrauchen Sie keine lokale Wetterstation diese haben einen unterschiedlichen Aufstellort einen anderen Aktualisierungszeitpunkt und mögliche Kalibrierungsfehler Um die Temperatur zu kalibrieren gehen Sie wie folgt vor 1 Installieren Sie den Temperatursensor an einem Ort im Schatten 2 Installieren Sie das Thermometer genau da...

Page 52: ...gut sind Ersetzen Sie die Batterien im Sender so wird innerhalb der nächsten drei Stunden eine neue Synchronisierung durchgeführt Alle Wetterdaten und eingestellten Alarmwerte bleiben behalten Möchten Sie aber dass die Geräte schneller synchronisieren so entfernen Sie die Batterien aus der Basisstation und legen Sie nach 10 Sekunden neue ein Achtung In diesem Fall verlieren Sie alle Wetterdaten un...

Page 53: ...keit 10 m s Innendaten Messintervall Temperatur und Feuchte 30 Sek Temperatur Bereich 9 9 C 60 C erscheint wenn außer Reichweite Auflösung 0 1 C Relative Luftfeuchte Bereich 1 99 Genauigkeit 1 Stromverbrauch Außensensor 2 x 1 5V AA Alkalinebatterien nicht mitgeliefert Basisstation 3 x 1 5V AA Alkalinebatterien nicht mitgeliefert geschätzte Batterielebensdauer 12 Monate für die Basisstation 24 Mona...

Page 54: ...eerstation DCF klok buitensensor Station météo horologe DCF émetteur extérieure Wetterstation DCF uhr Außensender Estación meteorológica reloj DCF sensor exterior Type or model type of model type ou modèle Typ oder Modell tipo o modelo WS1060 constituting the subject of this declaration conforms with the essential requirements and other relevant stipulations of the R TTE Directive 1999 5 EC die he...

Page 55: ... 1 2 2007 06 Technical data are available and can be obtained from Les données techniques sont disponibles et peuvent être obtenues chez Technische gegevens zijn beschikbaar en kunnen worden aangevraagd bij Die technische Dokumentation zu den oben gennanten Produkten wird geführt bei Los datos técnicos están disponibles y pueden ser solicitados a Velleman NV Legen Heirweg 33 9890 Gavere België Pla...

Page 56: ...f vervangbaar lampen rubberen onderdelen aandrijfriemen onbeperkte lijst defecten ten gevolge van brand waterschade bliksem ongevallen natuurrampen enz defecten veroorzaakt door opzet nalatigheid of door een onoordeelkundige behandeling slecht onderhoud of abnormaal gebruik of gebruik van het toestel strijdig met de voorschriften van de fabrikant schade ten gevolge van een commercieel professionee...

Page 57: ...quier gesto comercial no disminuye estos derechos La lista previamente mencionada puede ser adaptada según el tipo de artículo véase el manual del usuario del artículo en cuestión Velleman Service und Qualitätsgarantie Seit der Gründung in 1972 hat Velleman sehr viel Erfahrung als Verteiler in der Elektronikwelt in über 85 Ländern aufgebaut Alle Produkte entsprechen den strengen Qualitätsforderung...

Reviews: