HAA85
VELLEMAN
4
* OUTPUT RELAY 2: 1 Amp dry relay contacts, with Normally Open (N.O.) and Normally Closed (N.C.) terminals.
This relay is prepared for alarm ON-OFF control or reporting panic event connection. Connect the
appropriate pair of these terminals to the remote ARM/DISARM terminals on your alarm system for
alarm ON-OFF control; or to the panic/24 hour emergency loop for panic triggering. N.O. or N.C. loop
connection is possible. Relay contact is programmable for momentary or start/stop operation.
* DURESS OUTPUT: An NPN transistor Open Collector output. It switches to (-) supply when the Duress Code is
entered. Output transistor ratings -- Ic max.: 100mA sink. Vce max.: 25VDC
* N.C. TAMPER: Normally Closed contact when the keypad is secured on the box. It is open when keypad is
separated from the box. Connect these terminals in series with the tamper/panic/24hour emergency
circuit loop on your alarm system if necessary.
* RED, AMBER & GREEN LED LAMPS: Three on-board LED lamps are available. They are prepared for free
connections. Suggest connecting these LED lamps to the remote indicator terminals on your alarm
control panel. Be sure to observe the polarity (+ & -). Each of the on-board LED lamps is equipped with
a 1.5K ohm current limiting resistor.
* EGRESS OUTPUT: A Normally Open (N.O.) input terminal refers to the (-) ground with the help of a Normally Open
button to activate the Relay Output 1. The egress button is usually put inside the house near the door.
Leave this terminal open if not used.
3. The Pacifier Tones
The built-in buzzer generates the following tones for operation status:
STATUS
TONES
Successful key entry
1 beep
Successful code entry
2 beeps
Unsuccessful code entry
5 beeps
DAP jumper not replaced
Continuous beep
4. The DAP Jumper (Direct Access to Programming)
If the Personal Master Code is forgotten, use the DAP jumper to override the forgotten code permitting direct entry
into programming mode. You are required to apply the following procedure precisely:
1. Disconnect power supply
2. Displace the DAP jumper from OFF to ON.
3. Reconnect power supply (buzzer is activated).
4. Put the DAP jumper back to OFF position (this done, the buzzer is de-activated).
5. The Keypad is in programming mode and ready to receive your new programming data.
6. Enter the new programming data starting from Section (B) in the summary chart shown below.
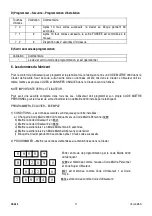
5. Program the Keypad – Summary Chart
A) Use the factory set master code entry in programming -- When starting for first time only
Entry of Code
Validation
Comments
0000
*
Enter in programming mode by factory set master code
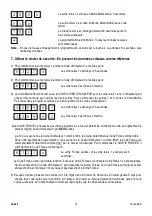
B) Programming -- Recording of personal master code & user codes -- User programming
Access Keys
Entry of Codes
Validation
Comments
0
From 1 to 8 Digits
#
Personal Master Code & Super User Code
1
From 1 to 8 Digits
#
User Code 1 & Duress Code (For door strike
or alarm ON-OFF)
2
From 1 to 8 Digits
#
User Code 2 (For alarm ON-OFF or panic
event reporting)
Summary of Contents for HAA85
Page 2: ...HAA85 VELLEMAN 2 ...


