background image

PROCD1000 

VELLEMAN 

3. General Guidelines 


The 

PROCD1000

 should only be used indoors with an alternating current of max. 230V AC/50Hz. 


Do not shake the device. Avoid brute force when installing or operating the device. 


Select a location where the device is protected against extreme heat, dust and moisture. 


Install the device in a well-ventilated area. Keep a minimum distance of 30cm around the device. 


Do not expose the device to direct sunlight. 


Keep the device away from sources of hum such as transformers or motors. 


Familiarise yourself with the functions of the device before actually using it. Do not allow operation by unqualified 

people. Any damage that may occur will most probably be due to unprofessional use of the device. 


Clean your hands before handling discs. Do not insert damaged discs into the device. 


Disconnect the power cord and all connecting cables before moving the device. 


Do not forget to close the disc tray to keep the laser pickup clean. 


Use the original packaging if the device is to be transported. 


All modifications of the device are forbidden for safety reasons. 


Only use the device for its intended purpose. All other uses may lead to short circuits, burns, electroshocks, 

crash, etc. Using the device in an unauthorised way will void the warranty. 


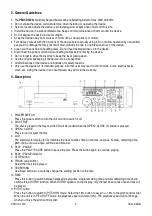
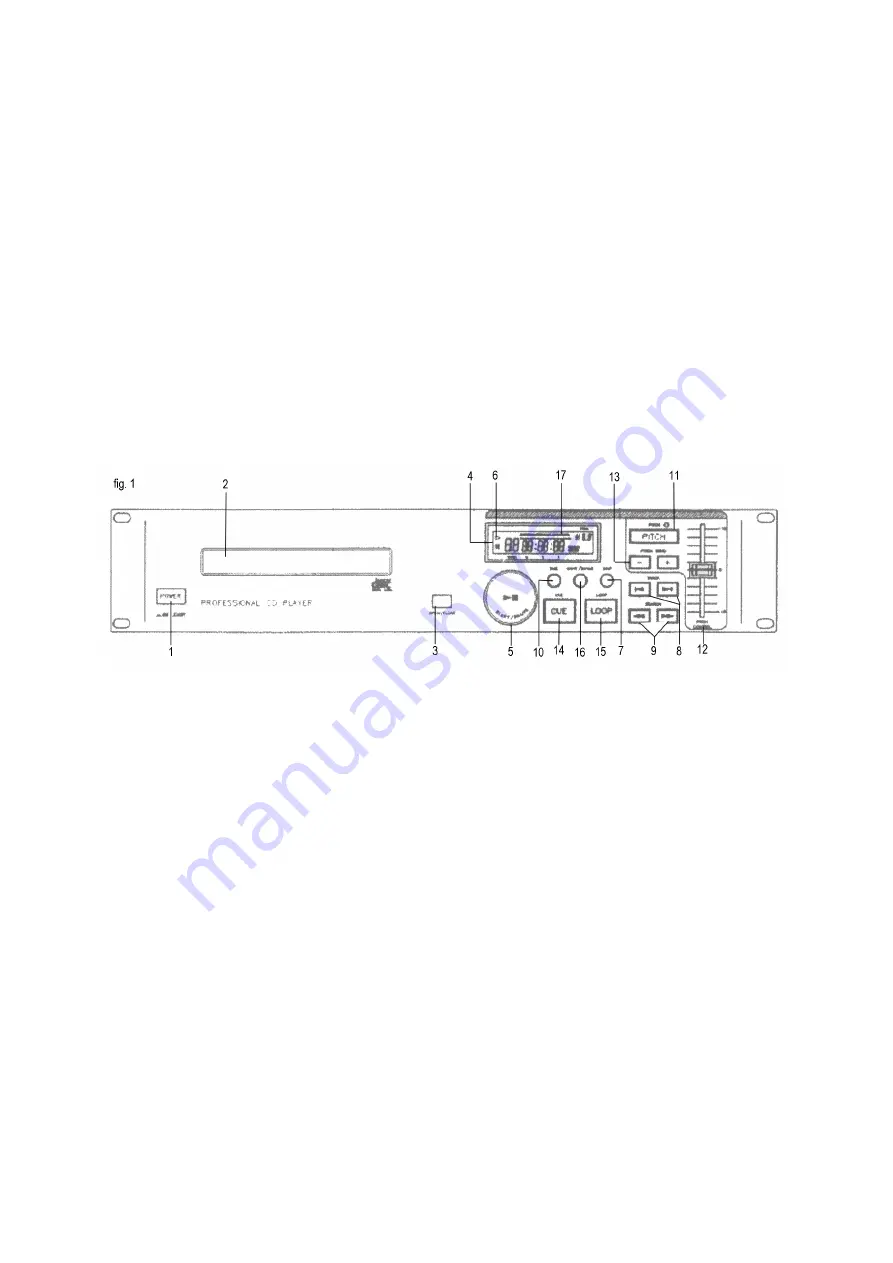
4. Description 


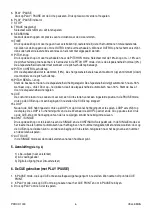
1.


POWER SWITCH 
Press the power switch to turn the unit on and to switch it off. 

2.


DISC TRAY 
The disc is placed in the tray and the CD will be loaded when the OPEN / CLOSE (3) button is pressed. 

3.


OPEN / CLOSE 
Press to load or eject the disc. 

4.


LCD 
The liquid crystal display (LCD) indicates the track number, time (in minutes, seconds, frames), remaining time, 
pitch, loop, auto cue single, continue and time bar. 

5.


PLAY / PAUSE 
Press the PLAY / PAUSE button to pause the disc. Press the button again to continue playing. 

6.


PLAY / PAUSE indicator 

7.


STOP button 

8.


TRACK (skip button) 
Select the track to be played. 

9.


SEARCHING 
Use these buttons to accurately change the starting position of the disc. 

10.


TIME 
Press this button to switch between elapsed playing time, single remaining time and total remaining time and to 
switch off the OUTRO function. When OUTRO appears on the display, only the last 30 seconds of each track will 
be played. 

11.


PITCH button 
Press this button to switch to PITCH ON mode. Select the 16% button to /- 16% to the pitch control slider. 
When the unit is in PITCH OFF mode, the playback speed is normal (0%). The playback speed will not change 
when you move the pitch control slider. 

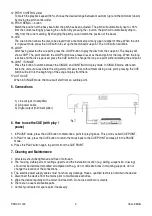
Summary of Contents for HQ POWER PROCD1000

Page 1: ...hocks Keep this device away from rain and moisture Unplug the mains lead before opening the housing Damage caused by disregard of certain guidelines in this manual is not covered by the warranty and t...

Page 2: ...pose All other uses may lead to short circuits burns electroshocks crash etc Using the device in an unauthorised way will void the warranty 4 Description 1 POWER SWITCH Press the power switch to turn...

Page 3: ...e after each track the unit auto cues where the song starts It means that without memorizing a cue point pressing the CUE button will return to the beginning of the song and play from there 17 AUTO CU...

Page 4: ...all audio plugs The information in this manual is subject to change without prior notice PROCD1000 PROFESSIONELE ENKELVOUDIGE CD SPELER 1 Inleiding en kenmerken Aan alle ingezetenen van de Europese Un...

Page 5: ...kinderen en onbevoegden 3 Algemene Richtlijnen U mag dit toestel enkel binnenshuis gebruiken met een wisselspanning van maximum 230Vac 50Hz Schud het toestel niet dooreen Vermijd brute kracht tijdens...

Page 6: ...dealt de afspeelsnelheid automatisch naar 16 Stem de bas af door de afspeelsnelheid te regelen 14 CUE De cuefunctie laat u toe zoveel u maar wilt een Cd te starten vanaf een ingestelde positie In de P...

Page 7: ...ingskabel zit niet goed in het stopcontact Duw de plug goed in het stopcontact De Cd wordt niet afgespeeld De Cd is verkeerd in de lader geplaatst De Cd is vuil Plaats de Cd in de lader met het label...

Page 8: ...ez votre revendeur de renouveler le c ble d alimentation si n cessaire D branchez l appareil s il n est pas utilis ou pour le nettoyer Tirez la fiche pour d brancher l appareil non pas le c ble Les do...

Page 9: ...6 choisissez la plage souhait e entre le maximum up et minimum down l aide du r gulateur coulissant du pitch 13 La touche PITCH BEND Apr s avoir r gl la vitesse de lecture harmonisez les rythmes grave...

Page 10: ...de rechange ventuelles chez votre revendeur 8 Sp cifications techniques Niveau de sortie 2Vpp 47K Ohm R ponse en fr quence 20 20 000Hz 2dB Distorsion harmonique totale 0 04 S paration des canaux 65dB...

Page 11: ...a os causados por descuido de las instrucciones de seguridad de este manual invalidar n su garant a y su distribuidor no ser responsable de ning n da o u otros problemas resultantes La instalaci n y e...

Page 12: ...pitch loop auto cue single continue y time bar 5 PLAY PAUSE Pulse la tecla PLAY PAUSE para hacer una pausa Vuelva a pulsar la tecla PLAY PAUSE para continuar la reproducci n 6 Indicador PLAY PAUSE 7...

Page 13: ...a tecla CUE para atribuir un punto de memorizaci n Este punto de memorizaci n es CUE POINT 2 En el modo PLAY pulse la tecla CUE para volver a CUE POINT y para quedarse en el modo PAUSE 3 Pulse la tecl...

Page 14: ...L CD PLAYER 1 Einf hrung Eigenschaften An alle Einwohner der Europ ischen Union Wichtige Umweltinformationen ber dieses Produkt Dieses Symbol auf dem Produkt oder der Verpackung zeigt an dass die Ents...

Page 15: ...eitung Bei Sch den verursacht durch eigenm chtige nderungen erlischt der Garantieanspruch Halten Sie Kinder und Unbefugte vom Ger t fern 3 Allgemeine Richtlinien Der PROCD1000 darf nur im Innenbereich...

Page 16: ...Pitch Control Schiebeschalter ndern 12 PITCH CONTROL Schiebeschalter Um der Abspielgeschwindigkeit 16 zu entsprechen w hlen Sie den gew nschten Bereich zwischen Maximum aufw rts und Minimum abw rts in...

Page 17: ...Sie mit den Servicearbeiten anfangen 5 Verwenden Sie zur Reinigung ein feuchtes Tuch Verwenden Sie auf keinen Fall Alkohol oder irgendwelche L sungsmittel 6 Es gibt keine vom Benutzer zu reparierende...

Reviews: