VPA2200MBN_v3
3
VELLEMAN
•
Only use the device for its intended purpose. All other uses may lead to short circuits, burns, electroshocks,
crash, etc. Using the device in an unauthorised way will void the warranty.
4. Fuse Replacement
•
Only fit or replace a fuse when the device is unplugged from the mains.
•
Replace a blown fuse with a fuse of the same type and rating (250Vac / 5A 5 x 20mm fuse, order code FF5N):
1.
Unscrew the fuse holder cap at the back with an appropriate screwdriver.
2.
Remove the old fuse and install a new one.
3.
Replace the old fuse holder and fasten it with the screwdriver.
5. Use
a.
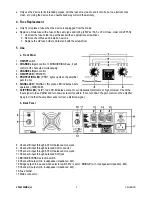
Front Panel
1.
ON/OFF
switch
2.
CHANNEL A
gain control. In MONO/BRIDGE use, it will
control both channels simultaneously.
3.
CHANNEL B
gain control
4.
ON/OFF LED
(‘POWER’)
5.
PROTECTION LED
(‘PRO’): lights up when the amplifier
gets too hot.
6.
SIGNAL LED
(‘SIGNAL’): this green LED indicates a safe
operation (-30dB~0dB).
7.
CLIPPING LED
(‘CLIP’): red LED indicates a state of over-modulation (distortion at high volumes). Check the
input signal to the amplifier and turn down its level if possible. If not, turn down the gain control on the amplifier.
Keep in mind that the amplifier cannot correct a distorted signal.
b.
Back Panel
8.
Channel B input through 6.35mm balanced mono jack.
9.
Channel B input through balanced XLR connector.
10.
Channel A input through 6.35mm balanced mono jack.
11.
Channel A input through balanced XLR jack.
12.
BRIDGE/STEREO selection switch.
13.
Channel B output (min. loudspeaker impedance: 4
Ω
).
14.
Bridge output: to be used when selector switch #12 is set to ‘BRIDGE’ (min. loudspeaker impedance: 8
Ω
).
15.
Channel A output (min. loudspeaker impedance: 4
Ω
).
16.
Fuse holder.
17.
Mains connector.


