_______________________________________________________________________________________________________________________________________________________
22
!
FIRST SWITCH OFF THE MAINS VOLTAGE AND REMOVE THE MAINS CORD FROM THE
SOCKET. WAIT FOR A COUPLE OF MINUTES UNTIL THE HIGH VOLTAGES ON THE SUPPLY
ELCOS HAVE DISSAPEARED.
Fit the small tubes:
V9 and V10, type ECC83 or 12AX7, CV492.
V11, type ECC82 or 12AU7, CV491.
Again connect the amplifier to the mains and set the mains switch to ON (fully up). Wait until the green
LED is lit continuously.
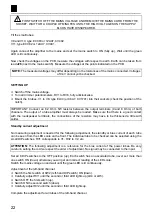
Now check the voltages on the PCB, measure the voltages with respect to earth. Earth can be taken from
lead
J26
(next to the mains switch). Measure the voltages at the points indicated on the PCB.
NOTE:
The measured voltages may differ depending on the tolerances of the mains connected. Voltages
of 0.4V cannot yet be checked.
SETTING UP
◊
Switch off the mains voltage.
◊
Turn all trimmer potentiometers, RV1 to RV8, fully anticlockwise.
◊
Mount the 8 tubes, V1 to V8, type EL34 (or C6A7, CV1741) into their sockets (check the position of the
notch).
IMPORTANT: Connect an 8.2 Ohm 5W resistor between the output terminals (0 and 8 Ohm) of both
channels. The output of a tube amplifier must always be loaded. Make sure that there is a good contact
with the loudspeaker terminals, the connections of the resistors may have to be thickened a little with
solder.
Standby current adjustment
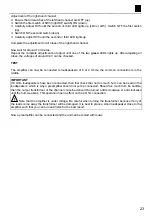
No measuring equipment is needed for the following adjustment, the standby or bias current of each tube
can be seen from the LED scale on the front. The individual tube to be checked can be selected using the
small DIP switches. RV1 corresponds to V1, RV2 to V2, etc.
ATTENTION:
The following adjustment is a reference for the bias current of the power tubes. Be very
careful in setting them. Also respect the order of adjustment. No signal may be connected to the input.
Set all 8 DIP switches to the OFF position (up). Each switch has an associated tube, never set more than
one switch ON (down) otherwise you will get an incorrect reading of the LED scale.
Switch the mains voltage on and wait until the green LED is lit continuously.
Adjustment of the left-hand channel:
◊
Switch the first switch of SW2 (left-hand DIP switch) ON (down).
◊
Carefully adjust RV1 until the second or third LED lights up (LD4 or LD5).
◊
Switch OFF the first switch (up).
◊
Switch ON the second switch (down).
◊
Carefully adjust RV2 until the second or third LED lights up.
Complete the adjustment for all tubes of the left-hand channel.


