background image

Modifications and typographical errors reserved © Velleman Kit nv  
H4040IP’1 - 2014 (rev. 3.0) 

5 4 1 0 3 2 9 3 1 9 1 8 2

VELLEMAN NV 

Legen Heirweg 33, B-9890 GAVERE  

Belgium (Europe) 

Summary of Contents for K4040B

Page 1: ...ginner 1 2 3 4 5 advanced Stereo valve power amplifier ILLUSTRATED ASSEMBLY MANUAL H4040IP 1 For most of us a high power valve amplifier is unaffordable This kit changes that so that now everybody can...

Page 2: ...AC 500VA max modifications reserved Features Pure valve sound with high quality EL34 valves High quality black and chrome housing Chrome valve socket covers Easy bias adjustment with LED indication Re...

Page 3: ...he eyes Needle nose pliers for bending leads or to hold components in place Small blade and Phillips screwdrivers A basic range is fine For some projects a basic multi meter is required or might be ha...

Page 4: ...ce and carefully solder the leads 2 Make sure the solder joints are cone shaped and shiny 3 Trim excess leads as close as possible to the solder joint REMOVE THEM FROM THE TAPE ONE AT A TIME Assembly...

Page 5: ...embly of the small input PCB P4040i This PCB is used to connect the input signal via two RCA sockets via two holes at the rear of the cabinet SK1 CINCH SK2 CINCH 2 CINCH RCA connector L GND R GND 3 Sh...

Page 6: ...small piece of wire could touch the bottom of the cabinet 1 Valve socket mounting 15mm M3 SPACER 8mm SPACER PCB VALVE SOCKET 15mm M3 BOLT 2 7 1 8 5 4 3 V 2 3 4 1 3 5 7 4 6 5 8 1 8 Also mount a 15 mm...

Page 7: ...ires J2 2 wires J3 2 wires J4 2 wires J5 2 wires J6 2 wires J7 J8 J9 J10 J11 J12 J13 J14 J15 J16 J17 J18 J19 J20 J21 J22 J23 J24 J25 J26 2 Jumpers 3 Jumpers for voltage selection REMARK Strike out the...

Page 8: ...B R18 820 8 2 1 B R19 180 1 8 1 B R20 1M 1 0 5 B R21 22K 2 2 3 B R22 3K9 3 9 2 B R23 820K 8 2 4 B R24 820 8 2 1 B R25 180 1 8 1 B R26 1M 1 0 5 B R27 22K 2 2 3 B R28 3K9 3 9 2 B R29 10K 1 0 3 B R30 10K...

Page 9: ...3 3 4 B 9 R71 330K 3 3 4 B 9 R72 330K 3 3 4 B 9 R73 330K 3 3 4 B 9 R74 330K 3 3 4 B 9 R75 330K 3 3 4 B 9 R76 330K 3 3 4 B 9 Construction R77 270 2 7 1 B R78 10K 1 0 3 B R79 10K 1 0 3 B R80 15K 1 5 3 B...

Page 10: ...4P SW3 DS 4P 15 DIP switches 1 SW Check the minimum voltage C3 100p 400V C4 100p 400V C5 22n 630V 0 022 C6 22n 630V 0 022 C7 470n 0 47 474 C8 2n2 222 2200 C9 22n 630V 0 022 C10 100p 400V C11 22n 630V...

Page 11: ...SK6 3p SK7 3p SK8 3p 18 PCB connectors 19 Valve sockets 5 9 8 7 4 3 2 V 6 1 The various relays have leads that correspond to the printing on the PCB RY3 VR5V122C RY4 VR10V121C RY5 VR10V121C 20 Power...

Page 12: ...38 100 F 400V C39 220 F 450V C40 220 F 450V C41 220 F 450V C42 220 F 450V 23 Electrolytic capacitors check the polarity C Mount him as square as possible against the PCB also solder the metal support...

Page 13: ...g VIEWED FROM SOLDERSIDE 3 4 5 4 3 5 6 V8 8 1 2 7 1 8 8 1 V5 8 1 7 2 6 5 4 5 3 3 4 4 3 3 4 5 5 6 V7 1 8 2 1 8 7 8 1 8 1 7 5 6 4 5 V6 2 3 3 4 f2 6 3VAC f2 f1 f1 5 3 4 4 5 3 1 2 8 V4 6 7 1 8 2 8 8 1 1 6...

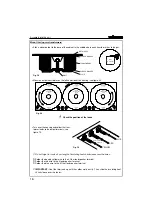
Page 14: ...that one of the sup porting bushes can make contact with the cabinet Mount the chrome feet at the four corners of the cabinet using an M4 bolt A piece of felt can be sticked under each foot Mount the...

Page 15: ...length to the middle terminal of the mains connector Slide a 1 5 cm length of insulating heat shrink sleeve over each terminal all the way up the con nector This can be shrunken by hot air e g with a...

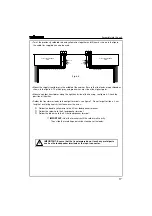
Page 16: ...w wire to the 4 Ohm loudspeaker terminal Solder the red wire to the 0 loudspeaker terminal Solder the blue wire to the 8 Ohm loudspeaker terminal IMPORTANT Heat the terminals up until the solder melts...

Page 17: ...s to the output terminals see figure 7 Do not forget to slide a 3 cm length of insulating heat shrink sleeve over the wires Solder the double yellow wire to the 4 Ohm loudspeaker terminal Solder the r...

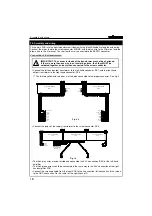
Page 18: ...k green wires should be connected in the same way to the 6 3V connection of the right hand amplifier PCB Connect the screened cable from the input PCB to the L connection left channel and the screen t...

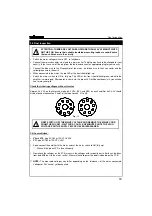
Page 19: ...3V should also be found at connectors 2 and 7 of the tube sockets V1 to V8 Fit the small tubes V9 and V10 type ECC83 or 12AX7 CV492 V11 type ECC82 or 12AU7 CV491 Again connect the amplifier to the mai...

Page 20: ...nd or third LED lights up Complete the adjustment for all tubes of the left hand channel Adjustment of the right hand channel Ensure that all switches of the left hand channel are OFF up Switch the fi...

Page 21: ...st to place a small loudspeaker close to the amplifier such that you can turn and listen for the best result Before fitting the covers check the supply and amplifier PCBs to see that no components hav...

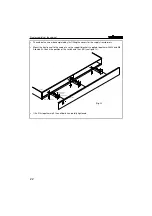
Page 22: ...d by first fitting the covers for the supply transformers Mount the front panel to the cabinet use the support brackets supplied together with M3 and M4 Allen bolts Check the position of the switch an...

Page 23: ...zo tweeter a 10 Ohm resistor must be placed in series with the tweeter Increase R65 and R68 in value e g 1k or 1K5 the input sensitivity will then be somewhat higher NOTES As tubes are very sensitive...

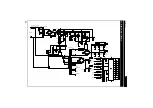
Page 24: ...220K BC516 T4 C24 100u GREEN R35 1K5 R37 560 LD1 L 56BHD D19 1N4007 ZD2 C23 4u7 C25 470u D18 1N4148 R9 220K D17 1N4007 D16 1N4148 R7 2K2 0 475 0 425 LD11 RED LD10 RED LD9 RED 0 375 0 325 LD5 RED LD6...

Page 25: ...82 RIGHT INPUT R2 1K IN RV5 100K RV6 100K R88 390K 1W R60 100K 5W R28 3K9 C5 22n 630V 2 1 V10 R27 22K 7 ECC83 R62 47K 5W C18 100p 400V V3R R86 47K 1W C15 22n 2 1 6 C19 22n 630V R54 100K C20 22n 630V R...

Page 26: ...C82 LEFT INPUT R1 1K IN RV1 100K RV2 100K R85 390K 1W R59 100K 5W R22 3K9 C9 22n 630V 7 6 V9 R21 22K 7 ECC83 R61 47K 5W C10 100p 400V V3L R83 47K 1W C6 22n 2 6 1 C11 22n 630V R42 100K C12 22n 630V R40...

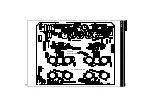
Page 27: ...R88 R28 J6 R23 1 B 120VAC A 100VAC R106 R108 2 5A SLOW AT 230 245VAC EARTH MAINS 5A SLOW AT 100 120VAC R107 F1 YELLOW LS RED LS D5 D6 12VDC D4 D3 T1 SK5 J7 L N R105 R4 ZD1 D1 RY3 R3 D13 D14 R79 YELLOW...

Page 28: ...Modifications and typographical errors reserved Velleman Kit nv H4040IP 1 2014 rev 3 0 5 4 1 0 3 2 9 3 1 9 1 8 2 VELLEMAN NV Legen Heirweg 33 B 9890 GAVERE Belgium Europe...

Reviews: