background image

PMRSET2_v2


VELLEMAN 

2

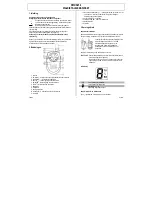
Adjusting the Speaker Volume 

 
Decrease the volume with  ; increase the volume with  . The volume level 
will be indicated by the digit (

1

 ~ 

8

) on the LCD screen. 


4. Receiving/Transmitting a Radio Signal 


Receiving a Signal 


A switched-on unit is continuously receiving signals when it is not 
transmitting. When receiving a signal, the LED lights red and the RX icon 
will be displayed. 


Transmitting a Signal 

 
Monitor the channel activity by pressing and holding the 

M

 button. You will 

hear static if the channel is unoccupied. Do not transmit if someone is 
talking on the channel. Press and hold the 

PTT

 button to transmit. The LED 

indicator will light red while the 

TX

 icon will be displayed. Hold the unit 

upright with the microphone two to three inches from the mouth. Speak into 

the unit while holding the 

PTT

 button pressed. Release the button when 

finished transmitting. 
 
NOTE: In order to receive a signal, at least two units must be on the same 

channel. Refer to the “

Changing Basic Channels

” section for 

further information. 


5. Operation 


Each unit features eight channels. 
 

Changing Basic Channels 


Press  /  once to enter the basic channel selection mode. The current 
channel number flashes on the LCD screen. While the channel number is 
flashing, press   to move to a higher channel or press   to move to a 
lower channel. Press 

PTT

 to confirm the selected channel and to return to 

normal mode. 
 
NOTE: In order to communicate with other PMR units, both units must be 

switched to the same channel. Please refer to the “

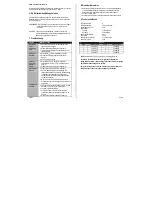
Channel Table

” 

section for a detailed channel listing. 


Selecting High/Low Power 


Press  /  twice to enter the low/high power selection mode. Select 
high/low power with  / . Press 

PTT

 to confirm the selected power. 

 
NOTE: The LCD screen will display L when low power is selected. A low 

power can extend battery life but may reduce the range. 


Monitoring the Radio Signal 

 
Use the monitor function to check for weak signals in the current channel. 
 
Press  /  thrice to activate the monitor function. Press again to deactivate 

the function. 
 

Sending Call Tones 


Use call tones to alert the other when attempting to contact them or to signal 
the beginning or end of a transmission. 
 
Press 

C

 to send a call tone. The LED will light red. 

 
NOTE: A call tone will only be received from a unit set to the same channel. 
 

Channel Scan 

 
Perform a channel scan to search for active channels in an endless loop. 
 
Press and hold 

S

 to activate the channel scan function. The unit will now 

search an active channel. During scanning, press and hold 

PTT

 to confirm 

the selected channel, press 

C

 to send a call tone to the active channel, 

press 

S

 to deactivate the channel scan mode. When an active channel has 

been found, press 

PTT

 to communicate through the active channel or press 

/  to change the channel. 


Torch 


Press and hold   to use the torch. The torch is also available when the unit 
is switched off. 
 

Auto Power-Off Timer 

 
The unit will automatically enter the standby mode after six seconds of 
inactivity in order to save the batteries. The unit will still be able to receive 
signals. 


Low Battery Level 

 
The unit will emit a tone and the red LED will flash once every fifteen 

seconds. Replace or recharge the batteries/battery pack. 
 

6. Charging the Batteries/Battery Pack 


Connect the charging dock to the mains with the supplied power cable. Turn 
the unit off and place it into the charging dock. The LED will light red. 
 
NOTE: The LED will not turn off when charge is complete. A full charge 

cycle will take approximately 6h or up to 14h for new batteries. 


Summary of Contents for PMRSET2

Page 1: ...R RECEIVER SET WALKIETALKIE BASISSET JEU METTEUR R CEPTEUR PMR DE BASE JUEGO TRANSMISOR RECEPTOR PMR B SICO BASISSATZ MIT SENDER EMPF NGER USER MANUAL GEBRUIKERSHANDLEIDING NOTICE D EMPLOI MANUAL DEL...

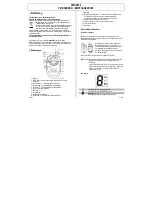
Page 2: ...tones 7 battery compartment 8 speaker 9 battery compartment latch 10 scan S button used to activate deactivate the channel scan function 11 microphone 12 menu power on off button press and hold to tur...

Page 3: ...h low power with Press PTT to confirm the selected power NOTE The LCD screen will display L when low power is selected A low power can extend battery life but may reduce the range Monitoring the Radio...

Page 4: ...three inches from the speaker Lower the volume to a comfortable level The units are too close far apart Respect the operating distance of five feet up to three miles Obstacles interfere with the trans...

Page 5: ...7 batterijvak 8 luidspreker 9 sluiting batterijvak 10 scanning S in uitschakeling van de scanfunctie 11 microfoon 12 menu aan uitschakelaar houd ingedrukt om het toestel in of uit te schakelen select...

Page 6: ...splay verschijnt het symbool L indien u het lage zendvermogen selecteert Een lager zendvermogen verbruikt minder energie maar kan het bereik aanzienlijk beperken Afluisteren van een radiosignaal Gebru...

Page 7: ...n afstand van 5 tot 10cm van de luidspreker Verlaag het volume De walkietalkies staan te dicht ver van elkaar Respecteer de gebruiksafstand van 2m tot 5km Obstakels hinderen de transmissie 8 Veilighei...

Page 8: ...compartiment des piles ou du bloc accu 8 haut parleur 9 verrou du compartiment des piles ou du bloc accu 10 touche de balayage S activation d sactivation de la fonction de balayage 11 microphone 12 to...

Page 9: ...de la puissance d mission Enfoncer deux reprises pour afficher le menu de s lection de la puissance d mission S lectionner la puissance avec Confirmer avec PTT REMARQUE Le symbole L s affiche sur l a...

Page 10: ...ure r duira consid rablement la port e Son distordu Parler normalement une distance de 5 10cm du haut parleur Diminuer le volume Les unit s se trouvent trop pr t loin l une de l autre Respecter une di...

Page 11: ...oz 9 bloquear el compartimento de pilas o el pack de bater as 10 tecla de exploraci n S activaci n desactivaci n de la funci n de exploraci n 11 micr fono 12 tecla de acceso al men interruptor ON OFF...

Page 12: ...s veces para visualizar el men de selecci n de la potencia de emisi n Seleccione la potencia con Confirme con PTT NOTA El s mbolo L se visualiza en la pantalla LCD en el modo de emisi n d bil Una pote...

Page 13: ...cuerpo bolsillo o el cintur n disminuir considerablemente el alcance Distorsi n del sonido Hable normalmente a una distancia de 5 a 10cm del altavoz Disminuya el volumen Los aparatos est n demasiado c...

Page 14: ...C einen Rufton senden 7 Batteriefach 8 Lautsprecher 9 Lasche des Batteriefachs 10 Scanning S Ein Ausschaltung der Scanfunktion 11 Mikrofon 12 Men Ein Ausschalter halten Sie diese Taste gedr ckt um da...

Page 15: ...spr ch zu empfangen oder abzuh ren Siehe die Tabellen f r mehr Einzelheiten Eine niedrige hohe Sendeleistung w hlen Dr cken Sie zweimal um das Men Auswahl f r die Sendeleistung anzuzeigen W hlen Sie d...

Page 16: ...ung in Geb uden und Fahrzeugen in der N he von Strukturen aus Stahl Beton und Laub beschr nken den Bereich erheblich Wenn Sie ein Walkie Talkie auf dem K rper im Hosentasche oder al G rtel tragen wird...

Page 17: ...on commerciale Markenname denominaci n commercial BASIC PMR TRANSMITTER RECEIVER SET type or model type of model type ou mod le Typ oder Modell tipo o modelo PMRSET2 constituting the subject of this d...

Page 18: ...obtained from Technische gegevens zijn beschikbaar en kunnen worden aangevraagd bij Les donn es techniques sont disponibles et peuvent tre obtenues chez Die technische Dokumentation zu den oben genna...

Reviews: