background image


VMM500 

V. 01 – 17/01/2019 

79 

©Velleman nv 


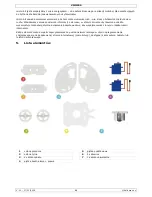
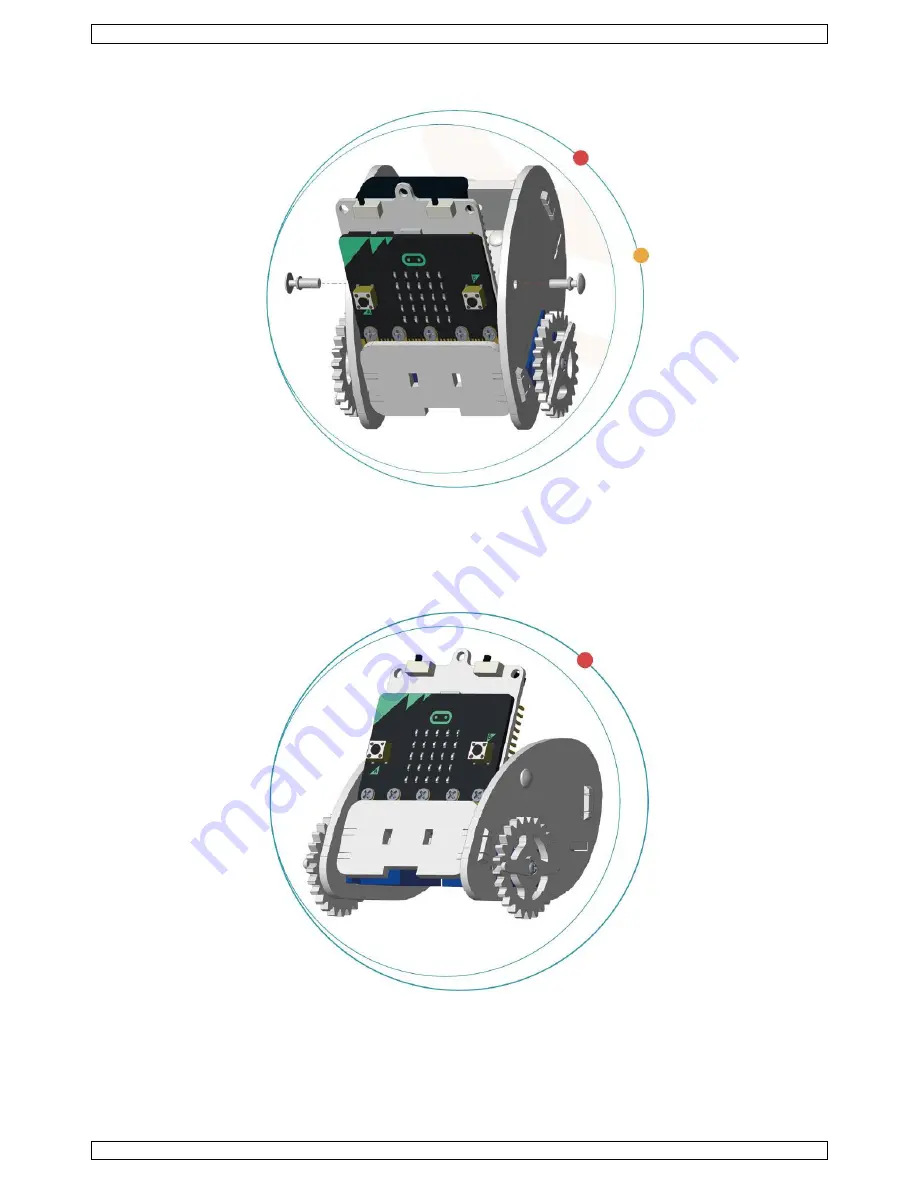
Befestigen Sie mit Nieten. 


Das Auto ist nun komplett zusammengebaut. 


Summary of Contents for VMM500

Page 1: ...VMM500 MICRO BIT EDUCATION SMART ROBOT KIT USER MANUAL 2 HANDLEIDING 19 MODE D EMPLOI 36 MANUAL DEL USUARIO 53 BEDIENUNGSANLEITUNG 70 INSTRUKCJA OBSŁUGI 87 MANUAL DO UTILIZADOR 104 ...

Page 2: ... caused by user modifications to the device is not covered by the warranty Only use the device for its intended purpose Using the device in an unauthorised way will void the warranty Damage caused by disregard of certain guidelines in this manual is not covered by the warranty and the dealer will not accept responsibility for any ensuing defects or problems Nor Velleman nv nor its dealers can be h...

Page 3: ...VMM500 V 01 17 01 2019 3 Velleman nv 5 Component List 1 front shield 5 base board 2 back shield 6 2x servo 3 2x wheel 7 1x universal wheel 4 left right side board ...

Page 4: ...VMM500 V 01 17 01 2019 4 Velleman nv 8 4x rivet 12 screwdriver 9 6x M2 2x5 tapping screw 13 Ring bit 10 5x M3x5 screw micro bit 11 rubber band ...

Page 5: ...nv 6 Assembly 6 1 Installing the universal wheel Before installation please get rid of the film paste on the acrylic components Components used base board 1x universal wheel Assembly Fix the universal wheels on the board with the rivets ...

Page 6: ...v 6 2 Installing the servos to each side of the board Components used 2x servo 4x M2 2x5 tapping screw left right side board Assembly Fix the servos to each side board with the tapping screws Hold the acrylic frosted side on the outside ...

Page 7: ...2019 7 Velleman nv 6 3 Assembling the Ring bit Car body Components used front shield base board back shield Assembly Fix the front and back shield to the side and base boards Hold the acrylic frosted side on the outside ...

Page 8: ...VMM500 V 01 17 01 2019 8 Velleman nv 6 4 Installing the Ring bit Car wheels Components used 2x wheel 2x M2 2x5 tapping screw Assembly Fix the wheels to the servo rod with the tapping screws ...

Page 9: ...VMM500 V 01 17 01 2019 9 Velleman nv 6 5 Fixing the micro bit to the Ring bit Components used Ring bit micro bit 5x M3x5 screw Assembly Fix the micro bit to the Ring bit with the screws ...

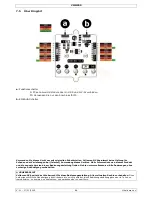
Page 10: ...leman nv 6 6 Wire connection Place 3x LR03 batteries into the holder of the Ring bit Slide and fit the micro bit assembly into the car Batteries are not included G brown ground servo V red power 3 V servo P1 P2 orange signal video ...

Page 11: ...VMM500 V 01 17 01 2019 11 Velleman nv Fix with the rivets Your car is now completed ...

Page 12: ...7 Code 7 1 Adding the package Go to www makecode org and click on the micro bit button to enter the code editor Click and select Advanced in the bottom of the code drawer Click Add Package Search for Ring bit Select the Ring bit Car package ...

Page 13: ...2 The S Walk We make a code to let the Ring bit Car run in an S shape 1 On start set the pins for the servos 2 Move forward for 1000 ms 3 Turn left for 1000 ms 4 Move forward for 2000 ms 5 Turn right for 1000 ms 6 Pause for 1000 ms 7 Move forward for 1000 ms 8 Download the programme into micro bit ...

Page 14: ... the same for the other blocks for steps 3 through 7 When complete we compile the program to generate a hex file Click on the download button and save the hex file to the Downloads folder C downloads This hex file is ready to be uploaded to the micro bit Plug the micro bit into the USB port via the micro USB cable Then drag and drop the hex file from the Downloads folder onto the micro bit Removab...

Page 15: ...x file is ready to be uploaded to the micro bit Plug the micro bit into the USB port via the micro USB cable Then drag and drop the hex file from the Downloads folder onto the micro bit Removable device to upload the programme Now place the Ring bit Car on a sheet of A4 A3 paper or cardboard Switch on the Ring bit Car and see what happens 7 4 Wireless control Let s make a remote control for contro...

Page 16: ...on under the forever loop Now place the block button A B is pressed next to the first if logic Place block button A is pressed next to the first else if logic and block button B is pressed next to the second else if logic The blocks can be found in the code drawer menu Now place the radio send number 1 block next to the first then logic and set the number to 1 Drag and drop a second radio send num...

Page 17: ...shown below and download this code into the second micro bit 1 Set the radio group Keep the sender and receiver the same 2 Set the pins for the servos 3 Save the received numbers into a variable item 4 Judge the number received 1 means to move forward 5 2 means to turn left 6 3 means to turn right 7 Other means to stop 8 Download the programme into micro bit When complete we compile the program to...

Page 18: ...y resulting from incorrect use of this device For more info concerning this product and the latest version of this manual please visit our website www velleman eu The information in this manual is subject to change without prior notice COPYRIGHT NOTICE The copyright to this manual is owned by Velleman nv All worldwide rights reserved No part of this manual may be copied reproduced translated or re...

Page 19: ...n 3 Algemene richtlijnen Raadpleeg de Velleman service en kwaliteitsgarantie achteraan deze handleiding Leer eerst de functies van het toestel kennen voor u het gaat gebruiken Om veiligheidsredenen mag u geen wijzigingen aanbrengen Schade door wijzigingen die de gebruiker heeft aangebracht aan het toestel valt niet onder de garantie Gebruik het toestel enkel waarvoor het gemaakt is De garantie ver...

Page 20: ...gebruikt een energiezuinige draadloze verbinding om met andere apparaten en het internet te communiceren Elk element is volledig programmeerbaar via gebruiksvriendelijke software op een speciale website microbit org die toegankelijk is vanaf een pc tablet of mobiele telefoon 5 Componentenlijst 1 frontplaat 5 basisplaat 2 achterplaat 6 2x servo 3 2x wiel 7 1x universeel wiel 4 zijplaat links rechts...

Page 21: ...VMM500 V 01 17 01 2019 21 Velleman nv 8 4x klinknagel 12 schroevendraaier 9 6x M2 2x5 zelftappende schroef 13 Ring bit 10 5x M3x5 schroef micro bit 11 rubberen ring ...

Page 22: ...Velleman nv 6 Montage 6 1 Het universele wiel monteren Voor de montage verwijder de lijmresten op de acrylcomponenten Componenten basisplaat 1x universeel wiel Montage Bevestig het universele wiel aan de plaat met de klinknagels ...

Page 23: ...De servo s aan weerszijden van de plaat monteren Componenten 2x servo 4x M2 2x5 zelftappende schroef zijplaat links rechts Montage Bevestig de servo s aan elke zijplaat met de zelftappende schroeven Houd de matte acrylplaat naar buiten gericht ...

Page 24: ...19 24 Velleman nv 6 3 De behuizing van de Ring bit Car monteren Componenten frontplaat basisplaat achterplaat Montage Bevestig de front en achterplaat aan de zij en basisplaten Houd de matte acrylplaat naar buiten gericht ...

Page 25: ...500 V 01 17 01 2019 25 Velleman nv 6 4 De wielen van de Ring bit Car monteren Componenten 2x wiel 2x M2 2x5 zelftappende schroef Montage Bevestig de wielen aan de servostangen met de zelftappende schroeven ...

Page 26: ...VMM500 V 01 17 01 2019 26 Velleman nv 6 5 De micro bit aan de Ring bit bevestigen Componenten Ring bit micro bit 5x M3x5 schroef Montage Bevestig de micro bit aan de Ring bit met de schroeven ...

Page 27: ...7 Velleman nv 6 6 Bedrading Plaats 3x LR03 batterijen in de houder van de Ring bit Schuif en monteer de micro bit in de auto Batterijen niet meegeleverd G bruin aarding servo V rood voeding 3 V servo P1 P2 oranje signaal video ...

Page 28: ...VMM500 V 01 17 01 2019 28 Velleman nv Bevestig met de klinknagels De montage is voltooid ...

Page 29: ...man nv 7 Code 7 1 Uitbreidingen Add Package Ga naar www makecode org en klik op de knop micro bit om naar de code editor te gaan Klik en selecteer Advanced in de blokgroep Klik op Add Package Zoek naar Ring bit Selecteer Ring bit Car ...

Page 30: ...bit Car een S beweging te laten uitvoeren 1 In On start stel de pinnen voor de servo s in 2 Beweeg voorwaarts gedurende 1000 ms 3 Draai links gedurende 1000 ms 4 Beweeg achterwaarts gedurende 2000 ms 5 Draai rechts gedurende 1000 ms 6 Wacht gedurende 1000 ms 7 Beweeg voorwaarts gedurende 1000 ms 8 Download het programma naar de micro bit ...

Page 31: ...de stappen uit voor de andere blokjes van stap 3 tot stap 7 Zet het programma om om een hex bestand te genereren Klik op de knop download en sla het hex bestand op in de map Downloads C downloads Dit hex bestand kan naar de micro bit geüpload worden Sluit de micro bit aan op de USB poort met de micro USB kabel Sleep het hex bestand van de map Downloads naar de micro bit Removable Device om het pro...

Page 32: ... naar de micro bit geüpload worden Sluit de micro bit aan op de USB poort met de micro USB kabel Sleep het hex bestand van de map Downloads naar de micro bit Removable Device om het programma te uploaden Plaats de Ring bit Car op een blad A4 A3 papier of karton Schakel de Ring bit Car in en ontdek wat er gebeurt 7 4 Draadloze aansturing Laten we een afstandsbediening maken om de Ring bit Car via R...

Page 33: ...lus forever Plaats het blokje button A B is pressed naast de eerste logische functie if Plaats het blok button A is pressed naast de eerste logische functie else if en het blok button B is pressed naast de tweede logische functie else if De blokjes bevinden zich in de blokgroep Plaats het blokje radio send number 1 naast de eerste logische functie then en stel het cijfer in op 1 Sleep een tweede b...

Page 34: ...wnload deze code naar de tweede micro bit 1 Stel de radiogroep in De zender en ontvanger moeten hetzelfde zijn 2 Stel de pinnen in voor de servo s 3 Bewaar de ontvangen cijfers in een variabel item 4 Interpreteer het ontvangen cijfer 1 betekent move forward 5 2 betekent turn left 6 3 betekent turn right 7 Een ander cijfer betekent to stop 8 Download het programma naar de micro bit Zet het programm...

Page 35: ...dit toestel Voor meer informatie over dit product en de laatste versie van deze handleiding zie www velleman eu De informatie in deze handleiding kan te allen tijde worden gewijzigd zonder voorafgaande kennisgeving AUTEURSRECHT Velleman nv heeft het auteursrecht voor deze handleiding Alle wereldwijde rechten voorbehouden Het is niet toegestaan om deze handleiding of gedeelten ervan over te nemen t...

Page 36: ...de l appareil avant de l utiliser Toute modification est interdite pour des raisons de sécurité Les dommages occasionnés par des modifications par le client ne tombent pas sous la garantie N utiliser l appareil qu à sa fonction prévue Un usage impropre annule d office la garantie La garantie ne se s applique pas aux dommages survenus en négligeant certaines directives de ce mode d emploi et votre ...

Page 37: ...eils et l Internet Chaque élément est entièrement programmable via un logiciel facile à utiliser sur un site Web dédié microbit org accessible depuis un PC une tablette ou un téléphone portable 5 Liste des composants 1 shield avant 5 carte de base 2 shield arrière 6 2x servo 3 2x roue 7 1x roue universelle 4 plaque latérale gauche droite ...

Page 38: ...VMM500 V 01 17 01 2019 38 Velleman nv 8 4x rivet 12 tournevis 9 6x M2 2x5 vis taraudeuse 13 Ring bit 10 5x M3x5 vis micro bit 11 anneau en caoutchouc ...

Page 39: ... 39 Velleman nv 6 Montage 6 1 Monter la roue universelle Avant le montage enlever la colle des composants acryliques Composants plaque de base 1x roue universelle Montage Fixer la roue universelle à la plaque avec les rivets ...

Page 40: ...man nv 6 2 Monter les servos sur les deux côtés de la plaque Composants 2x servo 4x M2 2x5 vis taraudeuse plaque latérale gauche droite Montage Fixer les servos sur les deux plaques latérales Tenir le côté acrylique vers l extérieur ...

Page 41: ...41 Velleman nv 6 3 Monter le corps de la Ring bit Car Composants shield avant plaque de base shield arrière Montage Fixer les shields avant et arrière aux plaques de base et latérales tenir le côté acrylique vers l extérieur ...

Page 42: ...VMM500 V 01 17 01 2019 42 Velleman nv 6 4 Monter les roues de la Ring bit Car Composants 2x roue 2x M2 2x5 vis taraudeuse Montage Fixer les roues à la tige de servo avec les vis taraudeuses ...

Page 43: ...VMM500 V 01 17 01 2019 43 Velleman nv 6 5 Fixer le micro bit au Ring bit Composants Ring bit micro bit 5x M3x5 vis Montage Fixer le micro bit au Ring bit avec les vis ...

Page 44: ...man nv 6 6 Câblage Insérer 3x piles LR03 dans le support de piles du Ring bit Insérer et monter le micro bit dans la voiture Les piles ne sont pas fournies G marron masse servo V rouge alimentation 3 V servo P1 P2 orange signal vidéo ...

Page 45: ...VMM500 V 01 17 01 2019 45 Velleman nv Fixer avec les rivets Le montage est prêt ...

Page 46: ...sions Add Package Aller à www makecode org et cliquer sur le bouton micro bit pour accéder à l éditeur de code Cliquer et sélectionner Advanced en bas de la colonne des blocs Cliquer sur Add Package Rechercher Ring bit Sélectionner l extension Ring bit Car ...

Page 47: ...ode qui permet à la voiture de se déplacer en forme de S S Walk 1 Définir les broches pour les servos 2 Marche avant pendant 1000 ms 3 Virage à gauche pendant 1000 ms 4 Marche avant pendant 2000 ms 5 Virage à droite pendant 1000 ms 6 Pause pendant 1000 ms 7 Marche avant pendant 1000 ms 8 Télécharger le programme et transférer sur le micro bit ...

Page 48: ...locs répéter les étapes 3 à 7 Une fois terminé compiler le programme pour générer un fichier hex Cliquer sur le bouton Télécharger et sauvegarder le fichier hex dans le dossier Téléchargements C Downloads Télécharger le fichier hex sur le micro bit Connecter le micro bit au port USB via le câble micro USB Glisser déposer le fichier hex depuis le dossier Teléchargements sur le micro bit Removable d...

Page 49: ...charger le fichier hex sur le micro bit Connecter le micro bit au port USB via le câble micro USB Glisser déposer le fichier hex depuis le dossier Teléchargements sur le micro bit Removable device pour télécharger le programme Poser la Ring bit Car sur une feuille de papier A4 A3 ou carton Allumer la Ring bit Car et découvrez ce qu il se passe 7 4 Contrôle sans fil Créons une télécommande pour con...

Page 50: ...e bloc button A B is pressed à côté de la première fonction logique if Placer le bloc button A is pressed à côté de la première fonction logique else if et le bloc button B is pressed à côté de la deuxième fonction logique else if Les blocs se trouvent dans la liste des blocs Placer le bloc radio send number 1 à côté de la première fonction logique then et régler le nombre sur 1 Glisser déposer un...

Page 51: ...sous et télécharger ce code dans le deuxième micro bit 1 Définir le groupe radio Utiliser le même nombre pour l émetteur et le récepteur 2 Définir les broches pour les servos 3 Sauvegarder les nombres reçus dans une variable 4 Interpréter le nombre reçu 1 signifie move forward 5 2 signifie turn left 6 3 signifie turn right 7 Autre signifie to stop 8 Télécharger le programme sur le micro bit Une fo...

Page 52: ...pouvant résulter de l utilisation de cet appareil Pour plus d informations concernant cet article et la dernière version de ce mode d emploi consulter notre site www velleman eu Les spécifications et le continu de ce mode d emploi peuvent être modifiés sans notification préalable DROITS D AUTEUR Velleman SA est l ayant droit des droits d auteur de ce mode d emploi Tous droits mondiaux réservés Tou...

Page 53: ...das Los daños causados por modificaciones no autorizadas no están cubiertos por la garantía Utilice sólo el aparato para las aplicaciones descritas en este manual Su uso incorrecto anula la garantía completamente Los daños causados por descuido de las instrucciones de seguridad de este manual invalidarán su garantía y su distribuidor no será responsable de ningún daño u otros problemas resultantes...

Page 54: ...VMM500 V 01 17 01 2019 54 Velleman nv 5 Lista de componentes 1 panel frontal 5 panel de base 2 panel trasero 6 2x servomotor 3 2x rueda 7 1x rueda universal 4 panel lateral izquierda derecha ...

Page 55: ...VMM500 V 01 17 01 2019 55 Velleman nv 8 4x remache 12 destornillador 9 6x tornillo autoroscante M2 2x5 13 Ring bit 10 5x tornillo M3x5 micro bit 11 goma elástica ...

Page 56: ...an nv 6 Montaje 6 1 Fijar la rueda universal Antes de empezar quite los residuos de cola de los componentes de acrílico Componentes utilizados panel de base 1x rueda universal Montaje Fije la rueda universal al panel con los remaches ...

Page 57: ...motores a los paneles laterales Componentes utilizados 2x servomotor 4x tornillo autoroscante M2 2x5 panel lateral izquierda derecha Montaje Fije los servomotores a los paneles laterales con los tornillos autroroscantes Mantenga el lado mate hacia el exterior ...

Page 58: ... nv 6 3 Montar la carcasa del Ring bit Componentes utilizados panel frontal panel de base panel trasero Montaje Fije el panel frontal y el panel trasero a los paneles laterales y el panel de base Mantenga el lado mate hacia el exterior ...

Page 59: ... 01 17 01 2019 59 Velleman nv 6 4 Fijar las ruedas del Ring bit Componentes utilizados 2x rueda 2x tornillo autoroscante M2 2x5 Montaje Fije las ruedas a la barra del servomotor con los tornillos autoroscantes ...

Page 60: ...VMM500 V 01 17 01 2019 60 Velleman nv 6 5 Fijar el micro bit al Ring bit Componentes utilizados Ring bit micro bit 5x tornillo M3x5 Montaje Fije el micro bit al Ring bit con los tornillos ...

Page 61: ...man nv 6 6 Esquema de conexión Introduzca 3 pilas LR03 en el portapilas del Ring bit Introduzca y monte el micro bit en el coche Las pilas no están incluidas G marrón masa servo V rojo alimentación 3 V servo P1 P2 naranja señal vídeo ...

Page 62: ...VMM500 V 01 17 01 2019 62 Velleman nv Fije con los remaches Ahora el coche está completamente montado ...

Page 63: ...uete Introduzca en el navegador la dirección www makecode org y haga clic en micro bit para abrir el editor de código Haga clic en Advanced Avanzado parte inferior del menú Haga clic en Add Package Extensiones Introduzca Ring bit Haga clic en el paquete Ring bit Car ...

Page 64: ...escribir un código para hacer que el Ring bit Car se mueva en forma de S 1 Bajo on start al iniciar es posible ajustar los pines para los servomotores 2 Avanzar 1000 ms 3 Girar hacia la izquierda 1000 ms 4 Avanzar 2000 ms 5 Girar hacia la derecha 1000 ms 6 Hacer una pausa 1000 ms 7 Avanzar 1000 ms 8 Descargar el programa al micro bit ...

Page 65: ...s para los otros bloques de paso 3 a 7 Luego compile el programa para generar un fichero hex Haga clic en el botón Download descargar y almacene el fichero hex file en la carpeta Downloads C Downloads Este fichero hex está listo para su subida a la micro bit Conecte el micro bit al puerto USB con el cable micro USB Luego arrastre y suelte el fichero hex de la carpeta Downloads en el Removable devi...

Page 66: ...para su subida a la micro bit Conecte el micro bit al puerto USB con el cable micro USB Luego arrastre y suelte el fichero hex de la carpeta Downloads en el Removable device de micro bit para subir el programa Ahora coloque el Ring bit Car en una hoja A4 A3 o un cartón Encienda el Ring bit Car y mire lo que pasa 7 4 Mando a distancia Ahora vamos a crear un mando a distancia a través de RF radiofre...

Page 67: ...te el nuevo condicional bajo el bloque forever para siempre Ponga el bloque button A B is pressed botón A B presionado junto al primer condicional if si Ponga el bloque button A is pressed botón A presionado junto al primer condicional else if si no y el bloque button B is pressed botón B presionado junto al segundo condicional else if si no Los bloques se sitúan en el menú bajo Input Entrada Ahor...

Page 68: ...de micro bit para subir el programa Código del Ring bit Car Arrastre y suelte los bloques véase la imagen y descargue este código a la segunda tarjeta programable micro bit 1 Seleccione el grupo de radio Asegúrese de que el número del emisor y del transmisor coincidan 2 Ajustar los pines para los servomotores 3 Almacenar los números recibidos 4 Juzgar el número recibido 1 avanzar 5 2 girar hacia l...

Page 69: ...de este aparato Para más información sobre este producto y la versión más reciente de este manual del usuario visite nuestra página www velleman eu Se pueden modificar las especificaciones y el contenido de este manual sin previo aviso DERECHOS DE AUTOR Velleman NV dispone de los derechos de autor para este manual del usuario Todos los derechos mundiales reservados Está estrictamente prohibido rep...

Page 70: ...zwasser aus 3 Allgemeine Richtlinien Siehe Velleman Service und Qualitätsgarantie am Ende dieser Bedienungsanleitung Nehmen Sie das Gerät erst in Betrieb nachdem Sie sich mit seinen Funktionen vertraut gemacht haben Eigenmächtige Veränderungen sind aus Sicherheitsgründen verboten Bei Schäden verursacht durch eigenmächtige Änderungen erlischt der Garantieanspruch Verwenden Sie das Gerät nur für Anw...

Page 71: ...eine energiearme kabellose Verbindung verwenden um mit anderen Geräten und dem Internet zusammenzuarbeiten Jedes Element ist über benutzerfreundliche Software programmierbar Sie können über PC Tablet oder Mobiltelefon auf die Website microbit org zugreifen 5 Komponentenliste 1 Frontplatte 5 Basisplatte 2 Rückplatte 6 2x Servomotor 3 2x Reifen 7 1x Universal Rad 4 Seitenplatte links rechts ...

Page 72: ...VMM500 V 01 17 01 2019 72 Velleman nv 8 4x Niet 12 Schraubendreher 9 6x Blechschraube M2 2x5 13 Ring bit 10 5x Schraube M3x5 micro bit 11 Gummiring ...

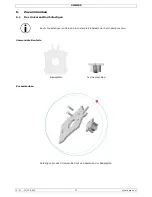
Page 73: ...mmenbau 6 1 Das Universal Rad befestigen Bevor Sie anfangen entfernen Sie zuerst die Klebereste der Acryl Komponenten Verwendete Bauteile Basisplatte 1x Universal Rad Zusammenbau Befestigen Sie das Universal Rad mit den Nieten an der Basisplatte ...

Page 74: ...en Seitenplatten befestigen Verwendete Bauteile 2x Servomotor 4x Blechschraube M2 2x5 Seitenplatte links rechts Zusammenbau Befestigen Sie die Servomotoren mit den Blechschrauben an den Seitenplatten Beachten Sie dass die matte Seite sich an der Außenseite befindet ...

Page 75: ...s Gehäuse vom Ring bit montieren Verwendete Bauteile Frontplatte Basisplatte Rückplatte Zusammenbau Befestigen Sie die Front und Rückplatte an den Seitenplatten und der Basisplatte Beachten Sie dass die matte Seite sich an der Außenseite befindet ...

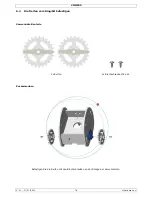
Page 76: ...1 17 01 2019 76 Velleman nv 6 4 Die Reifen vom Ring bit befestigen Verwendete Bauteile 2x Reifen 2x Blechschraube M2 2x5 Zusammenbau Befestigen Sie die Reifen mit den Blechschrauben an der Stange der Servomotoren ...

Page 77: ...M500 V 01 17 01 2019 77 Velleman nv 6 5 Den micro bit am Ring bit befestigen Verwendete Bauteile Ring bit micro bit 5x Schraube M3x5 Zusammenbau Befestigen Sie den micro bit mit den Schrauben am Ring bit ...

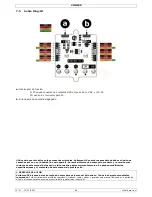
Page 78: ...hlussplan Legen Sie 3 LR03 Batterien in den Batteriehalter des Ring bit ein Schieben und montieren Sie den micro bit in das Auto Batterien nicht im Lieferumfang enthalten G braun Masse Servo V rot Stromversorgung 3 V Servo P1 P2 orange Signal Video ...

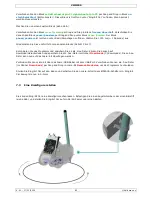
Page 79: ...VMM500 V 01 17 01 2019 79 Velleman nv Befestigen Sie mit Nieten Das Auto ist nun komplett zusammengebaut ...

Page 80: ... hinzufügen Gehen Sie zu www makecode org und klicken Sie auf micro bit um den Code Editor zu öffnen Klicken Sie auf Advanced Fortgeschritten unten im Menü Klicken Sie auf Add Package Erweiterungen Geben Sie Ring bit ein Klicken Sie auf das Paket Ring bit Car ...

Page 81: ...ing bit Car in S Form bewegen zu lassen 1 Unter on start Beim Starten lassen sich die Pins für die Servomotoren einstellen 2 Vorwärts fahren 1000 ms 3 Nach links drehen 1000 ms 4 Vorwärts fahren 2000 ms 5 Nach rechts drehen 1000 ms 6 Pausieren 1000 ms 7 Vorwärts fahren 1000 ms 8 Das Programm auf den micro bit übertragen ...

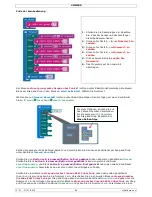
Page 82: ...ie anderen Blöcke Schritt 3 bis 7 Kompilieren Sie das Programm und speichern Sie es als Hex Datei Klicken Sie danach auf Download Herunterladen und speichern Sie die hex Datei im Ordner Downloads C downloads Diese hex Datei kann nun auf das micro bit übertragen werden Verbinden Sie den micro bit über das micro USB Kabel mit dem USB Port Verschieben Sie nun die hex Datei im Ordner Downloads per Dra...

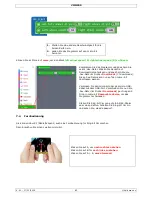
Page 83: ...tei kann nun auf den micro bit übertragen werden Verbinden Sie den micro bit über das micro USB Kabel mit dem USB Port Verschieben Sie nun die hex Datei im Ordner Downloads per Drag and Drop in micro bit Removable device um das Programm hochzuladen Stellen Sie Ring bit Car nun auf ein A4 A3 Papier oder einen Karton Schalten Sie Ring bit Car ein und sehen Sie was da passiert 7 4 Fernbedienung Sie k...

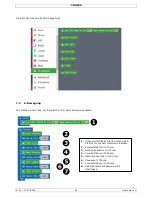
Page 84: ...forever dauerhaft Stellen Sie nun Button A B is pressed Button A B ist gedrückt neben den ersten Konditional if wenn Stellen Sie Block button A is pressed Button A ist gedrückt neben den ersten Konditional else if ansonsten und Block button B is pressed Button B ist gedrückt neben den zweite Konditional else if ansonsten Diese Blöcke sind im Menü unter Input Eingabe zu finden Stellen Sie einen Blo...

Page 85: ...Programm hochzuladen Ring bit Car Code Verschieben Sie die Blöcke per Drag and Drop siehe Abb und laden Sie diesen Code auf den zweiten micro bit herunter 1 Stellen Sie die Radiogruppe ein Beachten Sie dass der Sender und der Empfänger dieselbe Nummer haben 2 Die Pins für die Servomotoren einstellen 3 Die empfangenen Nummern speichern 4 Die empfangene Nummer bewerten 1 vorwärts gehen 5 2 nach link...

Page 86: ...bei falscher Anwendung dieses Gerätes Mehr Informationen zu diesem Produkt und die neueste Version dieser Bedienungsanleitung finden Sie hier www velleman eu Alle Änderungen ohne vorherige Ankündigung vorbehalten URHEBERRECHT Velleman NV besitzt das Urheberrecht für diese Bedienungsanleitung Alle weltweiten Rechte vorbehalten Ohne vorherige schriftliche Genehmigung des Urhebers ist es nicht gestat...

Page 87: ...tku wewnątrz pomieszczeń Chronić uchwyt przed deszczem wilgocią rozpryskami i ściekającymi cieczami 3 Informacje ogólne Proszę zapoznać się z informacjami w części Usługi i gwarancja jakości Velleman na końcu niniejszej instrukcji Przed rozpoczęciem pracy z urządzeniem należy zapoznać się z jego funkcjami Wprowadzanie zmian w urządzeniu jest zabronione ze względów bezpieczeństwa Uszkodzenia spowod...

Page 88: ...a informacji o kierunku w którym zmierza użytkownik ponadto wykorzystuje niskoenergetyczne połączenie bezprzewodowe aby współpracować z innymi urządzeniami i internetem Każdy element można w pełni zaprogramować za pośrednictwem łatwego w użyciu oprogramowania znajdującego się na dedykowanej stronie internetowej microbit org dostępnej z komputera tabletu lub telefonu komórkowego 5 Lista elementów 1...

Page 89: ...VMM500 V 01 17 01 2019 89 Velleman nv 8 4x nit 12 wkrętak 9 6x wkręt samogwintujący M2 2x5 13 Ring bit 10 5x śruba M3x5 micro bit 11 pierścień gumowy ...

Page 90: ... nv 6 Montaż 6 1 Montaż kółka uniwersalnego Przed montażem należy usunąć folię ochronną z elementów akrylowych Wykorzystywane elementy płytka podstawowa 1x kółko uniwersalne Montaż Zamocować kółka uniwersalne na płytce przy użyciu nitów ...

Page 91: ...bu płytkach bocznych Wykorzystywane elementy 2x siłownik 4x wkręt samogwintujący M2 2x5 płytka boczna lewa prawa Montaż Zamocować siłowniki na obu płytkach bocznych przy użyciu wkrętów samogwintujących Matowa strona elementu akrylowego musi znajdować się na zewnątrz ...

Page 92: ...taż nadwozia samochodu Ring bit Car Wykorzystywane elementy osłona przednia płytka podstawowa osłona tylna Montaż Przymocować osłonę przednią i tylną do płytek bocznych i podstawowej Matowa strona elementu akrylowego musi znajdować się na zewnątrz ...

Page 93: ... 93 Velleman nv 6 4 Montaż kół zębatych samochodu Ring bit Car Wykorzystywane elementy 2x kółko zębate 2x wkręt samogwintujący M2 2x5 Montaż Zamocować kółka zębate na trzpieniu siłownika przy użyciu wkrętów samogwintujących ...

Page 94: ...VMM500 V 01 17 01 2019 94 Velleman nv 6 5 Mocowanie micro bit do Ring bit Wykorzystywane elementy Ring bit micro bit 5x śruba M3x5 Montaż Przymocować micro bit do Ring bit przy użyciu śrub ...

Page 95: ...6 6 Połączenie kablowe Umieścić 3 baterie LR03 w uchwycie Ring bit Włożyć i dopasować do samochodu moduł micro bit Baterie nie wchodzą w skład zestawu G brązowy masa siłownik V czerwony zasilanie 3 V siłownik P1 P2 pomarańczowy sygnał wideo ...

Page 96: ...VMM500 V 01 17 01 2019 96 Velleman nv Zamocować nitami Samochód jest już gotowy ...

Page 97: ... nv 7 Kod 7 1 Dodawanie pakietów Przejść na stronę www makecode org i kliknąć przycisk micro bit aby wejść w edytor kodów Kliknąć i wybrać Advanced na dole szuflady kodów Kliknąć Add Package Wyszukać Ring bit Wybrać pakiet Ring bit Car ...

Page 98: ...wia poruszanie się samochodu po trasie o kształcie litery S S Walk 1 Na początek ustawić piny dla siłowników 2 Poruszać się do przodu przez 1000 ms 3 Skręcać w lewo przez 1000 ms 4 Poruszać się do przodu przez 2000 ms 5 Skręcać w prawo przez 1000 ms 6 Zrobić przerwę na 1000 ms 7 Poruszać się do przodu przez 1000 ms 8 Pobrać program na micro bit ...

Page 99: ...nych blokach powtórzyć kroki 3 7 Po ukończeniu skompilowany zostanie program do wygenerowania pliku hex Kliknąć przycisk pobierania download i zapisać plik hex w folderze pobierania C Pobrane Plik hex jest gotowy do załadowania na micro bit Podłączyć micro bit do portu USB przy użyciu kabla micro USB Następnie przeciągnąć plik hex z folderu Pobrane na urządzenie wymienne Removable device micro bit...

Page 100: ...SB przy użyciu kabla micro USB Następnie przeciągnąć plik hex z folderu Pobrane na urządzenie wymienne Removable device micro bit aby załadować program Teraz można ustawić samochód Ring bit Car na arkuszu papieru lub tektury o formacie A4 A3 Pozostaje włączyć samochód Ring bit Car i zobaczyć co się stanie 7 4 Sterowanie bezprzewodowe Do sterowania samochodem Ring bit Car za pośrednictwem RF często...

Page 101: ... i upuścić pod pętlą forever Teraz należy umieścić blok button A B is pressed obok pierwszej funkcji logicznej if Umieścić blok button A is pressed obok pierwszej funkcji logicznej else if a blok button B is pressed obok drugiej funkcji logicznej else if Bloki można znaleźć w menu szuflady kodów Teraz umieścić blok radio send number 1 obok pierwszej funkcji logicznej then i ustawić numer na 1 Prze...

Page 102: ...1 Wybrać odpowiednie radio radio set group Nadajnik i odbiornik powinny być takie same 2 Ustawić piny dla siłowników 3 Zachować otrzymane numery received numbers w pozycji zmiennej variable 4 Postąpić zgodnie z poleceniem przypisanym do otrzymanego numeru 1 oznacza poruszanie się do przodu move forward 5 2 oznacza skręt w lewo turn left 6 3 oznacza skręt w prawo turn right 7 Inny oznacza zatrzyman...

Page 103: ...skać więcej informacji dotyczących produktu oraz najnowszą wersję niniejszej instrukcji należy odwiedzić naszą stronę internetową www velleman eu Informacje zawarte w niniejszej instrukcji obsługi mogą ulec zmianie bez wcześniejszego powiadomienia INFORMACJA O PRAWACH AUTORSKICH Właścicielem praw autorskich do niniejszej instrukcji jest firma Velleman nv Wszelkie prawa są zastrzeżone na całym świe...

Page 104: ...inal deste manual do utilizador Familiarize se com o funcionamento do aparelho antes de o utilizar Por razões de segurança estão proibidas quaisquer modificações do aparelho desde que não autorizadas Os danos causados por modificações não autorizadas do aparelho não estão cobertos pela garantia Utilize o aparelho apenas para as aplicações descritas neste manual Uma utilização incorreta anula a gar...

Page 105: ...xão sem fios de baixa energia para interagir com outros dispositivos e com a Internet Cada elemento é totalmente programável através de um software de fácil utilização existente num site destinado para tal microbit org acessível a partir de um PC tablet ou telemóvel 5 Lista dos Componentes 1 escudo frontal 5 placa base 2 escudo traseiro 6 2x servo 3 2x roda 7 1 x roda universal 4 placa lateral esq...

Page 106: ...VMM500 V 01 17 01 2019 106 Velleman nv 8 4 x rebite 12 chave de fendas 9 6x parafuso de rosca M2 2x5 13 Ring bit 10 5 x parafuso M3x5 micro bit 11 banda em borracha ...

Page 107: ...leman nv 6 Montagem 6 1 Instalar a roda universal Antes da instalação retire filme que cobre os componentes de acrílico Componentes utilizados placa base 1x roda universal Montagem Fixe as rodas universais à placa usando os rebites ...

Page 108: ...rvos em cada um dos lados da placa Componentes utilizados 2x servo 4x parafuso de rosca M2 2x5 placa lateral esquerda direita Montagem Fixe os servos a cada uma das placas laterais usando os parafusos de rosca O lado de acrílico fosco deve ficar virado para fora ...

Page 109: ...leman nv 6 3 Montagem do corpo do Ring bit Car Componente utilizados escudo frontal placa base escudo traseiro Montagem Fixe o escudo dianteiro e traseiro às placas base e lateral O lado de acrílico fosco deve ficar virado para fora ...

Page 110: ...500 V 01 17 01 2019 110 Velleman nv 6 4 Montagem das rodas do Ring bit Car Componentes utilizados 2x roda 2x parafusos de rosca M2 2x5 Montagem Fixe as rodas na haste do servo usando os parafusos de rosca ...

Page 111: ...VMM500 V 01 17 01 2019 111 Velleman nv 6 5 Fixação do micro bit ao Ring bit Componente utilizados Ring bit micro bit 5x parafuso M3x5 Montagem Fixe o micro bit ao Ring bit usando os parafusos ...

Page 112: ...an nv 6 6 Ligação dos fios Coloque 3 pilhas LR03 no suporte do Ring bit Faça deslizar e encaixe o conjunto micro bit no carro As pilhas não estão incluídas G castanho terra servo V vermelho potência 3 V servo P1 P2 laranja sinal vídeo ...

Page 113: ...VMM500 V 01 17 01 2019 113 Velleman nv Fixe com os rebites O seu carro está pronto ...

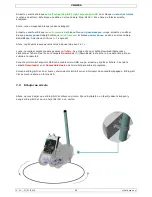
Page 114: ... Code 7 1 Adicionar um pacote Vá a www makecode org e clique no botão micro bit para entrar no editor de código Clique e selecione Advanced na parte inferior do separador Clique em Add Package Procurar Ring bit Selecione o pacote Ring bit Car ...

Page 115: ...Walk Geramos um código para permitir que o Ring bit Car corra em S 1 No início atribua os pinos aos servos 2 Avançar para 1000 ms 3 Virar à esquerda para 1000 ms 4 Avançar para 2000 ms 5 Virar à direita para 1000 ms 6 Pausa para 1000 ms 7 Avançar para 1000 ms 8 Descarregue o programa em into micro bit ...

Page 116: ...os blocos seguindo as etapas de 3 a 7 Quando concluído compilamos o programa para gerar um ficheiro hex Clique no botão para descarregar e guarde o ficheiro hex na pasta Downloads C downloads Este ficheiro hex file está pronto a ser carregado para o micro bit Ligue o micro bit à porta USB através do cabo micro USB Em seguida arraste e largue o ficheiro hex a partir da pastaDownloads no Removable d...

Page 117: ...stá pronto a ser carregado para o micro bit Ligue o micro bit à porta USB através do cabo micro USB Em seguida arraste e largue o ficheiro hex a partir da pastaDownloads no Removable device do micro bit para carregar o programa para o controlo remoto Agora coloque o Ring bit Car numa folha de papel A4 A3 ou cartão Ligue o Ring bit Car e veja o que acontece 7 4 Controlo sem fios wireless Vamos cria...

Page 118: ...ixo do loop forever Agora coloque o bloco button A B is pressed junto à primeira lógica if Coloque o bloco button A is pressed Junto à primeira lógica else if e o bloco button B is pressed junto à segunda lógica else if Os blocos podem ser encontrados no menu do desenhador de códigos Agora coloque o bloco radio send number 1 junto à primeira lógica then e defina o número para 1 Arraste e largue o ...

Page 119: ...ódigos conforme indicado abaixo e descarregue este código para o segundo micro bit 1 Defina o grupo de rádio Mantenha o remetente e o destinatário iguais 2 Atribua os pinos aos servos 3 Guarde os números recebidos num item variável 4 Interprete o número recebido 1 significa move forward 5 2 significa turn left 6 3 significa turn right 7 Outro significa to stop 8 Descarregue o programa para o micro...

Page 120: ...ido do aparelho Para mais informação sobre este produto e para aceder à versão mais recente deste manual do utilizador visite a nossa página www velleman eu Podem alterar se as especificações e o conteúdo deste manual sem aviso prévio DIREITOS DE AUTOR A Velleman NV detém os direitos de autor deste manual do utilizador Todos os direitos mundiais reservados É estritamente proibido reproduzir traduz...

Page 121: ...s dispositions légales en vigueur dans l UE Afin de garantir la qualité nous soumettons régulièrement nos produits à des contrôles de qualité supplémentaires tant par notre propre service qualité que par un service qualité externe Dans le cas improbable d un défaut malgré toutes les précautions il est possible d invoquer notre garantie voir les conditions de garantie Conditions générales concernan...
Page 122: ...tkowania np baterie ładowalne nieładowalne wbudowane lub wymienne żarówki paski napędowe gumowe elementy napędowe nieograniczona lista usterka wynika z działania pożaru zalania wszelkimi cieczami uderzenia pioruna upadku lub klęski żywiołowej itp usterka wynika z zaniedbań eksploatacyjnych tj umyślne bądź nieumyślne zaniechanie czyszczenia konserwacji wymiany materiałów ekspolatacyjnych niedbalstw...

Reviews: