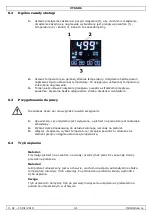
background image


VTSSD6 

V. 01 

 15/01/2019 

43 

©Velleman nv 

7.2


Lutowanie QFP 


1.


Nałożyć pastę lutowniczą. Nałożyć odpowiednią ilość pasty i topnika. Umieścić SMD 

na PCB. 


2.


Podgrzać SMD.


3.


Lutować, nagrzewając równomiernie SMD.


4.


Po ukończeniu lutowania oczyścić obszar środkiem do 

usuwania topnika. 


Uwaga 


Zawsze lutować metodą bezołowiową. Praca z lutem bezołowiowym wymaga 

temperatury roboczej około 30

 °C (54 

°F) wyższej niż podczas używania lutu cynowo

-

ołowiowego (lut 60/40).


7.3


Rozlutowywanie QFP 


1.


Stopić lut. Przytrzymać pistolet tak, aby dysza znajdowała się bezpośrednio nad 

układem scalonym, nie dotykając go. Pozwolić, aby gorące powietrze stopiło lut. 

Zachować ostrożność, aby nie dotknąć dyszą przewodów układu scalonego.


2.


Po stopieniu lutu, usunąć szczypcami układ scal

ony. 


3.


Wyłączyć stację. Nie odłączać od sieci zasilającej, dopóki urządzenie wydmuchuje 

powietrze chłodzące przez pistolet.


4.


Usunąć wszelkie pozostałości lutu za pomocą taśmy lub specjalnego narzędzia do 

rozlutowywania. 


8.


Wyłączanie stacji


1.


Po użyciu umieścić pistolet w uchwycie i wyłączyć stację.


2.


Po wyłączeniu urządzenia pozostawić wtyczkę w gniazdku na kilka minut. Gdy 

urządzenie zostanie wyłączone, funkcja automatycznego chłodzenia przez krótki 

okres powoduje wydmuchiwanie powietrza chłodzącego przez rurę elementu 

grzejnego. Pozwala to chronić element grzejny przed uszkodzeniem i wydłuża jego 

żywotność. Podczas procesu chłodzenia nie należy odłączać zasilania.


3.


Odczekać do momentu zakończenia procesu chłodzenia, a następnie odłączyć 

wtyczkę. Urządzenie zużywa niewielką ilość energii elektrycznej, nawet gdy jest 

wyłączone.


9.


Utrzymanie i konserwacja 


9.1


Informacje ogólne 


Przeprowadzać konserwację wyłącznie w zakresie opisanym w niniejszej instrukcji. 

Inne zabiegi konserwacyjne i naprawy wymagają skontaktowania się z 

autoryzowanym sprzedawcą lub punktem serwisowym.


W przypadku uszkodzenia pistoletu na powietrze lub stacji, lub jeśli urządzenie z 

jakiegokolwiek powodu nie działa poprawnie, należy je zwrócić do działu 

serwisowego autoryzowanego sprzedawcy lub agenta serwisowego. 


Zewnętrzna pokrywa pistoletu na powietrze i stacji może być czyszczona wilgotną 

ściereczką z niewielką ilością płynnego detergentu. Nigdy nie zanurzać urządzenia w 

cieczy, nie dopuścić, aby ciecz dostała się pod obudowę stacji. Nigdy nie używać 

rozpuszczalnika do czyszczenia obudowy. 


Należy stosować wyłącznie oryginalne części zamienne.


Summary of Contents for VTSSD6

Page 1: ...VTSSD6 USER MANUAL 3 HANDLEIDING 10 MODE D EMPLOI 17 MANUAL DEL USUARIO 24 BEDIENUNGSANLEITUNG 31 INSTRUKCJA OBSŁUGI 38 MANUAL DO UTILIZADOR 45 ...

Page 2: ...VTSSD6 V 01 15 01 2019 2 Velleman nv ...

Page 3: ... your dealer 2 Safety Instructions Read and understand this manual and all safety signs before using this appliance Indoor use only Do not crimp the power cord and protect it against damage Warning The supply cord cannot be replaced If the cord is damaged the appliance should be scrapped Make sure that the available voltage does not exceed the voltage stated in the specifications of this manual Pl...

Page 4: ...his tool must be placed on its stand when not in use Do not leave the tool unattended when switched on Use the soldering iron on a heatproof workbench Let a hot soldering iron cool down naturally and do not immerse in water This device can be used by children aged from 8 years and above and persons with reduced physical sensory or mental capabilities or lack of experience and knowledge if they hav...

Page 5: ... the temperature 7 temperature unit As set by the user 8 correction value Correction value for the heating element 9 SET ENTER buttons Setting buttons 5 Installation 1 Install the appliance on a flat stable and fire resistant surface 2 Make sure that the power switch at the back of the appliance is in the off position 0 3 Plug the power cord into a suitable earthed mains outlet 6 Operation 6 1 Pre...

Page 6: ...on Do not force the nozzle or bend its edges with pliers 1 Make sure the appliance is switched off and the air gun is completely cooled down 2 Select the nozzle matching the IC and slide it onto the air gun 3 Switch on the appliance select the temperature and airflow and wait for the heater to be at the set temperature 6 4 Sleep Mode Method 1 While holding the air gun press and hold the green butt...

Page 7: ... if you just need to adjust one of the three channels you can change the temperature and airflow values for that channel by simply pressing the ENTER button to store them To protect the heater you should never set the airflow to zero 0 We recommend setting a higher airflow value for higher temperatures 7 How to Solder 7 1 Precautions To extend the life of the heating element in the hot air gun do ...

Page 8: ...itching off leave the power cord plugged in for a few minutes When you switch off the unit the automatic cooling function blows cooling air through the heater pipe for a short period This protects the heater from damage and extends its lifetime Do not disconnect the mains plug during this cooling process 3 Wait until the cooling process has stopped then disconnect the power plug The device uses a ...

Page 9: ...leman nv cannot be held responsible in the event of damage or injury resulting from incorrect use of this device For more info concerning this product and the latest version of this manual please visit our website www velleman eu The information in this manual is subject to change without prior notice COPYRIGHT NOTICE The copyright to this manual is owned by Velleman nv All worldwide rights reserv...

Page 10: ...eidsvoorschriften Lees en begrijp deze handleiding en de veiligheidsinstructies vóór ingebruikname Uitsluitend voor gebruik binnenshuis De voedingskabel mag niet beschadigd zijn of ingekort worden Waarschuwing De voedingskabel kan niet worden vervangen Als de kabel beschadigd is dan moet het toestel uit gebruik worden genomen De beschikbare netspanning mag niet hoger zijn dan de spanning vermeld i...

Page 11: ...onbeheerd achter wanneer het ingeschakeld is Gebruik de soldeerbout op een hittebestendig oppervlak Laat de soldeerbout op natuurlijke wijze afkoelen en dompel de soldeerbout nooit onder in water Dit toestel is geschikt voor gebruik door kinderen vanaf 8 jaar door personen met fysieke zintuiglijke of verstandelijke beperkingen of door personen met gebrek aan ervaring en kennis op voorwaarde dat di...

Page 12: ...temperatuur te verhogen verlagen 7 temperatuureenheid Door de gebruiker in te stellen 8 correctiewaarde Correctiewaarde voor het verwarmingselement 9 SET ENTER knoppen Instelknoppen 5 Installatie 1 Plaats het toestel op een vlak stabiel en stabiel en hittebestendig oppervlak 2 Zorg ervoor dat de voedingsschakelaar aan de achterkant van het toestel op OFF staat 0 3 Steek de stekker in een geschikt ...

Page 13: ...en tang 1 Zorg ervoor dat het toestel uitgeschakeld is en het pistool volledig afgekoeld is 2 Kies het mondstuk dat overeenkomt met de printplaat en bevestig het op het pistool 3 Schakel het toestel is selecteer de gewenster temperatuur en luchtstroom en wacht tot de ingestelde temperatuur is bereikt 6 4 Slaapmodus Methode 1 Houd terwijl u het pistool vasthoudt houd de groene knop op het pistool g...

Page 14: ...de temperatuur en luchtstroomwaarden voor dat kanaal wijzigen met de ENTER knop om ze op te slaan Om het toestel te beschermen stel de luchtstroom nooit op nul 0 in We raden u aan om een hogere luchtstroomwaarde in te stellen voor hogere temperaturen 7 Hoe te solderen 7 1 Instructies Om de levensduur van het verwarmingselement te verlengen gebruik het toestel niet continu met een lage luchtstroom ...

Page 15: ...ruik het pistool in de houder en schakel het toestel uit 2 Laat na het uitschakelen de voedingskabel aangesloten gedurende enkele minuten Wanneer u het toestel uitschakelt dan wordt de automatische koelfunctie geactiveerd en wordt koude lucht door het verwarmingselement geblazen Dit beschermt het toestel tegen materiële schade en verlengt de levensduur Ontkoppel het toestel niet tijdens het afkoel...

Page 16: ...aansprakelijk voor schade of kwetsuren bij verkeerd gebruik van dit toestel Voor meer informatie over dit product en de laatste versie van deze handleiding zie www velleman eu De informatie in deze handleiding kan te allen tijde worden gewijzigd zonder voorafgaande kennisgeving AUTEURSRECHT Velleman nv heeft het auteursrecht voor deze handleiding Alle wereldwijde rechten voorbehouden Het is niet t...

Page 17: ...ndeur 2 Consignes de sécurité Lire et comprendre ce mode d emploi et toutes les consignes de sécurité avant d utiliser l appareil Utiliser cet appareil uniquement à l intérieur Le câble d alimentation ne peut pas être serti ou endommagé Avertissement Il est impossible de remplacer le câble d alimentation Si le câble est endommagé il est interdit d utiliser l appareil S assurer que la tension résea...

Page 18: ...upport lorsqu il n est pas utilisé Ne jamais laisser l appareil sans surveillance lorsqu il est branché Utiliser le fer à souder sur une surface thermorésistante Laisser refroidir la panne de manière naturelle et ne jamais l immerger dans de l eau Cet appareil peut être utilisé par des enfants âgés de 8 ans et plus et des personnes manquant d expérience et de connaissances ou dont les capacités ph...

Page 19: ...augmenter diminuer la température 7 unité de température Réglable par l utilisateur 8 valeur de correction Valeur de correction pour l élément chauffant 9 boutons SET ENTER Boutons de réglage 5 Installation 1 Installer l appareil sur une surface plane stable et thermorésistante 2 S assurer que l interrupteur on off est réglé sur OFF 0 3 Brancher le câble d alimentation sur une prise secteur approp...

Page 20: ... assurer que l appareil est éteint et que le pistolet est complètement refroidi 2 Choisir la buse correspondant au CI et fixer sur le pistolet 3 Allumer l appareil sélectionner la température et le flux d air Attendre jusqu à ce que l appareil ait atteint la température souhaitée 6 4 Mode sommeil Méthode 1 Tout en maintenant le pistolet maintenir enfoncé le bouton vert du pistolet pendant trois se...

Page 21: ...flux d air pour ce canal en appuyant sur le bouton ENTER pour les enregistrer Pour protéger l appareil ne jamais régler le flux d air sur zéro 0 Nous recommandons un réglage du flux d air plus élevé pour des températures plus élevées 7 Comment souder 7 1 Précautions Pour prolonger la durée de vie de l élément chauffant ne pas utiliser l appareil en mode continu avec un flux d air faible et une tem...

Page 22: ...tre le pistolet dans le support et éteindre l appareil 2 Après avoir éteint l appareil laisser le câble d alimentation branché quelques minutes Après l extinction de l appareil la fonction de refroidissement s activera automatiquement et souffle brièvement de l air froid à travers l élément chauffant Cela protège l élément chauffant contre des dommages et prolonge sa durée de vie Ne pas débrancher...

Page 23: ...sponsable des dommages ou lésions directs ou indirects pouvant résulter de l utilisation de cet appareil Pour plus d informations concernant cet article et la dernière version de ce mode d emploi consulter notre site www velleman eu Les spécifications et le continu de ce mode d emploi peuvent être modifiés sans notification préalable DROITS D AUTEUR Velleman SA est l ayant droit des droits d auteu...

Page 24: ...de seguridad Lea y comprenda este manual y todas las instrucciones de seguridad antes de usar el aparato Utilice el aparato sólo en interiores No aplaste el cable de alimentación y protéjalo contra posibles daños Advertencia No es posible reemplazar el cable de alimentación No utilice el aparato si el cable está dañado Asegúrese de que la tensión de red no sea mayor que la tensión indicada en las ...

Page 25: ...A Coloque el aparato en el soporte si no lo está utilizando No lo deje nunca activado sin vigilancia Utilice el soldador en una superficie resistente al calor Deje que la punta se enfríe de manera natural y nunca sumérjala en agua Este aparato no es apto para niños menores de 8 años ni para personas con capacidades físicas sensoriales o mentales reducidas ni para personas con una falta de experien...

Page 26: ...e las flechas para aumentar disminuir la temperatura 7 unidad de temperatura Seleccione la unidad de temperatura deseada C F 8 valor de corrección Valor de corrección para el elemento calentador 9 botones SET ENTER Botones de configuración 5 Instalación 1 Coloque el aparato en una superficie plana estable e ignífuga 2 Asegúrese de que el interruptor de encendido apagado parte trasera está en la po...

Page 27: ...uilla ni tire de ella con unas pinzas 1 Asegúrese de que el aparato esté apagado y de que la pistola de aire esté completamente enfriada 2 Seleccione la boquilla adecuada y fíjela a la pistola de aire 3 Encienda el aparato ajuste la temperatura y el flujo de aire y espere hasta que el elemento calentador alcance la temperatura deseada 6 4 Modo de espera Sleep Método 1 Sujete la pistola de aire y m...

Page 28: ...e pulsando el botón ENTER Por razones de seguridad nunca ponga el valor del flujo de aire en cero 0 Seleccione un valor más alto para temperaturas más altas 7 Cómo soldar 7 1 Precauciones Para prolongar la duración de vida del elemento calentador de la pistola de aire no utilice el aparato de manera continua con un bajo flujo de aire y una temperatura alta Deje que el elemento calentador se enfríe...

Page 29: ...nga la pistola de aire en el soporte y apague la estación 2 Después de haber desconectado el aparato deje conectado el cable de alimentación durante unos minutos Después de haber desconectado el aparato la función de enfriamiento se activará automáticamente soplando brevemente aire frío a través del tubo del elemento calentador De esa manera se evitarán daños y se prolongará la duración de vida de...

Page 30: ...e este aparato sólo con los accesorios originales Velleman NV no será responsable de daños ni lesiones causados por un uso indebido de este aparato Para más información sobre este producto y la versión más reciente de este manual del usuario visite nuestra página www velleman eu Se pueden modificar las especificaciones y el contenido de este manual sin previo aviso DERECHOS DE AUTOR Velleman NV di...

Page 31: ...e Lesen und begreifen Sie diese Bedienungsanleitung und die Sicherheitshinweise vor Inbetriebnahme Das Gerät eignet sich nur für die Anwendung im Innenbereich Achten Sie darauf dass die Netzleitung nicht gequetscht werden kann Achtung Ein beschädigtes Netzkabel kann nicht ausgetauscht werden Verwenden Sie das Gerät nicht wenn das Netzkabel beschädigt ist Vergewissern Sie sich dass die anzuschließe...

Page 32: ... Legen Sie die Heißluftdüse immer im Ablageständer ab wenn Sie es nicht benötigen Lassen Sie das Gerät in Betrieb nie unbeaufsichtigt zurück Verwenden Sie den Lötkolben auf einer hitzebeständigen Oberfläche Lassen Sie die Spitze auf natürlicher abkühlen und tauchen Sie den Lötkolben nie in Wasser ein Dieses Gerät kann von Kindern ab 8 Jahren und darüber sowie von Personen mit verringerten physisch...

Page 33: ...7 Temperatureinheit Wählen Sie die gewünschte Temperatureinheit C F 8 Korrekturwert Korrekturwert für das Heizelement 9 Tasten SET ENTER Einstelltasten 5 Installation 1 Stellen Sie das Gerät auf einen ebenen stabilen und unbrennbare hitzefesten Untergrund 2 Beachten Sie dass der EIN AUS Schalter Rückseite auf 0 steht 3 Stecken Sie den Netzstecker in eine geerdete Steckdose 6 Anwendung 6 1 Vorsicht...

Page 34: ...den Sie keine Zange 1 Beachten Sie dass das Gerät ausgeschaltet ist und dass sich die Heißluftdüse komplett abgekühlt hat 2 Wählen Sie die geeignete Düse und setzen Sie diese auf die Heißluftdüse auf 3 Schalten Sie das Gerät ein stellen Sie die Temperatur und die Luftmenge ein und warten Sie bis das Heizelement die gewünschte Temperatur erreicht hat 6 4 Sleep Modus Methode 1 Halten Sie die Heißluf...

Page 35: ...verwenden so ändern und speichern Sie die Temperatur und die Luftmenge für diesen Kanal indem Sie die Taste ENTER drücken Stellen Sie die Luftmenge niemals auf Null 0 Stellen Sie für höhere Temperaturen eine höhere Luftmenge ein 7 Löten 7 1 Vorsichtsmaßnahmen Um die Lebensdauer des Heizelements zu verlängern verwenden Sie das Gerät nicht kontinuierlich bei einem niedrigen Luftstrom und einer hohen...

Page 36: ...ausschalten 1 Setzen Sie die Heißluftdüse nach Gebrauch in den Ständer ein und schalten Sie die Station aus 2 Ziehen Sie den Netzstecker nach dem Ausschalten der Station nicht direkt aus der Steckdose Wenn Sie das Gerät ausschalten dann wird die automatische Kühlfunktion aktiviert und wird kalte Luft durch das Rohr des Heizelements geblasen Dies schützt das Heizelement vor Schäden und verlängert d...

Page 37: ...2 x 150 mm Gewicht 2 5 kg Verwenden Sie dieses Gerät nur mit originellen Zubehörteilen Velleman NV übernimmt keine Haftung für Schaden oder Verletzungen bei falscher Anwendung dieses Gerätes Mehr Informationen zu diesem Produkt und die neueste Version dieser Bedienungsanleitung finden Sie hier www velleman eu Alle Änderungen ohne vorherige Ankündigung vorbehalten URHEBERRECHT Velleman NV besitzt d...

Page 38: ... 2 Wskazówki bezpieczeństwa Przed zastosowaniem urządzenia należy zapoznać się z niniejszą instrukcją oraz symbolami bezpieczeństwa Wyłącznie do użytku wewnątrz pomieszczeń Nie zaginać przewodu zasilającego i chronić przed uszkodzeniami Uwaga Przewód zasilający nie podlega wymianie Jeśli przewód ulegnie uszkodzeniu urządzenie należy zniszczyć Należy upewnić się że napięcie nie przekracza wartości ...

Page 39: ...e Nie pozostawiać włączonego urządzenia bez nadzoru Używać lutownicy na żaroodpornym stole roboczym Gorącą lutownicę należy pozostawić do naturalnego schłodzenia nie zanurzać w wodzie Z niniejszego urządzenia mogą korzystać dzieci powyżej 8 roku życia i osoby o ograniczonych zdolnościach fizycznych zmysłowych bądź umysłowych jak również osoby nieposiadające doświadczenia lub znajomości urządzenia ...

Page 40: ...ury Według ustawień użytkownika 8 wartość korekcji Wartość korekcji dla elementu grzejnego 9 Przyciski SET ENTER Przyciski ustawień 5 Montaż 1 Ustawić urządzenie na płaskiej stabilnej i ognioodpornej powierzchni 2 Upewnić się że przełącznik zasilania z tyłu urządzenia znajduje się w pozycji wyłączenia 0 3 Umieścić wtyczkę zasilania w odpowiednim uziemionym gniazdku 6 Obsługa 6 1 Środki ostrożności...

Page 41: ...gotowanie do pracy Nie wciskać dyszy ani nie wyginać krawędzi szczypcami 1 Upewnić się czy urządzenie jest wyłączone a pistolet na powietrze jest całkowicie schłodzony 2 Wybrać dyszę dopasowaną do układu scalonego i wsunąć na pistolet 3 Włączyć urządzenie wybrać temperaturę i przepływ powietrza i odczekać aż element grzejny osiągnie ustawioną temperaturę 6 4 Tryb uśpienia Metoda 1 Trzymając pistol...

Page 42: ...wartości temperatury i przepływu powietrza dla tego kanału naciskając po prostu przycisk ENTER w celu ich zapisania Aby chronić element grzejny nie należy ustawiać przepływu powietrza na zero 0 Zalecamy ustawienie wyższej wartości przepływu powietrza dla wyższych temperatur 7 Lutowanie 7 1 Środki ostrożności Aby wydłużyć trwałość elementu grzejnego w pistolecie na gorące powietrze nie należy stale...

Page 43: ...kę w gniazdku na kilka minut Gdy urządzenie zostanie wyłączone funkcja automatycznego chłodzenia przez krótki okres powoduje wydmuchiwanie powietrza chłodzącego przez rurę elementu grzejnego Pozwala to chronić element grzejny przed uszkodzeniem i wydłuża jego żywotność Podczas procesu chłodzenia nie należy odłączać zasilania 3 Odczekać do momentu zakończenia procesu chłodzenia a następnie odłączyć...

Page 44: ...nie ponosi odpowiedzialności za uszkodzenia lub urazy wynikające z niewłaściwego korzystania z niniejszego urządzenia Aby uzyskać więcej informacji dotyczących produktu oraz najnowszą wersję niniejszej instrukcji należy odwiedzić naszą stronę internetową www velleman eu Informacje zawarte w niniejszej instrukcji obsługi mogą ulec zmianie bez wcześniejszego powiadomienia INFORMACJA O PRAWACH AUTORS...

Page 45: ...nstruções de segurança Leia este manual atentamente antes da utilização ou instalação Usar apenas em interiores Não danifique o cabo de alimentação e proteja o contra possíveis danos causados por uma qualquer superfície afiada Atenção O cabo de alimentação não pode ser substituído Se o cabo estiver danificado o aparelho deverá ser inutilizado Certifique se que a tensão de rede não é superior à ten...

Page 46: ...cada no seu suporte quando não está a ser usada Não deixe a ferramenta ligada e sem alguém a supervisionar Utilize o ferro de soldar numa superfície que seja resistente ao calor Deixe a ponta arrefecer naturalmente e numa a coloque debaixo de água Este aparelho pode ser usado por crianças com idade igual ou superior a 8 anos e pessoas com capacidades físicas mentais e sensoriais reduzidas ou com f...

Page 47: ...7 unidade de temperatura Conforme definido pelo utilizador 8 valor de correção Valor de correção para o elemento de aquecimento 9 Botões SET ENTER Botões de configuração 5 Instalação 1 Instale o aparelho numa superfície estável e resistente ao fogo 2 Certifique se de que o interruptor na parte de trás do aparelho está na posição de desligado 0 3 Ligue o cabo de alimentação a uma tomada de corrente...

Page 48: ...ico nem dobre as bordas com um alicate 1 Certifique se de que o aparelho está desligado e de que a pistola de ar já arrefeceu completamente 2 Selecione o bocal que corresponde ao CI e faça o deslizar pela pistola de ar 3 Ligue o aparelho selecione a temperatura e o fluxo de ar e aguarde até que o calefator atinja a temperatura desejada 6 4 Modo de repouso Método 1 Enquanto segura a pistola de ar q...

Page 49: ...es de temperatura e fluxo de ar para esse canal pressionando simplesmente o botão ENTER para os guardar De modo a proteger o calefator nunca deve ajustar o fluxo de ar para zero 0 Recomendamos um valor de fluxo de ar superior para temperaturas mais altas 7 Como soldar 7 1 Precauções Para prolongar a vida do elemento de aquecimento da pistola de ar quente não use o aparelho em modo contínuo com um ...

Page 50: ...sligue a estação 2 Após desligar deixe o cabo de alimentação ligado à corrente durante alguns minutos Quando desliga a unidade o sistema de arrefecimento automático envia ar frio para os tubos de aquecimento durante alguns instantes Isto evita possíveis danos e prolonga a vida do aparelho Não desligue o cabo da corrente durante este processo de arrefecimento 3 Aguarde até o processo de arrefecimen...

Page 51: ...kg Utilize este aparelho apenas com acessórios originais A Velleman NV não será responsável por quaisquer danos ou lesões causados pelo uso indevido do aparelho Para mais informação sobre este produto e para aceder à versão mais recente deste manual do utilizador visite a nossa página www velleman eu Podem alterar se as especificações e o conteúdo deste manual sem aviso prévio DIREITOS DE AUTOR A ...

Page 52: ...betalen In dat geval krijgt u een vervangend product of terugbetaling ter waarde van 100 van de aankoopsom bij ontdekking van een gebrek tot één jaar na aankoop en levering of een vervangend product tegen 50 van de kostprijs of terugbetaling van 50 bij ontdekking na één jaar tot 2 jaar Valt niet onder waarborg alle rechtstreekse of onrechtstreekse schade na de levering veroorzaakt aan het toestel ...

Page 53: ...utorización explícita de Velleman se calcula gastos de transporte de y a Velleman si el aparato ya no está cubierto por la garantía Cualquier artìculo que tenga que ser reparado tendrá que ser devuelto a su distribuidor Velleman Devuelva el aparato con la factura de compra original y transpórtelo en un embalaje sólido preferentemente el embalaje original Incluya también una buena descripción del f...

Page 54: ... produktu do i z serwisu wymienione wyżej warunki są bez uszczerbku dla wszystkich komercyjnych gwarancji Powyższe postanowienia mogą podlegać modyfikacji w zależności od wyrobu patrz art obsługi Garantia de serviço e de qualidade Velleman Desde a sua fundação em 1972 Velleman tem adquirido uma amplia experiencia no sector da eletrónica com uma distribuição em mais de 85 países Todos os nossos pro...

Reviews: