VTTEST15
VELLEMAN
- 2 -
VTTEST15 – AUDIO CABLE TESTER
1. Introduction
To all residents of the European Union
Important environmental information about this product
This symbol on the device or the package indicates that disposal of the device after its
lifecycle could harm the environment.
Do not dispose of the unit (or batteries) as unsorted municipal waste; it should be taken to a
specialized company for recycling.
This device should be returned to your distributor or to a local recycling service.
Respect the local environmental rules.
If in doubt, contact your local waste disposal authorities.
Thank you for choosing Velleman! Please read the manual thoroughly before bringing this device into
service. If the device was damaged in transit, don't install or use it and contact your dealer.
2. Use
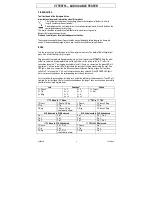
Turn the rotary switch fully clockwise to test the strength of a battery. The battery LED will light bright
green if the internal battery is fully charged.
Plug one end of the cable into the appropriate jack on the left side of your
VTTEST15
. Plug the other
end of the cable into the appropriate jack on the right. Now, set the rotary switch to “1” to test the
connection of contact “1” on the plug inserted into the left. If there is a connection, the green LED will
light below “1” while a yellow LED will light above the contact of the plug connected to the right. If no
LED lights, there is no connection: the left connection will either be floating or open. Set the rotary
switch to “2” to test contact “2” etc. until all contacts have been checked. If the GROUND LED lights,
there is a connection between the corresponding contacts and the chassis.
To test a cable with banana plugs, just plug each end of the cable into the banana jacks. The LED will
light and the unit will beep if there is a connection between the plugs. These jacks can also be used for
continuity tests using two probe leads.
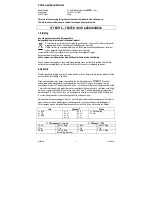
Jack
Speakon
®
Phono
1 = Sleeve
1 = -1
5 = -3
1 = Screen
2 = Tip
2 = +1
6 = +3
2 = Hot
3 = Ring
3 = -2
7 = -4
4 = +2
8 = +4
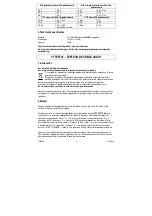
¼” TS Mono to ¼” Mono
¼” TRS to ¼” TRS
1 Sleeve
1 Sleeve, 3 Ring
1 Sleeve
1 Sleeve, 3 Ring
2 Tip
2 Tip
2 Tip
2 Tip
3 Ring
1 Sleeve, 3 Ring
(shorted with sleeve)
3 Ring
1 Sleeve, 3 Ring
XLR Balanced to XLR Balanced
XLR Unbalanced to XLR Unbalanced
Pin 1
Pin 1
Pin 1
Pin 1, Pin 3
Pin 2
Pin 2
Pin 2
Pin 2
Pin 3
Pin 3
Pin 3
Pin 1, Pin 3
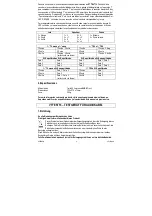
¼” TS Mono to XLR Unbalanced
¼” TRS to XLR Balanced
1 Sleeve
Pin 1, Pin 3
1 Sleeve
Pin 1
2 Tip
Pin 2
2 Tip
Pin 2
3 Ring
Pin 1, Pin 3
(shorted with sleeve)
3 Ring
Pin 3


