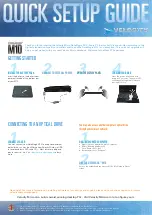

OPEN THE DISPLAY PANEL
Insert the battery in the battery com-
partment located at the bottom rear
of your M10.
Press the power button and hold
down for 2 seconds. The power LED
on the panel will light up to indicate
that the M10 is on.
3
4
2
1
INSTALL THE BATTERY PACK
CONNECT TO EXTERNAL POWER
TURN ON YOUR M10
Thank you for purchasing the Velocity Micro NoteMagix M10. Every PC that we build is constructed according to the
highest standards of quality and craftsmanship and the NoteMagix M10 is no exception. This quick set up guide will
help you get started with your new Velocity Micro notebook. Welcome to the New PC Experience.
ATTENTION
1. Do not charge the M10’s battery with any other power adapter or replace with another battery type.
2. Make sure your power socket and any extension cord(s) you use can support the total current load of all the connected devices.
3. Before cleaning your M10, make sure it is disconnected from any external power supplies (i.e. AC adapter) and battery.
GETTING STARTED
Need help? For more information on installing software or for user tips and support, please visit our online support hub – www.
velocitymicro.com/support.
Velocity Micro also builds award winning desktop PCs. Visit VelocityMicro.com to configure yours
.
You may connect your NoteMagix M10 to an optional external
optical drive, such as the VMdrive from Velocity Micro, via USB
to record and burn DVDs and CDs. Most drives are plug and
play for easy set up. Visit
velocitymicro.com/support
to learn
more.
1
CONNECT VIA USB
CONNECTING TO AN OPTICAL DRIVE
You may also access another computer’s optical drive
through your wireless network:
Access the networked drive via your M10’s “My Network Places”
folder.
a. Right click the optical drive in My Computer
b. Select “Sharing and Security”
c. Click “Share this Folder”
d. Set permissions to “Everyone”
2
1
ON A NETWORKED COMPUTER
ON YOUR NOTEMAGIX
™
M10