28
106309-03 - 4/19
IV. Venting
B. CPVC/PVC Venting - C. Polypropylene Venting (continued)
• Install screen and vent terminal
(supplied with boiler). See Figure 16 for
appropriate configuration.
• Brace exterior piping if required.
ii.
Combustion Air Piping
• If possible, locate combustion air
termination on the same roof location as
the vent termination to prevent nuisance
boiler shutdowns. Combustion air
terminal may be installed closer to roof
than vent. Alternatively, boiler may be
installed with vertical roof vent terminal
and sidewall combustion air terminal.
• Size roof opening to allow easy insertion
of combustion air piping and allow
proper installation of flashing and storm
collar to prevent moisture from entering
the structure.
- Use appropriately designed
vent flashing when passing through
roofs. Follow flashing manufacturers’
instructions for installation
procedures.
- Extend combustion air pipe to
maintain minimum vertical
and horizontal distance of 12 in.
(300 mm) from roof surface. Allow
additional vertical distance for
expected snow accumulation. Provide
brace as required.
- Install storm collar on combustion air
pipe immediately above
flashing. Apply Dow Corning Silastic
732 RTV Sealant or equivalent
between combustion air pipe and
storm collar to provide weather-tight
seal.
• Install screen and combustion air
terminal (supplied with boiler). See
Figure 16 for appropriate configuration.
• Brace exterior piping if required.
C. Polypropylene Venting
NOTICE
Do not exceed maximum vent/combustion air
system length. Refer to “2. Vent/Combustion
Air Piping” under “A. General Guidelines” of
this section for maximum vent/combustion air
system length.
Use only vent and combustion air terminals
and terminal locations shown in “3. Vent/
Combustion Air Terminals” under “A.
General Guidelines” of this section.
WARNING
Asphyxiation Hazard. Follow these instructions
and the installation instructions included by
the original polypropylene venting component
manufacturers, M&G/DuraVent or Centrotherm,
whichever applicable. Failure to do so could
cause products of combustion to enter the
building, resulting in severe property damage,
personal injury or death. Where a conflict
arises between M&G/DuraVent or Centrotherm
instructions and these instructions, the more
restrictive instructions shall govern.
Do not mix vent components or joining
methods for listed manufacturers.
Examine all components for possible
shipping damage prior to installation.
All condensate that forms in the vent must
be able to drain back to the boiler.
1. Components
a. Listed polypropylene vent system manufacturers
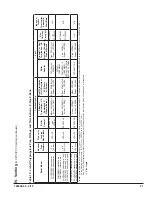
are shown in Table 16. It is the responsibility of
the installing contractor to procure polypropylene
vent system pipe and related components.
i.
All listed polypropylene vent system
manufacturers comply with the requirements
of ULC-S636-08 ‘Standard for Type BH
Gas Venting Systems’.
ii.
Centrotherm Eco Systems InnoFlue SW
Rigid Vent and Flex Flexible Vent, and
Z-Flex Z-Dens Single Wall Rigid Vent and
Flexible Vent comply with the requirements
of UL 1738 ‘Standard for Safety for Venting
Systems’.
b. See Table 17A for specific M&G Duravent
components.
c. See Table 17B for specific Centrotherm Eco
Systems components.
d. See Table 18 for specific Z-Flex Z-Dens
components.
2. Field Installation of Polypropylene
Adapters
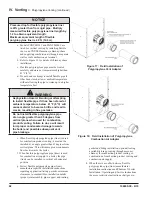
a. Vent Connector (see Figure 17)
i.
No adapter is required for M&G DuraVent
PolyPro vent pipe unless vent diameter
is reduced per Table 8. See Table 17A
for M&G DuraVent boiler adapters for
reduced vent diameter. An adapter is always
required for Centrotherm InnoFlue vent
pipe and Z-Flex Z-Dens vent pipe. See
Table 17B for Centrotherm InnoFlue boiler
adapters and Table 18 for Z-Flex Z-Dens
boiler adapters.
Summary of Contents for Phantom-X PHNTM399C
Page 49: ...49 106309 03 4 19 VI Water Piping and Trim continued Figure 28 Near Boiler Piping Heating Only...
Page 63: ...63 106309 03 4 19 VIII Electrical continued Figure 40 Ladder Diagram...
Page 64: ...64 106309 03 4 19 VIII Electrical continued Figure 41 Wiring Connections Diagram 2...
Page 73: ...73 106309 03 4 19 IX System Start up continued Figure 47 Operating Instructions...
Page 124: ...124 106309 03 4 19 XIII Service Parts continued...
Page 130: ...130 106309 03 4 19 XIII Service Parts continued...
Page 133: ...133 106309 03 4 19 XIII Service Parts continued 10A 10B 10C 10D 10G...
Page 139: ...139 106309 03 4 19...

