36
106309-03 - 4/19
IV. Venting
D. Stainless Steel Venting - E. Optional Room Air for Combustion (continued)
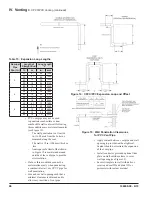
4. Horizontal Sidewall Vent Termination
a. Standard Two-Pipe Termination
See Figure 7.
i.
Vent Termination
• Use components listed in Table 19, 20 or
21.
NOTICE
The joint between the terminal and the last piece
of pipe must be outside of the building.
• Male end of terminal will fit into female
end of any of the listed stainless vent
systems.
• Apply a heavy bead of silicone to the
male end of the terminal before inserting
it into the last piece of pipe. Orient the
terminal so that the seam in the terminal
is at 12:00.
• Smooth the silicone over the seam
between the terminal and the last piece
of pipe, applying additional silicone if
necessary to ensure a tight seal.
• Allow the silicone to cure per the silicone
manufacturer’s instructions before
operating the boiler.
ii.
Combustion Air Termination
• Use a 90° elbow directed downward..
• Install a screen in the inlet terminal. Use
a screen having 1/2 in. x 1/2 in. (13 mm
x 13 mm) mesh.
b. Optional Two-Pipe Snorkel Termination
See Figure 8.
This installation will allow a maximum of
7 ft. (2.1 m) vertical exterior run of the vent/
combustion air piping to be installed on the
approved AL29-4C stainless steel horizontal
venting application.
i.
Vent Termination
• After penetrating wall, install the
appropriate manufacturer’s 90° elbow so
that the elbow leg is in the up direction.
• Install maximum vertical run of 7 ft.
(2.1 m) of appropriate manufacturer’s
vent pipe as shown in Figure 8.
• At top of vent pipe length install another
appropriate manufacturer’s 90° elbow
so that the elbow leg is opposite the
building’s exterior surface.
• Install horizontal vent terminal.
• Brace exterior piping if required.
ii.
Combustion Air Termination
• After penetrating wall, install a 90°
elbow so that the elbow leg is in the up
direction.
• Install maximum vertical run of 7 ft.
(2.1 m) of combustion air pipe as shown
in Figure 8.
• At top of vent pipe length install another
90° elbow so that the elbow leg is
opposite the building’s exterior surface.
• Install screen and horizontal vent
terminal.
• Brace exterior piping if required.
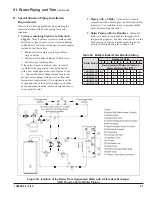
5. Vertical Vent Termination
a. Standard Two-Pipe Termination
See Figures 10 and 11.
i.
Vent Termination
• Use the terminal supplied by the vent
system manufacturer shown in Table
19, 20 or 21. Follow manufacturer’s
instructions to attach terminal to vent
system.
ii.
Combustion Air Termination
• Install vertical combustion air terminal.
Vertical combustion air terminal consists
of a 180° bend (comprised of two 90°
elbows) as shown in Figure 10.
• Install screen in the combustion air
terminal. Use a screen having 1/2 in. x
1/2 in. (13 mm x 13 mm) or larger mesh.
E. Optional Room Air for Combustion
1. General Guidelines
a. Room air is optional for commercial applications.
Room air uses one pipe to expel products of
combustion directly outdoors with combustion
air supplied from boiler room or enclosure.
Direct vent is recommended for residential
applications. Direct vent uses two pipes, one to
expel products of combustion directly outdoors
and one to supply combustion air to the boiler
directly from outdoors. See preceding sections A
through D for direct vent instructions.
b. Avoid combustion air contaminants in the boiler
room. See Table 4. Permanently remove any
contaminants found in the boiler room. If
contaminants cannot be removed, do not use
room air for combustion.
Summary of Contents for Phantom-X Series
Page 49: ...49 106309 03 4 19 VI Water Piping and Trim continued Figure 28 Near Boiler Piping Heating Only...
Page 63: ...63 106309 03 4 19 VIII Electrical continued Figure 40 Ladder Diagram...
Page 64: ...64 106309 03 4 19 VIII Electrical continued Figure 41 Wiring Connections Diagram 2...
Page 73: ...73 106309 03 4 19 IX System Start up continued Figure 47 Operating Instructions...
Page 124: ...124 106309 03 4 19 XIII Service Parts continued...
Page 130: ...130 106309 03 4 19 XIII Service Parts continued...
Page 133: ...133 106309 03 4 19 XIII Service Parts continued 10A 10B 10C 10D 10G...
Page 139: ...139 106309 03 4 19...


