background image

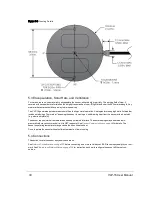
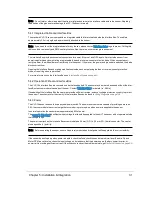
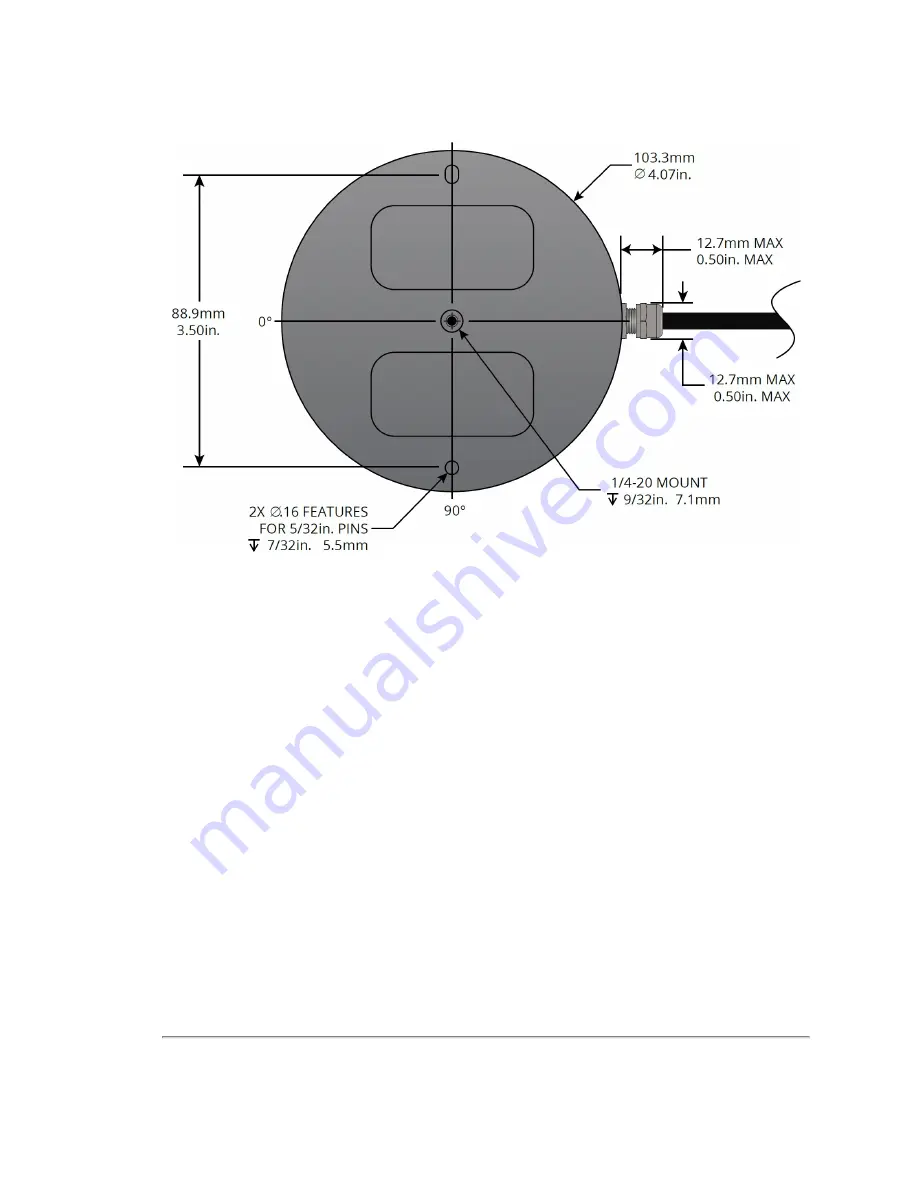
Figure 5-1 Mounting Details

5.3 Encapsulation, Solar Hats, and Ventilation

For various reasons, you may wish to encapsulate the sensor, either wholly or partially. The working field of view, if 
covered with transparent material, should be highly transmissive of near-IR light at and near the 903 nm wavelength. Any 
moisture that enters should have a way to drain passively.

The VLP-16 generates a moderate amount of heat during normal operation. Strategies for managing heat in hot weather 
include employing a "thermal hat," exposing the sensor to moving air, and drawing heat from the sensor with a heat sink 
(e.g. aluminum plate(s)).

The sensor reports internal temperatures passively on its web interface. The same readings may be obtained pro-
grammatically via curl commands (i.e. http GET requests). See 

Sensor Communication on page 68

 for details. The 

sensor's operating temperature range can be found on its data sheet.

Do not operate the sensor without sufficient ambient air flow or cooling.

5.4 Connections

This section covers the sensor’s physical connections.

See 

Network Considerations on page 135

 before connecting one or more Velodyne LiDAR sensors physically to your net-

work. See 

Ethernet and Network Setup on page 134

 for instructions on how to configure the sensor's Ethernet con-

nection.

30

VLP-16 User Manual

Summary of Contents for VLP-16

Page 1: ...VLP 16 User Manual 63 9243 Rev D ...
Page 2: ...ered users Limited Warranty Except as specified below products sold hereunder shallbe free from defects in materials and workmanship and shallcon form to Velodyne s published specifications or other specifications accepted in writing by Velodyne for a period of one 1 year from the date of shipment of the products The foregoing warranty does not apply to any Garmin products other products not manuf...

Page 3: ...sor s Ethernet MAC Address from Web Interface IMPROVED Low signalcross talk filtering performance IMPROVED Firmware update messages during update IMPROVED Phase Lock rotations error 5 degrees FIXED Intermittent ghost returns at 40 80 and greater than 124 meters IMPROVED SeveralJSON data additions and changes ADDED Reverse rotation capability Specify negative RPM values to use this capability For d...

Page 4: ...s 20 3 1 1 Caution Hazard Alerts 20 3 2 Safety Overview 20 3 2 1 Electrical Safety 20 3 2 2 Mechanical Safety 20 3 2 3 Laser Safety 21 Chapter 4 Unboxing Verification 4 1 What s in the Box 22 4 1 1 Variants 22 4 2 Verification Procedure 22 4 2 1 Network Setup in Isolation 23 4 2 2 Access Sensor s Web Interface 24 4 2 3 Visualize Live Sensor Data with VeloView 26 4 2 3 1 VeloView Operation 27 Chapt...

Page 5: ... 7 3 Ethernet Interface 41 7 4 GPS Pulse Per Second PPS and NMEA GPRMC Message 41 7 4 1 GPS Input Signals 41 7 4 2 Electrical Requirements 41 7 4 3 Timing and Polarity Requirements 41 7 4 4 GPS Connection Scenarios 44 7 4 4 1 Connecting a Garmin 18x LVC GPS Receiver 44 7 4 4 2 Connecting to a computer s serial port 44 7 4 4 3 Connecting to a microcomputer s UART 45 7 4 5 NMEA Message Formats 46 7 ...

Page 6: ...lected Spherical Data 52 9 3 Packet Types and Definitions 54 9 3 1 Definitions 54 9 3 1 1 Firing Sequence 55 9 3 1 2 Laser Channel 55 9 3 1 3 Data Point 55 9 3 1 4 Azimuth 55 9 3 1 5 Data Block 55 9 3 1 6 Time Stamp 55 9 3 1 7 Factory Bytes 56 9 3 2 Data Packet Structure 56 9 3 3 Position Packet Structure 60 9 4 Discreet Point Timing Calculation 61 9 5 Precision Azimuth Calculation 65 9 6 Converti...

Page 7: ...top lm20_temp 79 10 2 3 3 3 top pwr_5v 79 10 2 3 3 4 top pwr_2_5v 79 10 2 3 3 5 top pwr_3_3v 79 10 2 3 3 6 top pwr_5v_raw 79 10 2 3 3 7 top pwr_vccint 80 10 2 3 3 8 bot i_out 80 10 2 3 3 9 bot lm20_temp 80 10 2 3 3 10 bot pwr_1_2v 80 10 2 3 3 11 bot pwr_1_25v 81 10 2 3 3 12 bot pwr_2_5v 81 10 2 3 3 13 bot pwr_3_3v 81 10 2 3 3 14 bot pwr_5v 81 10 2 3 3 15 bot pwr_v_in 81 10 2 3 4 Get Snapshot 82 10...

Page 8: ... 11 2 Service and Maintenance 89 11 2 1 Fuse Replacement 89 11 3 Technical Support 90 11 3 1 Purchased through a Distributor 90 11 3 2 Factory Support 90 11 3 3 Support Desk 90 11 4 Return Merchandise Authorization RMA 90 Appendix A Sensor Specifications Appendix B Firmware Update B 1 Firmware Update Procedure 92 B 1 1 Special Procedure to Update Firmware 98 B 1 2 If An Error Occurs 99 Appendix C ...

Page 9: ...aming Sensor Data to PCAP File 114 E 5 Replay Captured Sensor Data from PCAP File 114 Appendix F Laser Pulse F 1 The Semiconductor Laser Diode 119 F 2 Laser Patterns 120 F 2 1 Laser Spot Pattern 120 F 2 2 Laser Scan Pattern 120 F 2 3 Beam Divergence 121 Appendix G Time Synchronization G 1 Introduction 123 G 2 Background 123 G 3 PPS Qualifier 124 G 3 1 Require GPS Receiver Valid 124 G 3 2 Require P...

Page 10: ...6 Method Four 133 Appendix J Network Configuration J 1 Ethernet and Network Setup 134 J 1 1 Defaults 134 J 1 2 Establishing Communication via Ethernet 134 J 2 Network Considerations 135 J 2 1 Throughput Requirements 135 J 2 2 Single Sensor Transmitting to a Broadcast Address 136 J 2 3 Multiple Sensors in the Same Network 136 J 2 3 1 Multiple Sensors Transmitting to a Broadcast Address 136 J 2 3 2 ...

Page 11: ...D and Model 53 Table 9 2 Factory Byte Values 56 Table 9 3 Position Packet Structure Field Offsets 60 Table 9 4 PPS Status Byte Values 60 Table 10 1 Configuration Screen Functionality and Features 69 Table 10 2 System Screen Functionality and Features 72 Table 10 3 Info Screen Functionality and Features 73 Table 10 4 System Screen Functionality and Features 75 Table 11 1 Common Problems and Resolut...

Page 12: ...40 Figure 7 2 Synchronizing PPS with NMEA GPRMC Message 42 Figure 7 3 PPS Signal Closely Followed by NMEA GPRMC Message 42 Figure 7 4 PPS Signal Followed 600 ms later by NMEA GPRMC Message 43 Figure 7 5 RS 232 Example Transmission 44 Figure 7 6 Garmin GPRMC Message 44 Figure 7 7 DB9 Pin outs DTE and USB to Serial Adapter 45 Figure 7 8 Signal Directly from UART incorrect polarity 46 Figure 7 9 Inve...

Page 13: ...3 Figure C 4 VLP 16 and Puck LITE Optical Keep Out Zone 86 0101 Rev B1 104 Figure C 5 Puck Hi Res Mechanical Drawing 86 0129 Rev A 105 Figure C 6 Puck Hi Res Optical Drawing 86 0129 Rev A 106 Figure C 7 Puck Hi Res Optical Keep Out Zone 86 0129 Rev A 107 Figure D 1 Interface Box Wiring Diagram 86 0107A 109 Figure D 2 Interface Box Schematic 69 8230A 110 Figure E 1 VeloView Open Sensor Stream 112 F...

Page 14: ...aser Firing 127 Figure H 2 Configuration Screen Phase Lock 128 Figure H 3 Right and Left Sensor Phase Offset 129 Figure H 4 Fore and Aft Sensor Phase Offset 129 Figure H 5 Sensor Data Shadows 130 Figure J 1 Sensor Network Settings 135 Figure J 2 Single Sensor Broadcasting on a Simple Network 136 Figure J 3 Multiple Sensors Improper Network Setup 137 Figure J 4 Multiple Sensors Proper Network Setup...

Page 15: ...h Resolution at 600 RPM 50 Equation 10 1 Standard Voltage Conversion 78 Equation 10 2 Standard Current Conversion 78 Equation 10 3 Standard Temperature Conversion 78 Equation F 1 Gap Between Scan Lines 121 Equation H 1 Arc of Shadow 130 15 ...

Page 16: ...ntegration for a project a tech tasked with sensor upkeep or data scientist looking to understand sensor output data 1 4 Document Conventions This document uses the following typographic conventions Convention Description Bold Indicates text on a window other than the window title including menus menu options buttons fields and labels Example Click OK Italic Indicates a variable which is a placeho...

Page 17: ...e important information They callattention to an operating procedure or practice which may enhance user interaction with the product Notes may also be used to prevent information loss or product damage Chapter 1 About This Manual 17 ...

Page 18: ...pins rapidly within its fixed housing to scan the surrounding environment firing each laser approximately 18 000 times per second providing in real time a rich set of 3D point data Advanced digitalsignalprocessing and waveform analysis provide highly accurate long range sensing as wellas cal ibrated reflectivity data enabling easy detection of retro reflectors like street signs license plates and ...

Page 19: ...and direction are registered The laser pulse travels through air untilit hits an obstacle which reflects some of the energy A portion of that energy is received by the paired IR detector which registers the time of acquisition and power received 2 4 Data Interpretation Requirements Desktop or Laptop computer Advanced geo referencing software application GPS Based SLAM Based User Built Purchased fr...

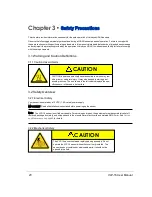
Page 20: ...njury It may also be used to alert against unsafe practices The icon shown in the left column displays the spe cific concern in this case a hot surface 3 2 Safety Overview 3 2 1 Electrical Safety Your sensor is powered by a 12 VDC 1 5 A rated power supply IMPORTANT Read allinstallations instructions before powering up the sensor Note The VLP 16 sensor is not field serviceable For servicing and rep...

Page 21: ... 24 2007 Figure 3 1 Class 1 Laser Note The VLP 16 sensor is a CLASS 1 LASER PRODUCT The product fulfills the requirements of IEC 60825 1 2014 Safety of Laser Products There are no controls or adjustments on the sensor itself that are user accessible Never look directly at the transmitting laser through a magnifying device Chapter 3 Safety Precautions 21 ...

Page 22: ... 0 m Ethernet cable Velodyne USB memory stick containing User Manual VeloView application installers for PC Mac and linux Sensor sample data i e pcap files Miscellaneous documents 4 1 1 Variants Variants of the sensor exist particularly with other connector types and or cable lengths and even without an Interface Box Your sensor or the type you are interested in may vary from the standard configur...

Page 23: ...mes from the factory set to its default value 192 168 1 201 This procedure prepares a com puter to communicate directly with the sensor at that address Note If using the computer s main Ethernet port disconnect it from whatever network it s on If using a secondary Eth ernet interface the primary network cannot be a 192 168 1 network If it is use the primary Ethernet interface instead 1 Open the co...

Page 24: ...ernet inter face How to do this is not covered here as the process varies widely 4 2 2 Access Sensor s Web Interface Now the computer is ready to connect to the sensor 1 Plug the Ethernet cable into the computer and then plug its other end into the Ethernet port on the sensor s Inter face Box Figure 4 2 on the facing page shows the Interface Box its externalports internalsensor terminal and fuse 2...

Page 25: ...sor begins scanning its environment and transmitting data approximately 30 seconds after power up 3 On the computer point a browser to http 192 168 1 201 4 The sensor s Web Interface should appear Figure 4 3 on the next page The Web Interface provides access to many of the sensor s controlsettings See Web Interface on page 68 for details Chapter 4 Unboxing Verification 25 ...

Page 26: ...ation and recording application tailored for Velodyne LiDAR sensors Other visualization software e g ROS DSR and PCL can perform similar functions and may be used instead VeloView is documented in more detailin VeloView on page 111 If the application isn t already on the computer perform the procedure detailed in InstallVeloView on page 112 Older versions should be updated to at least the version ...

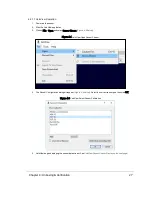
Page 27: ...4 below Figure 4 4 VeloView Open Sensor Stream 4 The Sensor Configuration dialog willappear Figure 4 5 below Select the correct sensor type then click OK Figure 4 5 VeloView Select Sensor Calibration 5 VeloView begins displaying the sensor data stream See VeloView Sensor Stream Display on the next page Chapter 4 Unboxing Verification 27 ...

Page 28: ...Figure 4 6 VeloView Sensor Stream Display Above is an example of a VeloView screen in an office workbench or lab scenario 28 VLP 16 User Manual ...
Page 29: ...etwork Configuration on page 134 Optionally connecting a GPS receiver or INS InertialNavigation System see GPS Pulse Per Second PPS and NMEA GPRMC Message on page 41 The typicalsensor setup uses a standard computer or laptop connected to the sensor However it is recommended to use at least a 100 Mbps Ethernet adapter to accommodate the sensor data rate 5 2 Mounting The sensor base provides one 20 ...

Page 30: ...d drawing heat from the sensor with a heat sink e g aluminum plate s The sensor reports internaltemperatures passively on its web interface The same readings may be obtained pro grammatically via curlcommands i e http GET requests See Sensor Communication on page 68 for details The sensor s operating temperature range can be found on its data sheet Do not operate the sensor without sufficient ambi...

Page 31: ...x is a convenience but it also adds bulk The sensor may be ordered and used without the Inter face Box to accommodate the needs of the user Contact Velodyne Sales for details i e SKUs If used without the Interface Box the user must provide sufficient reverse and over voltage protection circuitry to protect the sensor The schematic for the circuitry in the Interface Box can be found in Wiring Diagr...

Page 32: ...t values from 0 to 100 for reflectivities from 0 to 100 Retroreflectors report values from 101 to 255 where 255 represents an idealreflection Note When a laser pulse doesn t result in a measurement such as when a laser is shot skyward both distance and reflectivity values willbe 0 The key is a distance of 0 because 0 is a valid reflectivity value i e one step above noise 6 2 Laser Return Modes The...

Page 33: ...the last return or both returns depending on the laser return mode setting If the setting is Strongest and a pulse produces multiple returns only the strongest reflec tion results in a measurement Likewise if the setting is Last only the last time wise reflection results in a measurement This could be used to measure distances to the ground from the air 6 2 3 Dual Return Mode Figure 6 2 on the nex...

Page 34: ... last return the second strongest return is reported The majority of the beam hits the far walland is in this case the strongest return It s entirely possible however that the far wallmight be far enough away that despite reflecting the majority of the beam the return from the near wallwould be the strongest return 34 VLP 16 User Manual ...
Page 35: ...rn with Second Strongest Return It s also possible that a smallportion of the beam clips a retro reflector and returns more energy than the majority of the beam as in Figure 6 4 on the next page Chapter 6 Key Features 35 ...

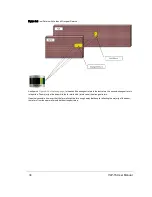
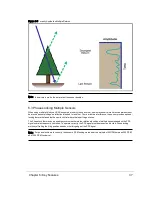
Page 36: ...where measurement of the height of trees is desired Figure 6 5 on the facing page indicates a sample response when the laser pulse initially hits the upper canopy penetrates it and eventually hits the ground producing multiple returns Which laser return mode would be best in this situation 36 VLP 16 User Manual ...
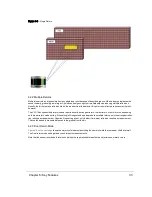
Page 37: ...es a phase locking feature that enables the user to controlwhere the laser firings overlap The Phase Lock feature can be used to synchronize the relative rotationalposition of multiple sensors based on the PPS signaland relative sensor orientation To operate correctly the PPS signalmust be present and locked Phase locking works by offsetting the firing position based on the rising edge of the PPS ...

Page 38: ...own in Figure 6 6 above indicate the firing direction of the sensor s laser at the moment it receives the rising edge of the PPS signal Additionalinformation for phase locking multiple sensors is located in Phase Lock on page 127 38 VLP 16 User Manual ...
Page 39: ... Signals 40 7 3 Ethernet Interface 41 7 4 GPS Pulse Per Second PPS and NMEA GPRMC Message 41 7 4 1 GPS Input Signals 41 7 4 2 Electrical Requirements 41 7 4 3 Timing and Polarity Requirements 41 7 4 4 GPS Connection Scenarios 44 7 4 5 NMEA Message Formats 46 7 4 6 Accepting NMEA Messages Via Ethernet 48 7 1 Power Requirements Power requirements are detailed in Chapter 5 Power on page 31 Chapter 7 ...

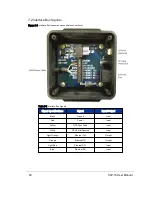
Page 40: ... Specifications Signal Input Output Black Ground Input Red Power Input Yellow GPS Sync Pulse Input White GPS SerialReceive Input Light Orange Ethernet TX Output Orange Ethernet TX Output Light Blue Ethernet RX Input Blue Ethernet RX Input Table 7 1 Interface Box Signals 40 VLP 16 User Manual ...
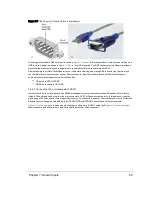
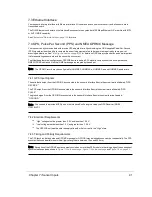
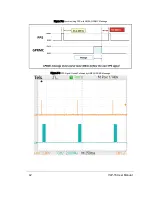
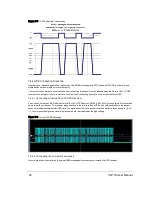
Page 41: ...SS s HHMMSS ss and HHMMSS sss formats 7 4 1 GPS Input Signals The serialdata output from the GPS INS is connected to the sensor s Interface Box via the screw terminallabeled GPS RECEIVE The PPS output from the GPS INS is connected to the sensor s Interface Box via the screw terminallabeled GPS PULSE The ground signalfrom the GPS INS is connected to the sensor s Interface Box via the screw terminal...

Page 42: ...Figure 7 2 Synchronizing PPS with NMEA GPRMC Message Figure 7 3 PPS SignalClosely Followed by NMEA GPRMC Message 42 VLP 16 User Manual ...

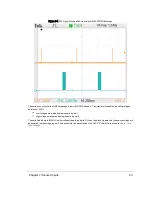
Page 43: ... 15 VDC Low voltages are marks and represent a logical1 High voltages are spaces and represent a logical0 The serialline idle state MARK is a low voltage indicating a logical1 When the start bit is asserted the positive voltage will be asserted representing a logical0 As an example the transmission of an ASCII character is shown in Figure 7 5 on the next page Chapter 7 Sensor Inputs 43 ...

Page 44: ...a Garmin 18x LVC GPS Receiver As an option Velodyne LiDAR offers a Garmin 18x LVC GPS Receiver P N 80 GPS18LVC pre configured for optimized operation with your sensor The receiver plugs directly into the Interface Box s GPS port and is used to synchronize your sensor s timestamp with precision GPS time The signals from the Garmin receiver willbe similar to those shown in Figure 7 6 below where the...

Page 45: ...e terminalscrew strip in the Interface Box DB9 pin 3 to GPS RECEIVE DB9 pin 5 connects to GROUND 7 4 4 3 Connecting to a microcomputer s UART In other situations you may wish to source NMEA messages from a microcomputer such as a Raspberry Pior Arduino instead The native signalcoming from the microcomputer s UART willhave incorrect polarity In this instance invert the signalusing a 7404 hex invert...

Page 46: ...d post NMEA version 2 3 sentence structures The difference is that in version 2 3 a Fix Mode Indicator field was added after Magnetic Variation and before the Checksum NMEA messages are terminated with sentence delimiter CR LF HEX 0D0A 7 4 5 1 Pre NMEA Version 2 3 Message Format Table 7 2 on the facing page provides a description of the pre NMEA 2 3 message format contents shown below 46 VLP 16 Us...

Page 47: ...e NMEA Version 2 3 Message Format 7 4 5 2 NMEA Version 2 3 Message Format Table 7 3 below provides a description of the post NMEA 2 3 message format contents shown below GPRMC 123519 A 4807 038 N 01131 000 E 022 4 084 4 230394 003 1 W A 02 Value Description GPRMC Recommended Minimum sentence 123519 Fix taken at 12 35 19 UTC A Receiver status A Active V Void 4807 038 N Latitude 48 deg 07 038 N 0113...

Page 48: ... 1 A host opens a TCP connection to the sensor s port 10110 and transmits NMEA sentences on the socket 2 A host transmits NMEA sentences in UDP packets to the sensor s UDP port 10110 3 A host transmits NMEA sentences in UDP packets to a broadcast address on port 10110 with an NMEA sen tence 1 and 2 require knowledge of the sensor s IP address 3 does not but it may load devices on the network that ...

Page 49: ...ing Sequence All16 lasers are fired and recharged every 55 296 μs The time between firings is 2 304 μs There are 16 firings 16 2 304 μs followed by an idle period of 18 43 μs Therefore the timing cycle to fire and recharge all16 lasers is given by 16 2 304 μs 18 432 μs 55 296 μs Figure 8 1 Firing Sequence Timing 8 2 Throughput Calculations Some terms used here are defined in Packet Types and Defin...

Page 50: ...ot evenly divisible by 60 neither motor speed control nor phase lock functions will function properly The user can set this parameter using the sensor s Web Interface or curlcommands See Configuration Screen on page 69 or Sensor Controlwith curlon page 76 for more on setting rotation speed Note In VeloView one rotation can be referred to as a single frame of data beginning and ending at approximat...

Page 51: ... smallvariation in speed produces a smallchange in the azimuthalgaps with every revolution Consequently over time the sensor automatically fills in the gaps between successive laser firings A data set from a stationary sensor provides an example of the how the sensor fills in the gaps and the effect is demon strated in Figure 8 2 below On the left is a single frame of data On the right is the same...

Page 52: ...reports distances relative to itself in sphericalcoordinates radius r elevation ω azimuth α Sensor data origin 0 0 0 is 37 7 mm above the sensor base on the center axis as shown in Figure 9 1 on the facing page see the side and top views which also shows the sensor s frame of reference See also the mechanical opticaldrawings in VLP 16 and Puck LITE MechanicalDrawing on page 102 9 2 Calculating X Y...

Page 53: ...or model see Factory Bytes on page 56 for more Laser ID Vertical Angle VLP 16 Vertical Angle Puck LITE Vertical Cor rection mm Vertical Angle Puck Hi Res Vertical Cor rection mm 0 15 15 11 2 10 00 7 4 1 1 1 0 7 0 67 0 9 2 13 13 9 7 8 67 6 5 3 3 3 2 2 2 00 1 8 4 11 11 8 1 7 33 5 5 5 5 5 3 7 3 33 2 7 6 9 9 6 6 6 00 4 6 Table 9 1 VerticalAngles ω by Laser ID and Model Chapter 9 Sensor Data 53 ...

Page 54: ...ted by the sensor data packets and position packets Position packets are some times referred to as telemetry packets or GPS packets Data packets contain the 3D data measured by the sensor as wellas the calibrated reflectivity of the surface from which the light pulse was returned Also contained in the data packet is a set of azimuths and a 4 byte timestamp as wellas two factory bytes identifying t...

Page 55: ... azimuth range from 0 to 35999 Only one azimuth value is reported per data block 9 3 1 5 Data Block The information from two firing sequences of 16 lasers is contained in each data block Each packet contains the data from 24 firing sequences in 12 data blocks Only one Azimuth is returned per data block A data block consists of 100 bytes of binary data A two byte flag 0xFFEE A two byte Azimuth 32 D...

Page 56: ...ry sensor modelline has its lasers arrayed vertically at slightly different angles Use the Product ID byte to identify the correct set of vertical or elevation angles Product IDs are not unique and may be shared by different sensors For example per Table 9 2 below the VLP 16 and Puck LITE share the same elevation angles Hence the two products share the same Product ID Conversely the Puck Hi Res ha...

Page 57: ...of data blocks for each azimuth angle firing The odd numbered blocks 1 3 9 11 contain either the strongest or second strongest return and the even numbered blocks 0 2 8 10 con tain the last return If the strongest return is also the last return then the second strongest return is provided If only one return was detected the data willbe identicalin the even odd block pairs 0 1 2 3 4 5 6 7 8 9 10 11...

Page 58: ...k trace of a single packet in Single Return Mode Figure 9 4 on the facing page shows the beginning of the packet and Figure 9 5 on the facing page shows packet end The location offset of the data relative to the initialbyte in the packet is shown in parentheses 58 VLP 16 User Manual ...

Page 59: ...Figure 9 4 Single Return Mode Packet Data Trace packet start Figure 9 5 Single Return Mode Packet Data Trace ending Chapter 9 Sensor Data 59 ...

Page 60: ...g a data packet The ratio of data packets to position packets is about 14 to 1 See NMEA Message Formats on page 46 for details on the GPRMC message Number of Bytes Byte Offset from beginning of packet hex Description 42 0x0000 UDP header 198 0x002A unused nullbytes 4 0x00F0 Timestamp µs 1 0x00F4 Pulse Per Second status 3 0x00F5 unused variable length 0x00F8 NMEA GPRMC sentence Table 9 3 Position P...

Page 61: ... Discreet Point Timing Calculation For the purpose of geo referencing LiDAR data it is helpfulto calculate the exact moment of a particular laser firing in order to more closely associate it with time stamped data from an INS By using the firing timing information given in Figure 9 7 on the next page you are able to compute the exact firing time for each data point Chapter 9 Sensor Data 61 ...

Page 62: ...oint Timing Off sets Single Return Mode and Figure 9 10 on page 65 for specific Data Point Timing Offsets DualReturn Mode The offset equation is given by TimeOffset 55 296 µs SequenceIndex 2 304 µs DataPointIndex To calculate the exact point time add the TimeOffset to the timestamp ExactPointTime Timestamp TimeOffset Example Calculate the timing offsets of every point in a packet in single or dual...

Page 63: ...f the last firing in a packet if the timestamp value is 45 231 878 µs Timestamp 45 231 878 µs TimeOffset timing_offsets 15 23 ExactPointTime Timestamp TimeOffset ExactPointTime 45 231 878 1 306 368 µs ExactPointTime 45 233 184 368 µs Figure 9 8 below shows the timing calculation for a specific data point Figure 9 8 Example Data Point Timing Calculation Chapter 9 Sensor Data 63 ...

Page 64: ...Figure 9 9 Single Return Mode Timing Offsets in µs 64 VLP 16 User Manual ...

Page 65: ... above Consider a single data packet with 12 data blocks If you assume the rotationalspeed is constant over the two 55 296 µs fir ing sequences in each data block you can use the algorithm below to estimate a more precise azimuth angle for each point The pseudo code below illustrates the concept K represents an index to a data point in the Nth data block where its valid range is 0 to 31 Do this fo...

Page 66: ... s markedly different from a point cloud file where the data points are referenced to a single coordinate system That coordinate system might be an earth frame latitude longitude elevation or another convenient reference frame Processing the raw LiDAR data into a point cloud is called geo referencing In geo referencing the user takes into account the sensor s position X Y Z and orientation pitch r...

Page 67: ...tationary objects to mathematically back out the movement of the LiDAR and translate the data into a single coordinate system Most Velodyne LiDAR customers develop their own geo referencing systems However inertialreferencing and SLAM solutions are available through third parties and many can be found on the system integrators page at http velo dyneLiDAR com integrators php Chapter 9 Sensor Data 6...

Page 68: ...s Screen 75 10 2 Sensor Control with curl 76 10 2 1 Using curl with Velodyne LiDAR Sensors 76 10 2 2 curl Command Parameters 76 10 2 3 Command Line curl Examples 77 10 2 4 curl Example using Python 84 10 1 Web Interface The easiest way to controla sensor s operation is through its Web Interface It has four screens This section provides an explanation of the feature sets and functionality on each s...

Page 69: ...ser ON or OFF ON Return Type Strongest Sensor provides only the strongest detected return Last Sensor provides only the last temporally detected return Dual Sensor provides both the strongest and last returns If the last is also Strongest Table 10 1 Configuration Screen Functionality and Features Chapter 10 Sensor Communication 69 ...

Page 70: ...eiver Valid ON OFF Set Activates the changes OFF Phase Lock Used to synchronize the firing of two or more sensors The offset is used to set the azimuth at which the laser fires in conjunction with the PPS signal s rising edge Requires a valid PPS signal Offset Enter the offset as the desired degrees multiplied by 100 For example if the desired offset is 270º enter 27000 Set Activates the changes O...

Page 71: ... relevant when the phase lock feature is active This value is presented in hundredths of a degree Laser State Indicates the current laser array firing status ON DISABLED See Time Synchronization on page 123 for additionalinformation on the PPS and GPS Qualifier functions 10 1 1 1 MAC Address The ability to change the sensor s MAC Address was introduced with VLP 16 firmware release 3 0 34 0 It may ...

Page 72: ...sor is done resetting you may refresh the page and go back to the Configuration Screen The MAC Address should match the Factory MAC Address 10 1 2 System Screen Figure 10 2 VLP 16 System Screen Function Description Update Firmware Choose File Enables user to select a new firmware image file Update Initiates the firmware update process Reset System Used to reset the system after a firmware update G...

Page 73: ...gure 10 3 VLP 16 Info Screen Function Description FPGA top board Board Top or Bottom board information Mode State of the Application Watchdog Velodyne use only Type Velodyne Use Only HW Version Velodyne Use Only SOPC SYSID Velodyne Use Only SW Version Current operating firmware version Build Velodyne Use Only Table 10 3 Info Screen Functionality and Features Chapter 10 Sensor Communication 73 ...

Page 74: ...age Image Firmware type Failsafe and Application Firmware Version Version Number of the stored Failsafe and Application images SOPC SYSID Failsafe boot 00 Velodyne Use Only Application hdlbot 03 Velodyne Use Only GPS Position See description in Table 10 1 on page 69 PPS See description in Table 10 1 on page 69 Motor State See description in Table 10 1 on page 69 Laser State See description in Tabl...

Page 75: ...v Internalvoltage status 3 3v Internalvoltage status 5v Raw Internalvoltage status 1 2v Internalvoltage status VHV Velodyne Use Only Bottom Board Scaled I out The sensor s electricalcurrent consumption 1 2v N A Temp Circuit board temperature 5v Internalvoltage status 2 5v Internalvoltage status 3 3v Internalvoltage status Table 10 4 System Screen Functionality and Features Chapter 10 Sensor Commun...

Page 76: ... Velodyne LiDAR Sensors Note It is recommended to issue at most one curlcommand per second to the sensor curltakes care of the following items for you But you should follow them when using libcurlin your software Always check the response from the sensor even if the function used does not return one curlcan and will respond with status error messages Always close the socket connection to the senso...

Page 77: ...bmit 2 http 192 168 1 201 cgi reset a reset_system 10 2 3 Command Line curl Examples 10 2 3 1 Get Diagnostic Data Returns a JSON formatted string containing values as seen on the Diagnostics page of the sensor s Web Interface Command curlhttp 192 168 1 201 cgi diag json Example Response volt_temp top hv 2917 lm20_temp 1105 pwr_5v 2075 pwr_2_5v 2047 pwr_3_3v 2693 pwr_5v_raw 2263 pwr_vccint 977 bot ...

Page 78: ...low to usable values Some fields are scaled by additional factors 10 2 3 3 1 top hv The HV field comes from the sensor s top board It represents the high voltage bias to the APD Avalanche photodiode Its operating range is 150 0 V to 132 0 V To convert the raw value use Equation 10 1 above then scale the result by subtracting 5 0 and multiplying the result by 101 0 Example hv 2917 raw value 2917 5 ...

Page 79: ...e 2075 5 0 4096 2 533 2 533 2 0 5 066 V 10 2 3 3 4 top pwr_2_5v This is the top board s 2 5 V rail Its operating range is 2 3 V to 2 7 V To convert the raw value use Equation 10 1 on the previous page Example pwr_2_5v 2047 raw value 2047 5 0 4096 2 499 V 10 2 3 3 5 top pwr_3_3v This is the top board s 3 3 V rail Its operating range is 3 1 V to 3 5 V To convert the raw value use Equation 10 1 on th...

Page 80: ...or spins up To convert the raw value use Equation 10 2 on page 78 Example i_out 2086 raw value 2086 5 0 4096 2 546 10 0 2 546 2 5 0 464 A 10 2 3 3 9 bot lm20_temp This field indicates the temperature of the bottom board Its operating range is 25 0 C to 94 0 C To convert the raw value use Equation 10 3 on page 78 Example lm20_temp 1231 raw value 1105 5 0 4096 1 503 1481 96 SQRT 2 1962E6 1 8639 1 50...

Page 81: ... 2046 5 0 4096 2 498 V 10 2 3 3 13 bot pwr_3_3v This is the bottom board s 3 3 V rail Its operating range is 3 1 V to 3 5 V To convert the raw value use Equation 10 1 on page 78 Example pwr_3_3v 2692 raw value 2692 5 0 4096 3 286 V 10 2 3 3 14 bot pwr_5v This is the bottom board s 5 0 V rail Its operating range is 4 8 V to 5 2 V To convert the raw value use Equation 10 1 on page 78 then scale the ...

Page 82: ... Response gps pps_state Absent position motor state On rpm 600 lock Off phase 0 laser state On 10 2 3 6 Set Motor RPM Sets the RPM of the motor Valid integer values range from 300 to 1200 in increments of 60 If the RPM setting is not evenly divisible by 60 neither motor speed control nor phase lock functions will function properly For values 1 through 299 the sensor defaults back to 300 RPM If a v...

Page 83: ... configuration so that the settings are persistent across power cycles This is equivalent to clicking on the Save Configuration button under the Configuration tab in the Web Interface Command curl data submit http 192 168 1 201 cgi save 10 2 3 10 Reset System Resets the sensor This command performs the same operation as pressing the Reset System button under the System tab in the Web Interface or ...

Page 84: ...1 cgi setting net 10 2 3 17 Set Gateway This sets the gateway address of the sensor The default is 192 168 1 1 This has the same effect as entering a gateway address in the Web Interface Gateway field Command curl data gateway 192 168 1 2 http 192 168 1 201 cgi setting net 10 2 3 18 Set DHCP This determines if the sensor is to rely on a DHCP server for its IP address This has the same effect as se...

Page 85: ...buf s setopt s URL url s setopt s POSTFIELDS pf s setopt s WRITEDATA buf s perform rcode s getinfo s RESPONSE_CODE success rcode in range 200 207 print s s d s url pf rcode OK if success else ERROR return success Base_URL http 192 168 1 201 cgi sensor pycurl Curl buffer BytesIO rc sensor_do sensor Base_URL reset urlencode data reset_system buffer if rc time sleep 10 rc sensor_do sensor Base_URL se...

Page 86: ...http 192 168 1 201 cgi setting laser on 204 OK Sensor laser is On motor rpm is 301 86 VLP 16 User Manual ...

Page 87: ...18 V drawing a maximum of 0 9 A dur ing normaloperation Fuse in the Interface Box is okay See Fuse Replacement on page 89 if it s blown Rotor doesn t spin Verify Power connection and polarity Proper voltage should be between 9 V and 18 V drawing a maximum of 0 9 A dur ing normaloperation Fuse in the Interface Box is okay See Fuse Replacement on page 89 if it s blown Unit spins but no data Verify E...

Page 88: ...ess access points often throttle broadcast data Are excessive broadcast packets from another service being seen by the sensor This can slow the sensor down Is the computer fast enough to keep up with the packet flow coming from the sensor Remove allnetwork devices and test with a computer directly connected to the sensor GPS Not Syn chronizing Check the following Baud rate set to 9600 and serialpo...

Page 89: ... be the least efficient most time consuming approach as 169 254 x x is a large list to scan 3 Once you have the address of the sensor change the IP address of the corresponding Ethernet interface on your computer to something on the same logicalnetwork segment For example if the sensor is found at 169 254 134 79 you can change the computer s IP address to 169 254 134 222 4 Now point your browser a...

Page 90: ...e the problem concisely including any non default sensor configuration and setup details as necessary 6 Attachments are limited to a maximum individualfile size of 20 MB No limit is placed on the number of attach ments nor on the totalsize of allattachments For very large files please host them somewhere suitable and include a link in the Description field Bundling files in zip files is fine 7 Cli...

Page 91: ...y specifications have been moved to product data sheets found on the Velodyne LiDAR web site at this address http www velodynelidar com downloads html datasheets For additionalinformation contact Velodyne LiDAR Sales http www velodynelidar com contacts php Appendix A Sensor Specifications 91 ...

Page 92: ...performs the update in two stages This procedure works best with the Chrome browser 1 Point your browser to the Velodyne Downloads page at http velodyneLiDAR com downloads html Figure B 1 Velodyne Downloads Page 2 Click the FIRMWARE icon on the left to advance to the Firmware section Note the latest version available 3 Open the sensor s Web Interface in your browser and click the Info button 4 Che...

Page 93: ...ding it from 3 0 37 x to 3 0 29 x a specialprocedure must be performed instead Stop the regular procedure here and proceed to Spe cialProcedure to Update Firmware on page 98 7 If your VLP 16 s firmware version predates 3 0 24 x it cannot be updated in the field Stop the regular procedure here and instead follow the Return Merchandise Authorization RMA on page 90 process to return the unit to the f...

Page 94: ...r Update Firmware 10 Using the dialog locate the new firmware file on your computer and select it 11 Verify that the correct file for your sensor modelhas been selected It must have the flash file extension 12 Click Update Firmware s Update button to initiate the update process 94 VLP 16 User Manual ...

Page 95: ...ar indicating the percentage of update completion is displayed 14 When this first stage of the update is complete the Firmware Update Complete screen below is displayed But wait there s more Internally you ve updated the bottom board but not the top yet Appendix B Firmware Update 95 ...

Page 96: ...ocedure The firmware image that you just uploaded is being prepared for use by the sensor 16 A second progress bar is shown Note This step should take approximately 70 seconds If it completes in less than 10 seconds an error occurred Instead of continuing perform the If An Error Occurs on page 99 procedure 96 VLP 16 User Manual ...

Page 97: ...n processing completes press the Reset System button to finalize the update The sensor willperform a warm boot 18 The Configuration screen willbe shown when the sensor finishes rebooting 19 Return to the Info page Appendix B Firmware Update 97 ...

Page 98: ...motor are dis abled Perform the If An Error Occurs on the facing page procedure below to resolve the issue B 1 1 Special Procedure to Update Firmware The firmware update process requires both the top and bottom boards be flashed A minor tweak is made to the steps nor mally used to update both boards When this tweak is made the normalprocedure becomes the SpecialProcedure to Update Firmware 1 First...

Page 99: ...onto the top board B 1 2 If An Error Occurs If an error occurs during the Firmware Update Procedure it did not finish Perform the steps below to complete the pro cess 1 Reset the sensor Either power cycle it remove power wait at least 10 seconds apply power wait 30 seconds or click the Reset System button if you re on the sensor s Firmware Update Complete screen or can get to the sensor s System p...

Page 100: ... the Velodyne LiDAR web site C 1 Interface Box Mechanical Drawing 101 C 2 VLP 16 and Puck LITE Mechanical Drawing 102 C 3 VLP 16 and Puck LITE Optical Drawing 103 C 4 VLP 16 and Puck LITE Optical Keep Out Zone 104 C 5 Puck Hi Res Mechanical Drawing 105 C 6 Puck Hi Res Optical Drawing 106 C 7 Puck Hi Res Optical Keep Out Zone 107 100 VLP 16 User Manual ...

Page 101: ...C 1 Interface Box Mechanical Drawing Figure C 1 Interface Box MechanicalDrawing 50 6001 Rev A Appendix C Mechanical Diagrams 101 ...

Page 102: ...C 2 VLP 16 and Puck LITE Mechanical Drawing Figure C 2 VLP 16 and Puck LITE MechanicalDrawing 86 0101 Rev B1 102 VLP 16 User Manual ...

Page 103: ...C 3 VLP 16 and Puck LITE Optical Drawing Figure C 3 VLP 16 and Puck LITE OpticalDrawing 86 0101 Rev B1 Appendix C Mechanical Diagrams 103 ...

Page 104: ...C 4 VLP 16 and Puck LITE Optical Keep Out Zone Figure C 4 VLP 16 and Puck LITE OpticalKeep Out Zone 86 0101 Rev B1 104 VLP 16 User Manual ...

Page 105: ...C 5 Puck Hi Res Mechanical Drawing Figure C 5 Puck Hi Res MechanicalDrawing 86 0129 Rev A Appendix C Mechanical Diagrams 105 ...

Page 106: ...C 6 Puck Hi Res Optical Drawing Figure C 6 Puck Hi Res OpticalDrawing 86 0129 Rev A 106 VLP 16 User Manual ...

Page 107: ...C 7 Puck Hi Res Optical Keep Out Zone Figure C 7 Puck Hi Res OpticalKeep Out Zone 86 0129 Rev A Appendix C Mechanical Diagrams 107 ...

Page 108: ...appendix provides technicalwiring and schematic drawings and diagrams High resolution versions may be accessed on the Velodyne LiDAR web site D 1 Interface Box Wiring Diagram 109 D 2 Interface Box Schematic 110 108 VLP 16 User Manual ...

Page 109: ...D 1 Interface Box Wiring Diagram Figure D 1 Interface Box Wiring Diagram 86 0107A Appendix D Wiring Diagrams 109 ...

Page 110: ...D 2 Interface Box Schematic Figure D 2 Interface Box Schematic 69 8230A 110 VLP 16 User Manual ...

Page 111: ... playback pre recorded data stored in pcap Packet Capture files Note VeloView does not support pcapng files VeloView displays distance measurements from a Velodyne LiDAR sensor as point data It supports custom colored dis play of variables such as intensity of return i e calibrated reflectivity time distance azimuth and laser ID The data can be exported as XYZ data in CSV format Functionality and ...

Page 112: ...elow to installfrom the web site 1 Point your browser to http velodynelidar com downloads html software 2 Click the VeloView Download button to go the officialVeloView download page 3 Scrolldown to the How to Obtain section 4 Choose the correct binary installer for your operating system click the link 5 Save the executable installer to disk 6 Launch the installer and follow the on screen instructi...

Page 113: ...t Sensor Calibration 5 VeloView begins displaying the sensor data stream Figure E 3 VeloView Sensor Stream Display The stream can be paused by pressing the Play button Press it again to resume streaming Appendix E VeloView 113 ...

Page 114: ...ing and closes the pcap file Note Velodyne LiDAR sensors generate a lot of data See Sensor Specifications on page 91 for data rates The pcap file can become quite large if the recording duration is lengthy Also it is best to record to a fast localHDD or SSD not to a slow subsystem such as a USB storage device or network drive E 5 Replay Captured Sensor Data from PCAP File To replay or examine a pc...

Page 115: ...OK VeloView should display frame 0 Figure E 6 VeloView Play Button 4 Press Play to replay pause the data stream Use the Scrub slider tool it looks like an old fashioned volume slider to move back and forth through the data frames Both controls are in the same toolbar as the Record button 5 To take a closer look at some data scrub to an interesting frame and click the Spreadsheet button Appendix E ...

Page 116: ... willbe familiar You can change column widths by dragging the column header divider left or right and by double clicking them Drag column headers left or right to reorder them Sort the table by clicking column headers And you can make the table itself wider by dragging the table s sides left or right Make Points_m_XYZ wider to expose the XYZ points themselves Figure E 8 VeloView Data Point Table 7...

Page 117: ...e empty 8 Click the Select All Points tool This turns your mouse into a point selection tool Figure E 10 VeloView Select AllPoints 9 In the 3D rendered data pane use your mouse to draw a rectangle around a smallnumber of points They will immediately populate the data table Appendix E VeloView 117 ...

Page 118: ...es are listed on the right In this example most of their intensity values exceed 100 indicating something retro reflective is there see Key Features on page 32 for details Azimuth is in hundredths of a degree Distances are with respect to the sensor s origin At any point you can save a subset of data frames by doing File Save As Select Frames 118 VLP 16 User Manual ...

Page 119: ...iode The source of each laser pulse in the sensor is a semiconductor laser diode The laser diode is a series of stacked p n junc tions similar at least in concept to that shown in Figure F 1 below When a current is applied across the junction photons are produced and routed out one end to form a tightly focused laser beam Note The physics of laser diodes can be found elsewhere on the Internet Star...

Page 120: ...he laser scan The dimensions of this laser spot at the sensor s ring lens is 9 5 mm tallby 12 7 mm wide but it doesn t remain that size as it speeds away Read more about that in Beam Divergence on the facing page Figure F 2 Laser Spot Shape F 2 2 Laser Scan Pattern Inside each VLP 16 sensor is a verticalarray of lasers Figure F 3 on the facing page shows three adjacent concurrent laser scans on th...

Page 121: ...flat target a short distance away F 2 3 Beam Divergence As a laser pulse propagates outward from the sensor the cross section of the laser beam describing the path of the pulse gradually steadily grows larger The angular measure of this increase in beam path diameter is called Beam Divergence Appendix F Laser Pulse 121 ...

Page 122: ...nce 3 0 mrad 0 18 deg 1 5 mrad 0 09 deg Table F 1 VLP 16 Beam Divergence Table F 2 below lists laser spot horizontaland verticaldimensions at various distances from the sensor Distance mm Horizontal mm Scan Direction Vertical mm 1000 15 4 11 0 2000 18 2 12 5 5000 26 4 17 0 10000 40 1 24 5 15000 53 8 32 0 25000 81 2 47 0 50000 149 7 84 6 100000 286 8 159 6 Table F 2 Dimensions of VLP 16 Laser Spots...

Page 123: ...ensor utilizes the timestamp provided in a NationalMarine Electronics Association NMEA sentence GPS Qualifier The new options shown below in their default positions can be found on the Configuration tab in the sensor s Web Inter face Figure G 1 Web Interface PPS and GPS Qualifier Option Selections G 2 Background Your sensor maintains a counter representing the number of microseconds since the Top ...

Page 124: ... invalid fix and begins using its own internal time to drive the PPS reference New controloptions PPS Qualifier and GPS Qualifier described below have been added to allow the user to finely adjust the manner in which the sensor reacts when a valid PPS is confirmed and locked onto G 3 PPS Qualifier The three settings described below and in Logic Tables on the facing page controlhow the sensor adjus...

Page 125: ...es if the minutes and seconds component of the TOH counter are adjusted to the timestamp provided by the GPS receiver or driven by the rollover of the sub second counter If the Require GPS Receiver Valid is On the minutes and seconds field in the NMEA sentence timestamp is used to adjust the minutes and seconds component of the TOH counter only when GPS receiver indicates a valid status If the Req...

Page 126: ...Figure G 4 Minutes and Seconds Counter Behavior Note If no NMEA sentence is provided the Minutes and Seconds counter is driven by the rollover of the sub seconds counter 126 VLP 16 User Manual ...

Page 127: ...tes a fir ing sequence at the phase lock offset specified by the user For example assume the user enters an angle of 35 α as the phase offset The red arrow in Figure H 1 below indicates the laser firing direction precisely as the sensor receives the rising edge of the PPS signal Note For Phase Lock to work correctly the sensor s RPM must be set to a multiple of 60 RPM between 300 RPM and 1200 RPM ...

Page 128: ...et for two or more sensors Velodyne recommends the sensors be configured to fire at each other This is the optimalconfiguration for minimizing interference because the location of the interference is under user control Figure H 3 on the facing page shows two sensors mounted on a vehicle The sensor mounted on the car s left side has its phase lock offset set to 90 and the phase lock offset of the s...

Page 129: ...fset In both scenarios the two sensors create data shadows behind each other To avoid any spurious data due to blockage or reflections from the opposing sensor the user should ignore any data in the shadowed azimuth ranges as shown in Figure H 5 on the next page To do that you need to know the diameter of the sensors see Sensor Specifications on page 91 and distance between the sensor centers Appe...

Page 130: ...Alternatively each sensor s Field of View controlmay be used to remove the subtended azimuths from the data stream Use Figure H 5 above and Equation H 1 above to determine for each sensor the azimuthalangles at which the shadows begin and end Then using each sensor s Web Interface or curlcommands or equivalent programmatic commands configure the sensor s horizontalFOV start and end angles See Conf...

Page 131: ...5 Method Three 132 I 1 6 Method Four 133 I 1 Cleaning the Sensor CAUTION READ THROUGH THIS ENTIRE SECTION BEFORE CLEANING YOUR VLP 16 SENSOR Improper handling can permanently damage it I 1 1 Required Materials 1 Clean microfiber cloths 2 Mild liquid dish washing soap 3 Spray bottle with warm clean water 4 Spray bottle with warm mildly soapy water 5 70 isopropylalcohol Method 2 ONLY 6 NACL Precisio...

Page 132: ... soapy water and a clean microfiber cloth to gently wipe the sensor again taking care not to abrade the surface When cleaning the ring lens wipe gently along the curve of the sensor not top to bottom To finish spray the sensor with clean water to rinse off any remaining soap then dry with another clean microfiber cloth I 1 4 Method Two This sensor s ring lens is made of polycarbonate and may be cl...

Page 133: ...f Simple Green and distilled water to remove particulates on the lens with a rinsing action After heavy particulates are removed additionalSimple Green solution and a soft microfiber cloth can be used gently to clean the lens This should then be followed up with a 99 IPA IsopropylAlcohol wipe using a microfiber cloth to remove any residualSimple Green Never use an ammonia based cleaner Appendix I ...

Page 134: ...r s IP address is set at the factory to 192 168 1 201 By default the sensor sends UDP data packets to broadcast address 255 255 255 255 Note Each sensor has a unique MAC Address and SerialNumber set at the factory by Velodyne LiDAR that cannot be changed J 1 2 Establishing Communication via Ethernet The instructions below are for Windows computers For linux or Macintosh computers perform equivalen...

Page 135: ...gs J 2 Network Considerations Your application network topology may be simple with a single sensor transmitting data on a basic network Or it could be complicated with multiple sensors This section presents certain topics to consider J 2 1 Throughput Requirements When actively sensing its environment your sensor produces a lot of data which it transmits via Ethernet The volume of data depends part...

Page 136: ...ination IP address to a specific non broadcast IP address However two or more sensors may share the same destination address The scenarios below illustrate the wrong way and then a better way to configure them An alternative would be to direct connect sensors to separate NICs J 2 3 1 Multiple Sensors Transmitting to a Broadcast Address If multiple sensors on a network transmit data to a broadcast ...

Page 137: ...rk to transmit their data to a non broadcast address If every sensor in the same network transmits packets to a specific non broadcast destination address doesn t have to be the same one as illustrated in Figure J 4 below the other sensors willnot suffer unnecessary network overhead Figure J 4 Multiple Sensors Proper Network Setup Appendix J Network Configuration 137 ...

Page 138: ...Corporate Headquarters Velodyne LiDAR Inc 5521 Hellyer Ave San Jose CA 95138 U S A www VelodyneLiDAR com Phone 1 408 465 2800 Fax 1 408 779 9227 Emaillidar velodyne com VLP 16 User Manual 63 9243 Rev D ...

Reviews: