background image

14

15

English: 

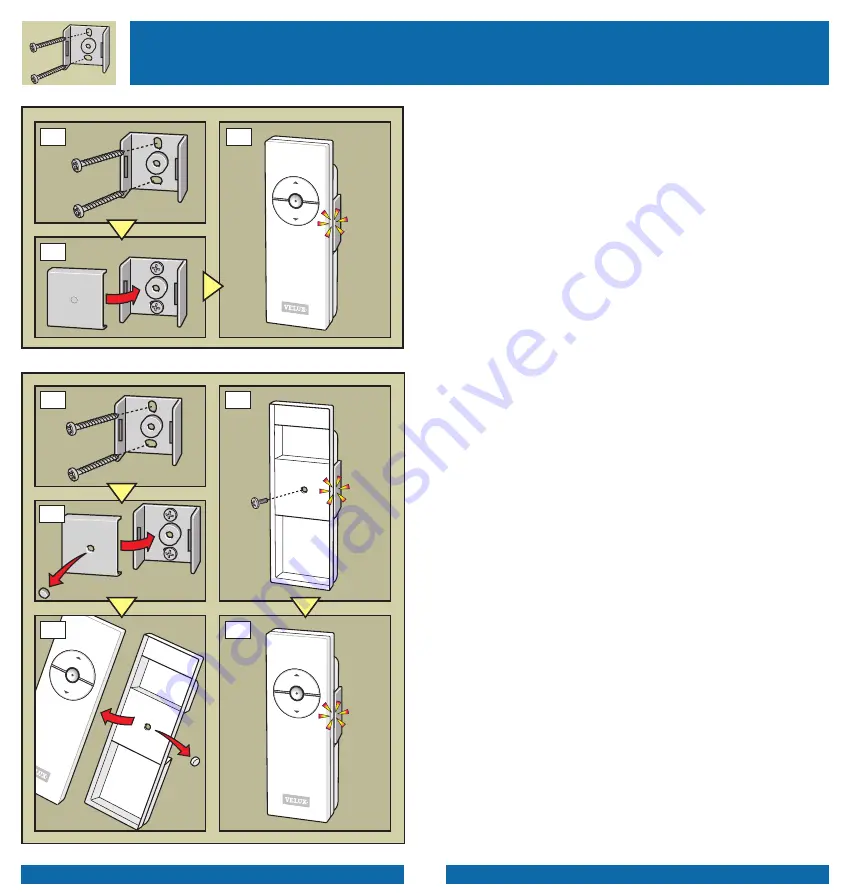
The remote control is supplied with a holder which can be fitted to the wall 

anywhere in your home.

Note: 

Before the holder is fixed to the wall, it is recommended to check if the 

remote control is able to operate the relevant solar products from the fixed 

position.

1a

  Fit the backplate of the holder to the wall with the two screws supplied.

2a

 Click the cover plate onto the back plate.

3a

 Place the remote control in the holder.

If required the remote control can be fixed in the holder.

1b

  Fit the back plate of the holder to the wall with the two screws supplied.

2b

  Make hole in cover plate by removing knock-out and click the cover plate 

onto the back plate. 

3b

  Remove front of the remote control and make hole in the back by remov-

ing knock-out.

4b

  Click the back into the holder and fix with screw.

5b

 Click front onto back.

Deutsch: 

Die Fernbedienung wird mit einer Halterung geliefert, die überall im Haus an 

einer Wand montiert werden kann.

Hinweis:

 Wir empfehlen zu prüfen, ob man mit der Fernbedienung die rele-

vanten Solar-Produkte von der dafür vorgesehenen Stelle aus bedienen kann, 

bevor die Halterung an der Wand befestigt wird.

1a

   Die Hinterplatte der Halterung mit den beiden mitgelieferten Schrauben 

befestigen. 

2a

 Die Deckplatte auf die Hinterplatte drücken.

3a

 Die Fernbedienung in die Halterung einrasten lassen.

Die Fernbedienung kann, falls gewünscht, in die Halterung festgeschraubt 

werden.

1b

   Die Hinterplatte der Halterung mit den beiden mitgelieferten Schrauben 

befestigen.

2b

  Das vorgestanzte Loch in der Deckplatte durchstechen und die Deckplat

-

te auf die Hinterplatte drücken.

3b

  Die Frontseite der Fernbedienung entfernen und das vorgestanzte Loch 

durchstechen.

4b

  Die Rückseite der Fernbedienung in die Halterung drücken und mit der 

Schraube befestigen.

5b

 Die Frontseite in die Rückseite einrasten lassen.

Français :  

La télécommande est fournie avec un support qui peut être installé sur le 

mur n'importe où dans la maison.

Attention :

 avant de fixer le support sur le mur, il est recommandé de vérifier 

si la télécommande permet de commander de cette position les produits 

solaires concernés.

1a

 Fixer la patte arrière du support sur le mur à l'aide des deux vis fournies.

2a

 Clipper le capot sur la patte arrière.

3a

 Placer la télécommande dans son support.

Si besoin la télécommande peut rendue fixe dans son support.

English: Fitting of holder for remote control 

Deutsch: Montage der Halterung für die Fernbedienung

Français: Installation du support de la télécommande

1a

2a

3a

1b

4b

5b

2b

3b

Summary of Contents for DSL

Page 1: ...our un ventuel besoin ult rieur Dansk Brugsvejledning L s hele brugsvejledningen grundigt igen nem f r ibrugtagning Vejledningen b r opbevares til senere brug Nederlands Gebruiksaanwijzing Lees de geb...

Page 2: ...mmande 18 20 Fjernbetjening 18 20 Afstandsbediening 18 20 Telecomando 18 20 Mando a distancia 18 20 Maintenance technical information 21 23 Wartung technische Informationen 21 23 Entretien information...

Page 3: ...tet werden da die Gefahr eingeklemmt zu werden dann besteht wenn sich K rperteile im Funktionsbereich des Produktes befinden Das Solar Produkt nicht bedienen falls Reparaturarbeiten oder Anpassung erf...

Page 4: ...overbelasting en zal automatisch stop pen bej een blokkering Dansk Vigtig information Nederlands Belangrijke informatie Het product op zonne energie wordt van stroom voorzien door een batterij die kan...

Page 5: ...Das Solar Produkt darf nicht benutzt werden bevor es fertigmontiert ist Hinweis Falls das Produkt bei Bet tigung der Fernbedienung nicht reagiert wurde es w hrend der Montage in der Fernbedienung nic...

Page 6: ...uikt voordat deze gemonteerd is Opmerking Als het product niet reageert bij gebruik van de afstandsbediening dan is het product niet geregistreerd in de afstandsbediening tijdens de installatie Om het...

Page 7: ...s mandos a distancia pueden utilizarse para el funcionamiento simult neo El ejemplo muestra tres productos por solares A B y C donde los tres productos est n registrados en el mando a distancia del pr...

Page 8: ...Hinterplatte der Halterung mit den beiden mitgelieferten Schrauben befestigen 2a Die Deckplatte auf die Hinterplatte dr cken 3a Die Fernbedienung in die Halterung einrasten lassen Die Fernbedienung k...

Page 9: ...de afstandsbediening en maak een gat in de achterzijde door het plaatje eruit te drukken 4b Klik de achterzijde op de houder en zet hem vast met een schroef 5b Klik de voorzijde op de achterzijde Ita...

Page 10: ...Taste nicht l nger gedr ckt wird Fran ais Positionnement remplacement des piles dans la t l com mande Retirer l arri re de la t l commande et placer remplacer les piles dans la t l commande comme indi...

Page 11: ...iano Telecomando Espa ol Mando a distancia English Maintenance The surface of the remote control may be cleaned with a soft damp cloth using a small amount of household cleaner diluted in water In cas...

Page 12: ...nstalleren is Producten met het io homecontrol label communiceren met elkaar wat het comfort de veiligheid en de energiebesparing bevordert www io homecontrol com Italiano Manutenzione La superficie d...

Page 13: ...S A 91 509 71 00 FI VELUX Suomi Oy 0207 290 800 FR VELUX France 0821 02 15 15 0 119 TTC min GB VELUX Company Ltd 0870 380 9593 HR VELUX Hrvatska d o o 01 5555 444 HU VELUX Magyarorsz g Kft 06 1 436 0...

Reviews: