#65101-10242-G
How to install your
Vertical Honeycomb Blind
5
Movable Vertical Rail
7
Bottom Bracket
6
Fabric Clips and Rollers
8
Tension Cord
Note: for Centre Opening model, repeat steps 3 to 7 for the other side of the blind.
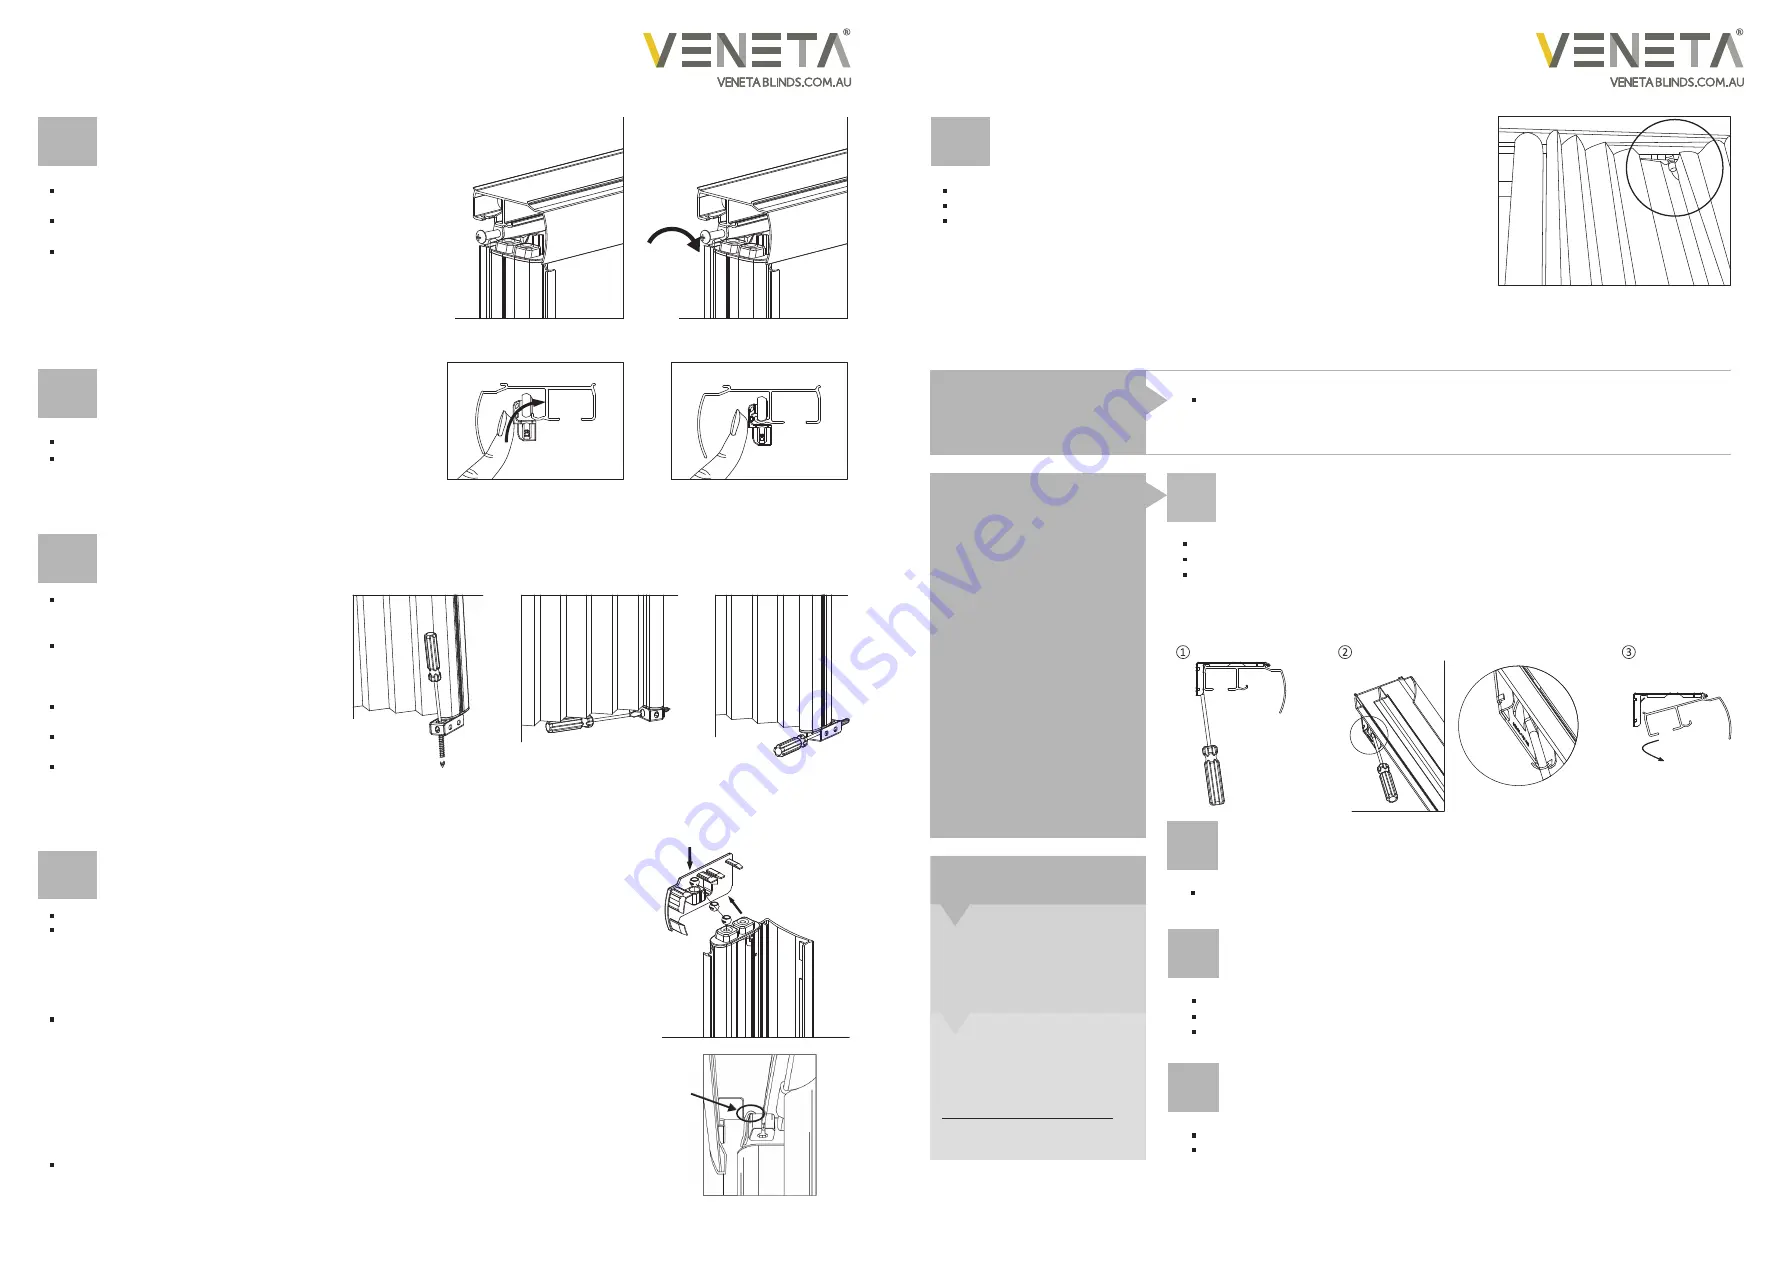
As per the drawings to the right, decide which
way you will face the bottom bracket
to be screwed to the wall or the floor.
Tilt the bottom of the fixed vertical rail out
into the room and insert the bottom
bracket into the slot in the bottom of the
fixed vertical rail.
We recommend drilling a pilot hole for
the screw using a 2mm bit.
Fix the bracket into place using a
medium screw.
Note: photo on right is taken from the
rear of the blind.
Note: Slide the support shaft along the head rail to the
required spot.
Align the movable vertical rail to the sliding support shaft
in head rail.
Insert and screw the bolt until firm.
Press onto headrail from the front of the blind.
NOTE: The rollers should be facing away from you.
Remove the rubber band from the cord and bead.
Left or right stack
• At the opposite end to the fabric stack on the headrail, you will find the bead
housing located within the end cap.
• Insert the beaded cord into the bead housing from the top.
Note: The string needs to be inserted into the slot.
Centre opening
• For the right hand fabric stack, take the beaded cord to
the far left hand side end cap & insert the beaded cord
into the bead housing from the top.
• For the left hand fabric stack, take the beaded cord to the
far right hand side end cap & insert the beaded cord into the
bead housing from the top.
Note: Use your hand to push the fabric back to reveal the housing – fabric will bounce back.
How to install, operate and maintain your
Vertical Honeycomb Blind
9
Vertical Alignment
If the movable vertical rail is not vertical, adjust the screw as per image.
Turn the screw either clockwise or anti-clockwise to make the rail vertical.
Note: the fabric can be crinkled and will bounce back into place.
Operating your
Blind
Maintaining your
Blind
To operate the blind simply grab the movable vertical rail to slide the blind.
Use a warm damp cloth or a mild detergent for tougher stains.
Dab the affected area, but do not rub the fabric. Finish with just a warm damp cloth.
Allow the fabric to dry in the closed position.
3
Spot Cleaning
If ultrasonically cleaning the blind please specify that a mild solution must be used.
Note the rails should never be immersed in liquid.
4
Ultrasonic Cleaning
Please write a review on our
website at…
www.venetablinds.com.au
Feedback?
We would love to know how you
went with your installation…
1
Removing your blind
Remove the blanket from the head rail.
Hold the blanket, and then to remove the vertical rail from the head rail.
Refer to below guide to remove the head rail.
a. Position a flat head screw driver between the back of the headrail and bracket.
b. Push screw driver upwards
c. Pull back of headrail down to unclip bracket from headrail.
d. Repeat for all other brackets.
Dust can be removed using a feather duster or vacuum with brush attachment
on low suction.
2
Dusting
3
4
Great Job… Enjoy your new Veneta Blinds!
Keep the end of
cord upwards.


