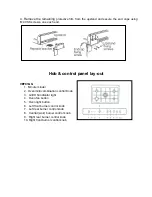
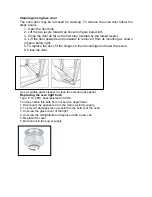
background image

Oven cooking tips 

This is a large oven. Allow at least 15 minutes preheat

ing

 time before cooking commences to 

allow the interior to 

heat

 up to the required temperature. Personal experience will help 

determine any variations in the values reported in the table. In any case, it is 
recommended to follow the instructions of the specific recipe used. 


When baking cakes and pastries it is advisable to preheat the oven to one gas mark higher 
than required. This will compensate for 

h

eat loss when opening the oven door. Reduce

 the


temperature to 

the 

setting required once food is placed in the oven. 

 
When opening the door during operation turn the fan off to minimise heat loss. Turn 

the 

fan on 

again once cooking has resumed. 
 
Open

 the

 door as little as possible during operation. 

 
If 

it is 

necessary to cover food with foil or baking paper whilst cooking in fan mode, ensure that 

the foil or paper is firmly secured. 
 
Avoid using dark scone trays, cake tins or muffin trays. Light coloured metal vessels will 
give more even browning. Dark ones may cause scorching on the base. 
 
For easy viewing and a more even cooking result bring the dishes and trays forward to the 
front of the oven shelf. 
 
For even heat circulation ensure that dishes and trays do not touch each other or the sides 
of the oven. Best results when baking, roasting and multi level cooking will be obtained by 
cooking with the fan in operation. 
 
Best results when baking meringues, pavlovas, souffles and other delicate items will be 
obtained by cooking without the fan in operation. 
 
Do not p

l

ace foil, baking trays, dishes or any other items directly on the base of the oven. 

 
Note: When 

the 

oven is operating the glass door will become hot 

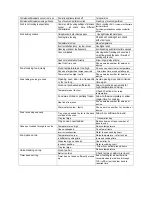
Trouble shooting guide 

Problem Possible 

cause 

Action 

Burners don’t light 

Power to appliance turned off 

Turn on power supply 

Oven burner di

ff

icult to light


Oven contr

ol

 not turned on fully or held 

depressed for long enough


Turn to mark 

8 (270) 

and h

o

ld in until 

ignited


Fault in igniter


Phone service number for service or 

advice


Oven going out just after ignition


Contr

ol

 knob not depressed long enough


Depress contr

ol

 knob until burner remains 

alight


Oven goes out during cooking


Phone service number for service or 

advice


Oven goes out when closing door


Door closed too fast


Close door gently


Hotplate burner di

ff

icult to light


Burner cap damp or incorrectly positioned


Dry and reposition cap


Spark ignitor clogged with grease


Clean ignitor


Burner ports blocked


Clean ports


Spark igniter does not function


Phone service number for service or 
advice.


Summary of Contents for VEF91GG

Page 1: ...INSTALLATION INSTRUCTIONS USER INSTRUCTIONS COOKER MODEL VEF91GG 90X60 cm...

Page 2: ...et and program your LED clock and importantly taking care of your appliance when cleaning please call us because we are here to help you It is important that you read through the following use and car...

Page 3: ...erable Your new cooker was protected by suitable packaging while it was on its way to you All materials used for this purpose are environmentally friendly and suitable for recycling Please make a cont...

Page 4: ...sure that the power cord does not get caught in the hot oven door The plastic insulation could melt Do not use loose greaseproof paper in the oven e g when heating the oven The paper could be drawn to...

Page 5: ...600 mm above the burner should be protected by noncombustible millboard at least 6 mm thick which is covered with sheet metal not less than 0 4 mm thick or should be protected by an equivalent materi...

Page 6: ...Gas regulator The gas connection is via 1 2 compression Connect the cooker to the gas supply and check for gas soundness If using a flexible connection This appliance is approved for connection with a...

Page 7: ...ct the cooker to the gas supply and check for gas soundness NEVER use a naked flame to check for gas leaks Gas inlet mm Nat gas Gas inlet mm LPG From RH rear side 35 mm From RH rear side 35mm Up from...

Page 8: ...by wrong connection or improper installation When being repaired the appliance must always be disconnected from the mains supply if required notify our customer service Support legs The cookers are su...

Page 9: ...upplied screw 2 Mark the centre position of the cooker installation position on the floor 3 Measure from the rear most point of the hob to the mount point of strap Dimension A then using Dimension A m...

Page 10: ...inless steel hob models are fitted with an upstand The upstand is packaged at the top rear of the cooker The upstand is fixed along the rear of the cooker hob Fixing points for locating the upstand ar...

Page 11: ...control panel lay out VEF91GG 1 Minute minder 2 Oven Grill combination control Knob 3 Grill ON indicator light 4 Oven fan button 5 Oven light button 6 Left front burner control knob 7 Left rear burne...

Page 12: ...lectronic ignition 2 Once the flame is stabalised turn the knob to the desired setting Keep the knob depressed for 5 seconds to activate the flame failure device 3 If the flame goes out repeat the pro...

Page 13: ...rhead exhaust fan Minute minder The minute minder control knob is positioned on the left hand side of the control panel To activate the timer rotate the knob clock wise through 360 then return the kno...

Page 14: ...without the fan Shelf positions 4 or 5 are ideal for baking pizzas quiches and pies where a crisp base is desirable Shelf position 2 is ideal for grilling however larger foods or foods with a high fa...

Page 15: ...l apply to shelf position 3 only Food placed on shelves below position 3 will be cooking at a higher temperature than indicated whilst food placed above shelf position 3 will be cooking at a lower tem...

Page 16: ...n shelf For even heat circulation ensure that dishes and trays do not touch each other or the sides of the oven Best results when baking roasting and multi level cooking will be obtained by cooking wi...

Page 17: ...ce Food taking too long to cook Opening oven door too frequently or for too long Avoid opening door and minimise time open Oven not preheated sufficiently Allow to preheat especially for high temperat...

Page 18: ...c to remove stubborn food remains from the hob surface trivets burners and oven interior Do not allow acidic products such as vinegar lemon juice etc to come into contact with the hob Cleaning the ove...

Page 19: ...w right 5 To replace the door fit the hinges on their mountings and lower the levers 6 Close the door Use a suitable glass cleaner to clean the exterior glass panel Replacing the oven light bulb Type...

Page 20: ...door 2 Remove left hand side panel as per the headings To remove side panels 3 The oven burner is held in position over the injector by a bracket on the LHS retaining the elbow of the burner mixing tu...

Page 21: ...GG A copy of those diagrams is situated on the back panel of the cooker Data plates The data plates are attached to the inside of the oven door centre bottom Always quote your model number when reques...

Reviews: