background image

Instructions for Installation 

THE MANUFACTURER DECLINES ANY AND ALL RESPONSIBILITIES FOR DAMAGES TO THINGS

OR INJURIES TO PERSONS OR ANIMALS DERIVING FROM INCORRECT INSTALLATION OR USE 

OF THE EQUIPMENT. 

5

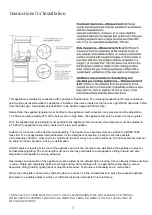
This appliance is suitable for connection with rigid pipe or flexible hose. The isolating manual shut-off valve connection 
point must be accessible when the appliance is installed. Gas inlet is located at the top rear, right OR left hand side, 50mm

Natural Gas: the supplied regulator must be fitted to the appliance inlet connection. Gas pressure must be adjusted to 
1.0 kPa when approximately 50% of the burners are on high flame, the appliance test point is located on the regulator.

LPG: the supplied test point adaptor must be fitted to the appliance inlet connection. Gas pressure must be adjusted to
2.75 kPa, the appliance test point is located on the test point adaptor.

Suitable for connection with a flexible hose assembly. The flexible hose assembly must be certified to AS/NZS 1869
class B or D, be of appropriate internal diameter for the total gas consumption, be kept as short as possible 
(not exceeding 1200mm), must not be in contact with the floor or any hot or sharp surfaces. The hose assembly must not 
be subject to strain, abrasion, kinking or deformation.

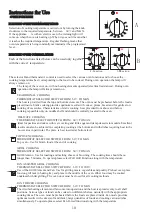
Anti tilt chains are located at the rear of the appliance and must be secured to the wall behind the appliance to prevent
accidental tipping/tilting. The chain length must be as short as practicable to avoid appliance tilting forward and also 
diagonal to avoid appliance moving sideways. 

Gas leakage and operation of the appliance must be tested by the installer before leaving. Check all burner flames are blue
in colour, stable and completely ignite at both high and low flame settings with no appreciable yellow tipping, carbon

from the side edge.

 Overall dimensions 900mm wide, 600mm deep and 900mm high. 

deposition, lifting, floating, lighting back or objectionable odour. Test burners individually and in combination. 

Where the data plate is obscured by cabinetry when the cooker is in the installed position, place the supplied duplicate
data plate to a suitable adjacent surface or within the instruction manual for future reference.

Summary of Contents for VU90EG

Page 1: ...venini com au user manual 2 year warranty VU90EG 90cm freestanding cooker...

Page 2: ...enhance your kitchen such as cook tops Range hoods built in hobs built in ceramic hobs and built in ovens These are models to complement your new oven We make every effort to ensure that our products...

Page 3: ...eristic table Instructions for use Description of the main parts of the appliance Ignition and operation of the burners Recommendations Oven function Electronic programmer Maintenance and cleaning Ins...

Page 4: ...e Before using the oven we suggest to l Remove all the special film covering the oven door glass when provided l Heat the empty oven at max Temperature for 45 minutes to remove unpleasant smell and sm...

Page 5: ...supervision or instruction concerning use of the appliance by a person responsible for their safety Children should be supervised to ensure that they do not play with the appliance qualified persons...

Page 6: ...r D be of appropriate internal diameter for the total gas consumption be kept as short as possible not exceeding 1200mm must not be in contact with the floor or any hot or sharp surfaces The hose asse...

Page 7: ...s not come into contact with parts subject to heating Never use reductions shunts adaptors which can cause overheating or burning The manufacturer is not liable for any direct or indirect damage cause...

Page 8: ...must be 2 75 kPa it may be necessary to regulate When the injectors have been replaced SETTING THE MINIMUM FLAME THE BURNERS REQUIRE NO REGULATION OF THE PRIMARY AIR ABNORMAL OPERATION ANY OF THE FOL...

Page 9: ...ventilation for example increasing the level of mechanical ventilation where present Do not place anything e g flame tamer between pan and pan support Do not remove the pan support and enclose the bur...

Page 10: ...ided intervenes in case of accidental flame failure blocking the gas delivery e g air draughts spillage of liquids etc In any case the ignition device must not be actuated for longer than 15 seconds S...

Page 11: ...in the oven DELICATE COOKING THERMOSTAT SELECTOR SWITCH FROM 60 TO MAX Ideal for pastries and cakes with wet covering and little sugar and damp desserts in moulds Excellent results can also be achiev...

Page 12: ...d AUTO will flash After the roast is finished the roast operation process will be shut automatically Then AUTO flashing the alarm Rings The ring will stop by pressing the button B Set the time of endi...

Page 13: ...3 12 TIMER...

Page 14: ...e thermostat estinguishes Grill cooking Delete pre heat the oven for about 5 minutes During grill operation the heat comes from above it is based on the infrared radiation and is fit for low thickness...

Page 15: ...to dimensions 150 170 2 3 Fish 20 25 25 30 20 25 190 210 190 210 190 220 2 2 2 Time in minutes Level from below First courses Lasagne Oven baked pasta Creole rice Temperature Fan forced cooking First...

Page 16: ...th any other problems which may arise during use To keep the characteristics of brightness of the enamelled parts for a long time it is necessary to clean the oven after each cooking Once the oven is...

Page 17: ...PADS ITS PURPOSE IS BOTH PROVIDING BETTER STABILITY AND AVOIDING SCRATCHES ON THE PLANE SURFACES DURING USAGE Cleaning the oven door Unhooking the doors For a more thorough clean you have to remove th...

Page 18: ...venini com au...

Reviews: