Page 5
L111 1015A
Installation Details Continued
Warning: Make sure power is off and locked at the service disconnecting
means on the service panel during installation.
9) FOR HOODS WITH NON-REMOVABLE BLOWER MOUNTING
ASSEMBLIES ONLY. IF HOOD HAS A REMOVABLE BLOWER
MOUNTING ASSEMBLY, PROCEED DIRECTLY TO STEP 10.
Remove the three screws retaining each blower motor. Unplug
and remove the motors, taking care not to damage the blower
wheels. It is not necessary to remove the blower wheels from
the motors.
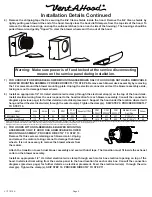
Attach the transition to each dual blower assembly and seal with duct tape. The transition must fit inside the exhaust
collar on the blower assembly.
Install an appropriate 1/2” UL listed electrical wire clamp through each motor box electrical opening on top of the
hood. Install electrical wiring from the service panel to the hood location for each motor box. Consult the connection
diagrams (previous page) for further details on electrical placement. Feed the electrical wire(s) through the wire
clamp(s). Tighten the clamp(s). SKIP STEP 10. PROCEED DIRECTLY TO STEP 11.
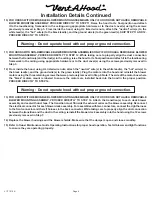
7) FOR HOODS WITH REMOVABLE BLOWER MOUNTING ASSEMBLIES ONLY. IF HOOD DOES NOT HAVE A REMOVABLE
BLOWER MOUNTING ASSEMBLY, PROCEED DIRECTLY TO STEP 9. Remove each blower deck assembly by removing
the 12 screws around the blower mounting plate. Unplug the electrical connector and set the blower assembly aside,
taking care not to damage blower wheels.
8) Install an appropriate 1/2” UL listed electrical wire clamp through the electrical strap(s) on the top of the hood deck.
Install electrical wiring from the service panel to the hood location for each blower assembly. Consult the connection
diagrams (previous page) for further details on electrical placement. Support the hood under the location where it will
hang and feed the electrical wire(s) through the wire clamp(s). Tighten the clamp(s). SKIP STEP 9. PROCEED DIRECTLY
TO STEP 10.
Model
Volts
Amps
Hz
RPM
CFM
SP@0.0" Equivalent CFM
•
CFM
SP@0.1"
CFM
SP@0.2"
CFM
SP@0.3"
Minimum Round
Duct Size
Sones
#
T200 Island Dual
115
4.0
60
1550
550
900
507
471
431
8" (50 in.
2
)
6.0
Two T200 Island Duals
115
7.5
60
1550
1100
1800
1014
942
862
Two 8" (50 in.
2
)
6.0
• Because the Magic Lung
®
blower uses centrifugal filtration rather than conventional baffle or mesh filters, the Magic Lung
®
blower can handle cooking equipment with higher cubic feet per minute (CFM) requirements and can deliver equivalent CFM much more
efficiently than other than other filtration systems. When comparing the Magic Lung
®
with other blower units made by other manufacturers, use the “Equivalent CFM”.
#
Ratings in accordance with the Standard Test Code by the Energy Systems Laboratory of the Texas Engineering Experiment Station.
6) Remove the shipping tape that is securing the E-Z Clean shields inside the hood. Remove the E-Z Clean shields by
lightly pulling each toward the end of the hood. Gently close the back draft dampers from the top side of the hood. To
remove the blower housings, unsnap the suitcase latches (one on each side of the housing). The housings should be
pulled forward and gently “tipped” to clear the blower wheels and then out of the hood.


