8
iii.
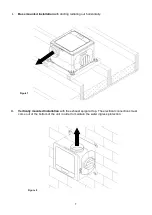
Ceiling mounted
Installation
with ducting radiating out horizontally.
WIRING
WARNING:
THE UNIT AND ANCILLARY CONTROL EQUIPMENT MUST BE ISOLATED
FROM THE POWER SUPPLY DURING THE INSTALLATION / OR
MAINTENANCE. THIS UNIT MUST BE EARTHED.
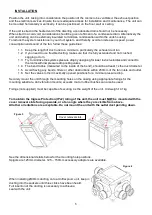
1. To remove the cover, use a coin or similar; depress the retaining tabs via the slots in the side of the
unit.
2. With the power off, connect a suitable mains power cable from a switched, fused spur to the screw
terminal block. Use the cable clamps and clip provided to secure the lead.
3. Two mains voltage Live Switched (LS1 and LS2) connections are provided, and can be used to
trigger a change in speed. Common inputs would be from a bathroom lighting circuit. When
commissioning the unit, a delay on timer and an overrun timer can be selected and adjusted in the
software using the buttons and screen. See Unit Adjustment section on page 12 of this document
for details.
4. The switched live output (230Vac) from any other switch or controller, (such as a simple latching pull
cord or push button switch, humidistat or PIR detector) can be connected to the LS terminal instead
of connecting to a lighting circuit.
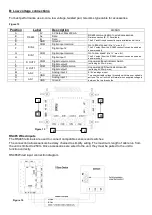
5. Important: Use low voltage twisted pair, data cable for accessories that are connected via the IO
(Input Output) PCB. See the Low Voltage Connections diagram, use the cable clamp and grommet
provided.
6. There are no, delay-on or overrun timers when connecting via the Low Voltage connections (B), as
the controller should determine when the fan is running at Boost or Normal speeds. Use the LS
connection described above if a timer is needed.
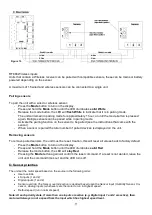
Figure 9
Summary of Contents for 1003000074
Page 6: ...6 Figure 5 Figure 6...
Page 26: ...26 Figure 7...
Page 36: ...36 Batterie Commutateur vitesse 4 voies 230 V...


