background image

Installation Instructions


Specifications are subject to change without notice. 

Page 11

sales@simx.co.nz | www.manrose.co.nz 

Distributed by Simx Limited


MultiVent Continuous Extract Ventilation

Using instructions from the section “UNIT ADJUSTMENT” make the following changes:

LS1 change from Low to BOOST
D2 change from Purge to BOOST 

With this completed the MultiVent once switched ON will operate in NORMAL speed (35%) when the bathroom FAN switch is turned on the 
MultiVent will operate at BOOST (70%) speed clearing away steam and humidity if the kitchen FAN switch is turned on the MultiVent will operate 
at BOOST (70%) if both bathroom and kitchen FAN switches are turned on together the MultiVent will operate at PURGE (100%) speed helping 
to clear away steam and cooking odours. The toilet FAN switch will also turn the MultiVent on to BOOST (70%). Please note that only having the 
2 larger rooms (bathroom and kitchen) switched on will activate PURGE (100%) speed.

FAULT CODES

FOR COMPLIANCE WITH G4/AS1 CLAUSE 1.5

If the MultiVent unit detects a fault it will display an error message on the HMI display.

These applications are to be installed and maintained to the requirements of AS/NZS 3666.1 and AS/NZS 3666.2.

Fault Code

Description

F01

Control fault – Unit failed startup check

F02

Motor Fault – No RPM

F03

Humidity/Temp sensor Fault – No value

F04

Temp or Humidity sensor connected via RF/RS485 is offline/Lost

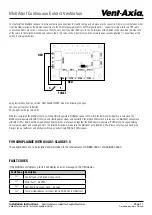
For the toilet the MultiVent will use its Extra Low Voltage connections for control. Using a short piece of wire connect a 0.5mm (or similar sized wire) 
from the GND terminal at the RS485 connection to the COM terminal adjacent to DIN 2 (digital input 2) + connector. Using a twin red TPS cable 
connect one RED core to the + connector at DIN 2 and connect the other RED core to the 5V terminal at the RS485 connection. Run the other end 
of the cable to the toilet FAN switch and connect the 2 red cores to the C (common) and the normally open (usually labelled 1) connections at this 
switch. See diagram below.

C

TOILET

1

RED

RED

Summary of Contents for MultiVent FAN7453

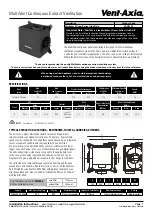
Page 1: ... FAN7453 is a the MultiVent 3 Room Extract Unit ONLY Details in this Installation Instruction Manual give recommendations to how the centralised extract unit can be combined with other components to make it a complete system See the comprehensive Manrose range of Duct and Grille items to complete the installation A B C D E ØF 330 390 111 250 96 125 Supply Max Operating Temp IP Rating Motor Housing...

Page 2: ...y do not play with the MultiVent continuous extract ventilation system In case of damage to the supply cord switch off the device and do not tamper with it Damaged supply cords must only be repaired or replaced exclusively by the manufacturer or by an appointed representative Failure to comply with the above may endanger the safety of people and cause possible damage to the whole system The unit m...

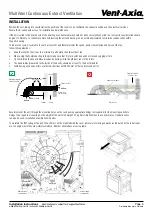
Page 3: ...n the kit make sure that it is fully extended and not crushed sagging or torn Try to minimize the use of diffusers valves by having similar length duct runs to the inlets The bend radius measured to the inside of the bend should be at least 1x the duct diameter Avoid having any bends filters or other obstructions within 250mm of the fan inlets and outlet Securely mount the unit through the mountin...

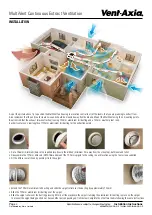
Page 4: ...lengths of 125mm aluminium foil ducting for the extraction points Extend the 125mm aluminium foil ducting and slide the spigot collar over the ducting by approximately 150mm Slide the 125mm aluminium foil ducting over the spigot Slide the spigot collar over the ducting pressing it firmly all the way down the spigot clamping the aluminium foil ducting in place on the spigot To prevent the spigot be...

Page 5: ... the 150mm aluminium foil ducting DCT0214 to the 150mm waterproof cowl with mesh DCT3619 and tape it to the spigot From outside of the building cut a 150mm minimum hole in the outside cladding of the home and push the 150mm ducting through the hole Fit the waterproof cowl to the building exterior and then from the roof space pull the ducting taut and tape it off at the 150mm to 125mm reducer Exten...

Page 6: ...nit a delay on timer and an overrun timer can be selected and adjusted in the software using the buttons and screen See Commissioning section on page 10 of this document for details 4 The switched live output 230V AC from any other switch or controller such as a simple latching pullcord or push button switch humidistat or PIR detector can be connected to the LS terminal instead of connecting to a ...

Page 7: ...tion Action A 5V 5V Output Max 250mA RS485 communication to wired accessories Data connection B C if available The 5V and Ground connections are available on all units B A Data C B Data D GND Ground E COM Digital input common Go to Boost speed Min 1V max 6V The 5V output from the RS485 connection can be used as a power supply F Digital input 2 G COM Digital input common Go to Low speed Min 1V max ...

Page 8: ...old The unit will boost when the RH is above the threshold set point Analogue inputs Both analogue inputs have adjustable low and high trigger voltages within the 0 10V range The response to being above or below either of the threshold voltages is user settable Note The display doesn t show a decimal point for example at threshold voltage of 5 2V is displayed as 52 on the unit Digital Inputs The u...

Page 9: ...Switch 1 2 Low boost or purge speed Purge c n Comfort Mode Comfort mode Yes or No No d n Delay On Delay on Yes or No No d10 Delay On Time Delay to boost duration 1 to 60 minutes 10m o n Overrun Overrun Yes or No No o10 Overrun Time Overrun duration 1 to 60 minutes 10m r y Humidity Rapid Rise Rapid Rise Rapid rise Yes or No Yes A n Humidity Ambient Response Ambient response Yes or No No h70 Humidit...

Page 10: ...all power is OFF and ensure that it is electrically safe before starting Wire the 230VAC connections as per the diagram below Wire mains connections from a suitable source lighting circuit or add a new dedicated circuit from an RCD protected 10A MCB with the cable to L live BROWN N neutral BLUE and E protective earth GREEN YELLOW Wire a 230V connection from a switch located in the Bathroom that co...

Page 11: ...n switched on will activate PURGE 100 speed FAULT CODES FOR COMPLIANCE WITH G4 AS1 CLAUSE 1 5 If the MultiVent unit detects a fault it will display an error message on the HMI display These applications are to be installed and maintained to the requirements of AS NZS 3666 1 and AS NZS 3666 2 Fault Code Description F01 Control fault Unit failed startup check F02 Motor Fault No RPM F03 Humidity Temp...

Page 12: ...bly Only the full scroll assembly is replaceable 2 To remove the scroll assembly isolate the power then use a coin or similar to depress the cover retention clips and remove the cover 3 Disconnect and remove the power supply and signal leads 4 Remove the scroll assembly by unscrewing the two screws and unclipping the clips in the opposite two corners and lift the scroll assembly out of the housing...

Reviews: