background image


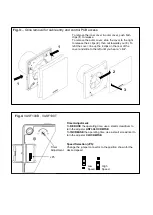
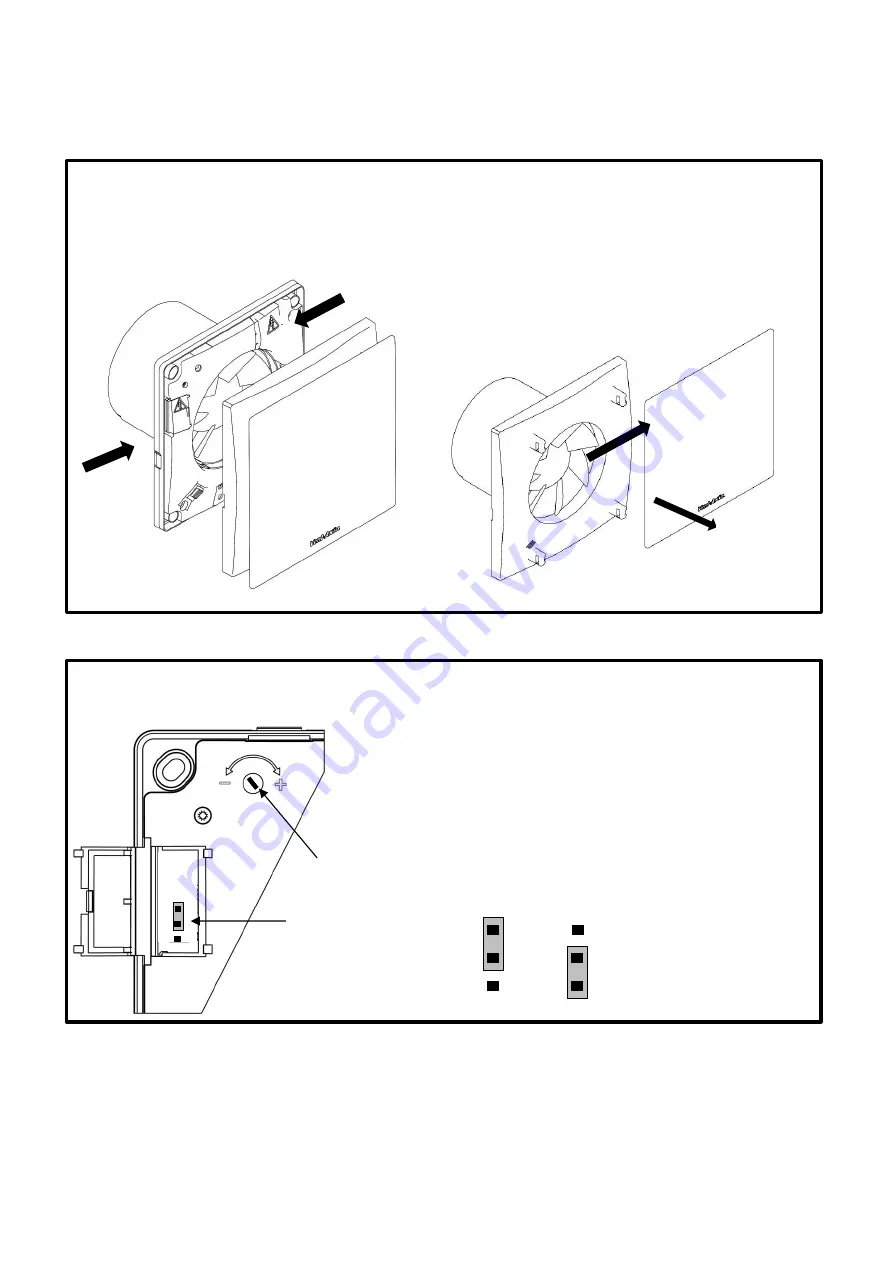
Fig.3

– Grille removal for cable entry and control PCB access. 


To remove the inner cover & outer cover, push both 
clips (

1

) to release. 

To remove the outer cover, slide the cover to the right 
to release the 4 clips (

2

), then out towards you (

3

). To 

refit the cover, line up the 4 clips on the rear of the 
cover and slide to the left until you hear a “click”. 


Fig.4

: VASF100B , VASF100T


Timer 
Adjustment 
 

JP5 
 

Timer Adjustment: 

To 

REDUCE

 the operating time, use a small screwdriver to 

turn the adjuster 

ANTI-CLOCKWISE.  

To 

INCREASE

 the operating time, use a small screwdriver to 

turn the adjuster 

CLOCKWISE. 


Speed Selection (JP5): 

Change the jumper connector to the position shown for the 
desired speed 


High 
Speed 


Low 
Speed 


Summary of Contents for VASF100B

Page 1: ...Wiring Instructions PLEASE READ INSTRUCTIONS IN CONJUNCTION WITH ILLUSTRATIONS PLEASE SAVE THESE INSTRUCTIONS Silent Fan IPX5 220 240V 50Hz Stock Ref N 446658B VASF100B 446659B VASF100T 477436B VASF10...

Page 2: ...Vent Axia products E The Fan should only be used in conjunction with fixed wiring F When the Fan is used to remove air from a room containing a fuel burning appliance ensure that the air replacement...

Page 3: ...lation ensure impeller rotates freely and the shutters can open 6 Replace the grille and ensure the clips reactivate WALL MOUNTING 1 For wall mounting either cut a 115mm diameter hole for 100mm fans t...

Page 4: ...TALLATION OR MAINTENANCE Fixed Speed Range Fig1 2 3 4 5 VASF100B Basic Remote or light switch operation 2 Speed options selectable at install VASF100T Timer Overrun timer adjustable 5 30min 2 Speed op...

Page 5: ...the fan should be inspected and cleaned to ensure there is no build up of dirt or other deposits 2 Wipe the inlets and front face with a damp cloth until clean The fan has sealed for life bearings wh...

Page 6: ...line up the 4 clips on the rear of the cover and slide to the left until you hear a click Fig 4 VASF100B VASF100T Timer Adjustment JP5 Timer Adjustment To REDUCE the operating time use a small screwd...

Page 7: ...inbuilt humidity sensor automatically adjusts dependant on ambient conditions and does not need adjusting Speed Selection Adjust the fan speed by turning the pot clockwise to increase and anti clockwi...

Page 8: ...y material or workmanship In the event of any part being found to be defective the product will be repaired or at the Company s option replaced without charge provided that the product Has been instal...

Reviews: