background image


HE350 - Installation and Operation Manual


67


Important Notes: 

The air tubes are identified for placement as follows: 

Model 

Type of tube 

HE350 fireplace 

Front 

 95 holes of 0.141" 

Middle front 

 67 holes of 0.125’’ 

Middle rear 

 67 holes of 0.109’’ 

Rear 

 67 holes of 0.101’’ 


Summary of Contents for HE350

Page 1: ...ustin de Desmaures Quebec Canada G3A 2H3 After sale service 418 908 8002 E mail tech sbi international com READ AND KEEP THIS MANUAL FOR REFERENCE This manual is available for free download on the manufacturer s web site It is a copyrighted document Re sale is strictly prohibited The manufacturer may update this manual from time to time and cannot be responsible for problems injuries or damages ar...

Page 2: ...ons and installation inspection requirements in your area Please read this entire manual before you install and use your new fireplace You may need to get a building permit for the installation of this fireplace and the chimney that it is connected to Consult your municipal building department or fire department before installation We recommend that you also inform your home insurance company to f...

Page 3: ...3 3 Fuel 13 3 1 How to Prepare or Buy Good Firewood 13 3 1 1 What is Good Firewood 13 3 1 2 Tree Species 14 3 1 3 Log Length 14 3 1 4 Piece Size 14 3 1 5 How to Dry Firewood 15 3 1 6 Judging Firewood Moisture Content 16 3 2 Manufactured Logs 16 4 Operating Your Fireplace 17 4 1 Your First Fires 17 4 2 Lighting Fires 17 4 2 1 BEST PRACTICE The Top Down Fire 17 4 2 2 Conventional Fire Starting 17 4 ...

Page 4: ...Fireplace Installation 33 6 3 Fireplace Installation 33 6 3 1 Standoff installation 33 6 3 2 Transportation Packaging 34 6 3 3 Locating the HE350 34 6 3 4 Clearances to combustible materials 34 6 3 5 Raised base installation of more than 12 R value for the hearth extension not required 35 6 3 6 On the floor or on a raised base of less than 12 installation 2 00 R value for the hearth extension requ...

Page 5: ...CE OR REPLACEMENT 58 APPENDIX 4 INSTALLING THE FRESH AIR INTAKE KIT 60 APPENDIX 5 REFRACTORY SLABS REPLACEMENT 64 APPENDIX 6 INSTALLATION OF SECONDARY AIR TUBES AND BAFFLE 65 APPENDIX 7 AIR CONTROL SNAP DISC REPLACEMENT 68 APPENDIX 8 ELECTRICAL WIRING 69 APPENDIX 9 EXPLODED DIAGRAM AND PARTS LIST 71 VENTIS LIMITED LIFETIME WARRANTY 75 REGISTER YOUR WARRANTY ONLINE To receive full warranty coverage...

Page 6: ...EEP CHILDREN CLOTHING AND FURNITURE AWAY CONTACT MAY CAUSE SKIN BURNS GLOVES MAY BE NEEDED FOR FIREPLACE OPERATION DO NOT STORE FUEL WITHIN HEATER MINIMUM INSTALLATION CLEARANCES BURN ONLY SEASONED NATURAL FIREWOOD DO NOT BURN SCRAP OR GARBAGE TREATED WOOD OR WOOD SUCH AS DRIFTWOOD FROM THE OCEAN WHICH HAS BEEN EXPOSED TO SALT OR OTHER CHEMICALS SALT OR CHEMICALS CAN CORRODE THE FIREBOX AND CHIMNE...

Page 7: ...ALSO INSTALL A CO DETECTOR ALARM TO PROVIDE WARNING IF SMOKE SPILLAGE FROM THE FIREPLACE OCCURS KEEP COMBUSTIBLE MATERIALS AT LEAST 48 INCHES AWAY FROM THE FRONT OF THE FIREPLACE OPENING DO NOT USE A FIREPLACE INSERT AND OTHER PRODUCTS NOT SPECIFIED FOR USE WITH THIS FIREPLACE DO NOT INSTALL IN A MOBILE HOME CANADA OR MANUFACTURED HOME USA WARNING DO NOT USE MATERIALS OTHER THAN THOSE LISTED IN TH...

Page 8: ...ate fuel type and other variables The recommended heated area for a given appliance is defined by the manufacturer as its capacity to maintain a minimum acceptable temperature in the designated area in case of a power failure 1 Values are as measured per test method except for the recommended heating area firebox volume maximum burn time and maximum heat output 2 The maximum heat output dry cordwo...

Page 9: ...an standard safety ULC S610 East west through the door you see the longitudinal sides of the logs north south through the door you see the tips of the logs Mobile home Canada or manufactured home USA The US department of Housing and Urban Development describes manufactured homes better known as mobile homes as followed buildings built on fixed wheels and those transported on temporary wheels axles...

Page 10: ...10 HE350 Installation and Operation Manual 2 3 Measurements ...

Page 11: ...HE350 Installation and Operation Manual 11 ...

Page 12: ...ng system to provide backup heating Your success with zone heating will depend on several factors including the correct sizing and location of the fireplace the size layout and age of your home and your climate zone Three season vacation homes can usually be heated with smaller fireplaces than houses that are heated all winter 2 5 The Benefits of Low Emissions and High Efficiency The low smoke emi...

Page 13: ...e recycled The door and glass gaskets are fibreglass which is spun from melted sand Black gaskets have been dipped into a solvent free solution Disposal at a landfill is recommended The door glass is a 5 mm thick ceramic material that contains no toxic chemicals It is made of natural raw materials such as sand and quartz that are combined in such a way to form a high temperature glass Ceramic glas...

Page 14: ...at and longer burn cycles are desirable Note that hardwood trees like oak maple ash and beech are slower growing and longer lived than softer woods like poplar and birch That makes hardwood trees more valuable The advice that only hardwoods are good to burn is outdated Old leaky cast iron stoves wouldn t hold a fire overnight unless they were fed large pieces of hardwood That is no longer true You...

Page 15: ...akes a long time to dry Small pieces dry more quickly than large pieces Split pieces dry more quickly than unsplit rounds Softwoods take less time to dry than hardwoods Softwoods like pine spruce and poplar aspen can be dry enough to burn after being stacked in the open for only the summer months Hardwoods like oak maple and ash can take one or even two years to dry fully especially if the pieces ...

Page 16: ...d Logs Manufactured logs made of 100 wood residues can be burn in your fireplace However they must be used carefully Therefore you cannot place a large quantity of such logs into your fireplace Manufactured logs typically release a much larger heat output over a short period of time Start with one log and see how the fireplace reacts You can increase the number of logs burned at a time to a maximu...

Page 17: ... method first it does not collapse and smother itself as it burns and second it s cleaner The top down method only works properly if the wood is well seasoned Start by crisscrossing around 10 finely split and dry kindling 0 5 to 1 in leaving air space between the pieces Then put at least 5 news paper sheets to the top of the pieces The best way to have your ignition clean and environmentally frien...

Page 18: ... there will be variations in temperature throughout the day and night This is normal and for experienced wood burners these are advantages of zone heating with wood Do not expect steady heat output from your fireplace It is normal for its surface temperature to rise after a new load of wood is ignited and for its temperature to gradually decline as the fire progresses This rising and falling of te...

Page 19: ...N A WOODEN DECK 4 3 3 Raking Charcoal Rekindle the fire when you notice that the room temperature has fallen You will find most of the remaining charcoal at the back of the firebox furthest from the door Rake these coals towards the door before loading There are two reasons for this raking of the coals First it concentrates them near where most of the combustion air enters the firebox and where th...

Page 20: ...OL SYSTEM IS ACTIVATED ONLY WHEN THE AIR INTAKE IS COMPLETLY CLOSED POSITION B AND WHEN THE FIREPLACE IS HOT ENOUGH When you close the air intake you gradually reduce the combustion Visually you will be able to notice a considerable reduction of combustion Under these conditions you will be at the medium combustion rate Using the secondary air intake lever you can adjust your combustion system to ...

Page 21: ...HE350 Installation and Operation Manual 21 In the B position it is also possible to close the air supply manually if a power failure occurs by pushing the small lever to the left ...

Page 22: ...ctly in the firebox so the pieces are packed tightly together You will need to fire the load hot for long enough to fully char the log surfaces before you can turn the air down Make sure the fire is flaming brightly before leaving the fire to burn 4 3 5 4 High Output Fires for Cold Weather When the heat demand is high during cold weather you ll need a fire that burns steadily and brightly This is ...

Page 23: ...utput long lasting fires for cold weather 5 MAINTAINING YOUR WOOD HEATING SYSTEM 5 1 Fireplace Maintenance Your new fireplace will give many years of reliable service if you use and maintain it correctly Some of the internal components of the firebox such as refractory slabs baffles and air tubes will wear over time under intense heat You should always replace defective parts with original parts F...

Page 24: ...r goal should be clear glass with no brown stains If you continue to see brown stains on the glass something about your fuel and operating procedure needs to be changed Stains on the glass indicate incomplete combustion of the wood which also means more smoke emissions and faster formation of creosote in the chimney If you see brown streaks coming from the edge of the glass it is time to replace t...

Page 25: ...he split pin A with a small hammer 5 1 4 Door Alignment To align open the fireplace s door and loosen the pressures screws located on the lower and upper hinges of the door using a 3 32 Allen key to free the adjustable hinge rods Using a flat screwdriver turn the adjustable hinge rods in the direction shown to adjust the doors Tighten all door hinge pressure screws when they are at the desired pos...

Page 26: ... allow air to leak past it You can test the condition of the door gaskets by closing and latching the doors on a strip of paper Test all around the door If the paper slips out easily anywhere it is time to replace the gasket Use the correct replacement gasket A for the doors and H for the doors junction Both can be purchased from your retailer The diameter and density of the gasket is important to...

Page 27: ...eplacing the Door Glass The glass used in the HE350 is 5 mm thick of dimension 17 78 x 15 76 45 16cm x 40 03cm and tested to reach temperatures up to 1400º F If the glass breaks it must be replaced with one having the same specification Contact your Ventis dealer to obtain a genuine replacement part see replacement parts in appendix to get the proper part number WARNING TEMPERED GLASS OR ORDINARY ...

Page 28: ...the gasket taking care that it is perfectly centred on the gasket Peel off more of the backing and rotate the glass and press the next section onto the gasket Do not stretch the gasket as you place it Continue until you get to the start and trim the gasket to length Now pinch the gasket to the glass in a U shape all around the glass Reinstall the glass being careful to centre the glass carefully i...

Page 29: ...of the chimney Severe chimney fires can damage even the best chimneys Smouldering smoky fires can quickly cause a thick layer of creosote to form When you avoid smouldering so the exhaust from the chimney is mostly clear creosote builds up more slowly Your new fireplace has the right characteristics to help you to burn clean fires with little or no smoke resulting in less creosote in the chimney 5...

Page 30: ... up and down inside the chimney flue to scrub off the creosote The chimney should be checked regularly for creosote build up Inspection and cleaning of the chimney can be facilitated by removing the baffle NOTE DO NOT EXPECT CHEMICAL CLEANERS TO KEEP YOUR CHIMNEY CLEAN THE RAIN CAP CAN BE REMOVED FOR INSPECTION AND OR CLEANING OF THE CHIMNEY The chimney should be swept following these steps 1 Remo...

Page 31: ...of Secondary Air Tubes and Baffle for details 5 2 5 Chimney Fire Regular chimney maintenance and inspection can prevent chimney fires If you have a chimney fire follow these steps 1 Close the fireplace door and the air intake controls 2 Alert your family of the possible danger 3 If you require assistance alert your fire department 4 If possible use a dry chemical fire extinguisher baking soda or s...

Page 32: ...TY INFORMATION 6 1 Summary of Installation Cautions and Warnings THE INFORMATION GIVEN ON THE CERTIFICATION LABEL AFFIXED TO THE APPLIANCE ALWAYS OVERRIDES THE INFORMATION PUBLISHED IN ANY OTHER MEDIA OWNER S MANUAL CATALOGUES FLYERS MAGAZINES AND OR WEB SITES MIXING OF APPLIANCE COMPONENTS FROM DIFFERENT SOURCES OR MODIFYING COMPONENTS MAY RESULT IN HAZARDOUS CONDTIONS ANY MODIFICATION OF THE APP...

Page 33: ...ys Fireplaces Vents and Solid Fuel Burning Appliances and the ANSI NFPA 70 National Electrical Code are to be followed in the absence of local code requirements NOTE THE FIREPLACE IS NOT APPROVED FOR USE WITH A SO CALLED POSITIVE FLUE CONNECTION TO THE CLAY TILE OF A MASONRY CHIMNEY 6 3 Fireplace Installation 6 3 1 Standoff installation BEFORE INSTALLING YOUR FIREPLACE YOU MUST INSTALL THE TWO STA...

Page 34: ...e easier to relocate the fireplace than to rework the building structure Also choose a location that allows installing the least amount of offsets in the chimney Usually no additional floor support is needed for the fireplace The adequacy of the floor can be checked by first estimating the weight of the fireplace system Weights are given in section 2 2 General Features Next measure the area occupi...

Page 35: ...or non combustible base If the fireplace is elevated more than 12 B an R value for the hearth extension is not required However the upper and lower angle for the full width of the floor protection must be protected 2 horizontally and 2 vertically E by a piece of sheet metal not included Apart from these two corners the sheet metal does not have to cover the rest of the wall between the base of the...

Page 36: ...36 HE350 Installation and Operation Manual CLEARANCE MINIMUM MEASUREMENTS A 84 2 13m minimum E 2 51 mm ...

Page 37: ... THE FLOOR PROTECTION A NON COMBUSTIBLE HEARTH EXTENSION FLOOR AREA WITH A 2 00 R FACTOR MUST EXTEND AT LEAST 32 813 MM IN FRONT OF THE FIREPLACE MINIMUM MEASUREMENT E 2 51 mm A noncombustible floor protection with R value insulation equal to or greater than 2 00 must be installed in front of the unit For more details see 6 3 7 Minimum Hearth Extension Requirements The use of an R value is conveni...

Page 38: ...ble In the case of a known K and thickness of alternative materials to be used in combination convert all K values to R by dividing the thickness of each material by its K value Add the R values of your proposed materials as shown in the previous example In the previous example Four inches of brick K 4 5 0 8 1 inch of Durock R 1 1 92 0 52 0 8 0 52 1 32 Table 1 Thermal Characteristics of Common Flo...

Page 39: ...han 12 A non combustible hearth extension floor area must extend at least 32 813 mm in front of the hearth with a 2 00 R factor For whether installation the hearth extension floor area must extend at least 8 203 mm on each side of the door opening C The joint between the hearth extension and the fireplace hearth needs to be made of a piece sheet metal not included CLEARANCES A 32 813 mm B 49 1245 ...

Page 40: ...lled flush with the fireplace facing Frame headers between the vertical studs only as follows Place the front facing headers in 2 3 or of a depth no more than the depth of the top standoffs Do not put wood or any material within the area above the fireplace Place headers only as required to support the facing and mantel LEGEND Combustible material allowed in this area Non combustible material only...

Page 41: ...l Finishing material Refer to the building code or the local code for regulations concerning the need to install finishing material inside the chase around the fireplace NOTE THIS FIREPLACE IS BUILT IN ORDER TO MAINTAIN A 1 2 GAP MINIMUM BETWEEN THE FIREPLACE AND THE FACEPLACE IT IS RECOMMANDED TO HAVE THE NON COMBUSTIBLE MATERIAL FLUSH WITH THE FIREPLACE ...

Page 42: ...material inside the chase around the fireplace MINIMUM MEASUREMENTS FOR FRESH AIR INTAKE J MINIMUM MEASUREMENTS FOR FORCED AIR KIT M J 12 305 mm M 18 457 mm The fresh air intake kit may be installed on the right side and at the bottom of the fireplace Forced air distribution kit may be installed on either sides of the fireplace 6 3 8 3 Framing for a corner installation CAUTION FLEXIBLE PIPE IN THE...

Page 43: ...n combustible and have the minimum dimensions shown on the following section Non combustible materials such as brick stone or ceramic tile may project in front of and onto the fireplace decorative frame CAUTION MATERIALS MUST BE INSTALLED SO THAT THE FACEPLATE MAY BE REMOVED AFTER THE INSTALLATION THE FACEPLATE IS DESIGNED TO OVERLAP THE MATERIAL SURROUNDING THE FIREPLACE IF THE MATERIAL IS THICKE...

Page 44: ... allowed in this area Non combustible material only in this area 6 3 10 Installation of a non combustible shelf It is possible to install a shelf but it must be made of non combustible materials It must be installed at at least 52 from the base of the fireplace WARNING THE SHELF WILL BE HOT DO NOT PUT COMBUSTIBLE MATERIAL ON THE SHELF ...

Page 45: ...east 1 m 3 ft above the highest point of contact with the roof and at least 60 cm 2 ft higher than any roof line or obstacle within a horizontal distance of 3 m 10 ft 7 4 The Relationship Between the Chimney and the House Because the venting system is the engine that drives the wood heating system it must have the right characteristics The signs of bad system design are cold backdrafting when ther...

Page 46: ...4 6 m from the bottom of the fireplace to the top of the outside chimney All chimney installations must include at least one support Reducing the amount of chimney weight on the fireplace will help avoid the noise created when the fireplace expands This can be achieved by having the chimney supported by the supports The maximum chimney length that should be supported by the fireplace is 12 ft 3 7 ...

Page 47: ...ere more than one chimney is located in the same non chase or within the same area we suggest that their terminations be separated by at least 16 410 mm horizontally and 18 460 mm vertically This separation is to prevent smoke migrating from one chimney to another ...

Page 48: ...allation and Operation Manual 18 457 21mm 18 457 2mm 16 406 4mm 16 406 4mm 18 457 2mm Note The chimney chase on the roof must be the same size as the flashing CHIMNEY 12 305 mm MIN ABOVE ROOF FLASHING CHIMNEY RIDGE ...

Page 49: ...Installation Instructions Always refer to the chimney manufacturer s Installation manual to ensure a safe installation Some non illustrated parts may be required 7 6 1 Figures of Typical Chimney Installation Direct installation Exterior offset installation ...

Page 50: ...ROOF MUST BE MAINTAINED THE FLOOR AND WALLS BELOW THE ATTIC MUST BE INSULATED USING THE SAME INSULATION A To insure a good draft it is recommended to have a length of 18 inches from the top of the unit to the first offset However starting using a 30 or 45 elbow is also approved B Mandatory measure of 15 ft from the bottom of the fireplace to the top of the outside chimney ...

Page 51: ... roof that the chimney will go through C to provide a 2 50 mm minimum clearance between the chimney and any combustible materials Do not fill this space with insulation or any other combustible material 5 Every time the chimney passes through a ceiling or a wall install the appropriate firestop B When you reach the desired height install the roof support not shown Refer to instructions included wi...

Page 52: ...chimney manufacturer s instructions In many cases it is recommended to use three 3 12 mm metal screws If the offset length is made of two 2 chimney lengths or more many chimney manufacturers may require that you use an offset or roof support halfway up the offset If penetrating a wall install a wall radiation shield supplied by the chimney manufacturer See section 7 6 Chimney Installation Instruct...

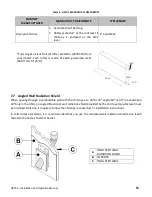
Page 53: ...el 10 44 W x 5 126 H 7 7 Angled Wall Radiation Shield When passing through a combustible wall with the chimney at a 30 or 45 angle 30 or 45 in Canada and 30 only in the USA an angled firestop or wall radiation shield provided by the chimney manufacturer must be installed Only one is required Follow the chimney manufacturer s installation instructions In cold climate locations it is recommended tha...

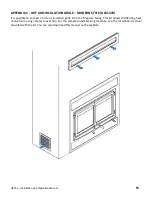
Page 54: ...ainst the risk of smoke return caused by house depressurization it will certainly minimize the risk NOTE IT IS STRONGLY RECOMMENDED TO INSTALL A MECHANICAL DAMPER TO CLOSE THE FRESH AIR INTAKE WHEN THE FIREPLACE IS NOT IN USE IT IS STRONGLY RECOMMENDED TO INSTALL A CARBON MONOXIDE CO DETECTOR ALARM IN THE ROOM WHERE THE FIREPLACE IS INSTALLED THE CO DETECTOR WILL WARN YOU IF FOR ANY REASON THE WOO...

Page 55: ...01378 It is possible to connect a hot air circulation grille kit in the fireplace facing This kit allows distributing heat to the room using natural convection For the complete installation procedure see the installation manual provided with the kit You can also download this manual on the website ...

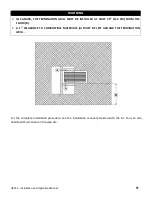
Page 56: ...ect a forced air distribution kit on either sides of the HE350 This kit allows distributing heat to another room up to 50 feet 15 m of the fireplace The insulated flexible pipe not included in the kit must be HVAC type pipe and must comply with ULC S110 and or UL 181 Class 0 or Class 1 Standards and must withstand temperatures up to 250 F ...

Page 57: ...ILL MUST BE INSTALLED AT LEAST 59 150 CM FROM THE FLOOR B A 1 CLEARANCE TO COMBUSTIBLE MATERIALS A MUST BE LEFT AROUND THE TERMINATION GRILL For the complete installation procedure see the installation manual provided with the kit You can also download this manual on the web site ...

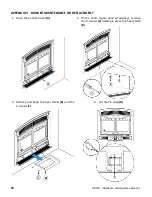
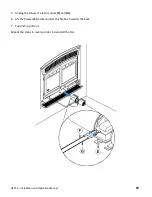
Page 58: ... APPENDIX 3 BLOWER MAINTENANCE OR REPLACEMENT 1 Open the bottom louver A 2 With a short square head screwdriver remove the 4 screws C holding in place the heat shield B 3 Remove and keep the heat shield B and the 4 screws C 4 Cut the Tie wrap D ...

Page 59: ...ation and Operation Manual 59 5 Unplug the blower s electric wires F and G 6 Lift the blower E located under the firebox towards the back 7 Turn 90 to pull out Repeat the steps in reverse order to reinstall the fan ...

Page 60: ...t more than 50 of the total height of the chimney o At more than 10 ft 3 m above the base of the fireplace o At more than 3 ft Below the base of the fireplace The fresh air must come from outside the house The air intake must not draw air from the attic from the basement or from a garage The outside wall termination should be installed where it is not likely to be blocked by snow or exposed to ext...

Page 61: ... on the fireplace 1 On the right side of the appliance most common 2 On the right side under the appliance 1 Remove the knock out located on the right hand side of your fireplace 2 Install the 5 adapter included in your fireplace Align the notch on the adaptor with the one on the fireplace and turn clockwise ...

Page 62: ... one of the adjustable pipe clamps C Secure the other end of the pipe to the outside wall termination E using the second adjustable pipe clamp C The outside wall termination E must be installed outside of the building For a pipe length less than 20 ft use a 5 pipe diameter For a pipe length of more than 20ft or having more than two deviations use a 6 pipe diameter The maximum pipe length is 30 ft ...

Page 63: ...the outside wall termination E in the hole open side down and fasten the register to the wall with screws Place the insulated pipe over the wall termination tube and over the fireplace outside air connector At each end carefully pull back the insulation and plastic cover exposing the flexible pipe Attach the flexible pipe using pipe clamps For a better seal you may also use aluminum tape Wrap the ...

Page 64: ... normally diminish the effectiveness of the refractory slabs If large cracks develop then the refractory slabs should be replaced To replace the refractory slabs follow these steps 1 Remove the inner ash retainer and the floor refractory slabs A B 2 Using a power screwdriver and hex tip 5 16 remove the slab holders D and the left and right refractory slabs C 3 Remove the rear refractory slab E To ...

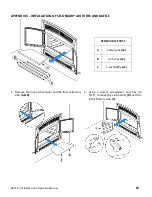
Page 65: ... OF SECONDARY AIR TUBES AND BAFFLE REMOVABLE PARTS A Cotter pins x4 B Air tubes x4 C C cast baffle x1 1 Remove the inner ash retainer and the floor refractory slab A B 2 Using a power screwdriver and hex tip 5 16 remove the slab holder D and the left refractory slab C ...

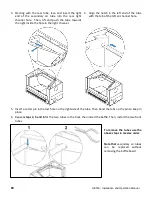
Page 66: ...lign the notch in the left end of the tube with the tab of the left air channel hole 5 Insert a cotter pin in the last hole on the right side of the tube Then bend the tabs on the pin to keep in place 6 Repeat steps 4 5 and 6 for the two tubes in the back then install the baffle Then install the two front tubes To remove the tubes use the above steps in reverse order Note that secondary air tubes ...

Page 67: ...ation Manual 67 Important Notes The air tubes are identified for placement as follows Model Type of tube HE350 fireplace Front 95 holes of 0 141 Middle front 67 holes of 0 125 Middle rear 67 holes of 0 109 Rear 67 holes of 0 101 ...

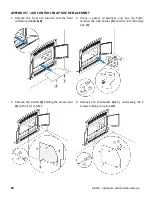
Page 68: ...he inner ash retainer and the floor refractory slab A B 2 Using a power screwdriver and hex tip 5 16 remove the slab holder D and the left refractory slab C 3 Remove the 4 bolts E holding the access door F with a 1 4 ratchet 4 Remove the thermodisc G by unscrewing the 2 screws holding it in place H ...

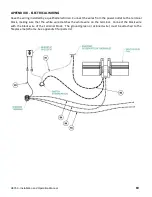
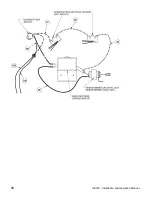
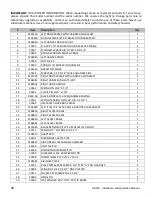
Page 69: ...ectrician Connect the wires from the power outlet to the terminal block making sure that the white wire matches the white wire on the terminal Connect the black wire with the black wire of the terminal block The ground green or skinned wire must be attached to the fireplace metal frame See appendix 9 for parts list ...

Page 70: ...70 HE350 Installation and Operation Manual ...

Page 71: ...HE350 Installation and Operation Manual 71 APPENDIX 9 EXPLODED DIAGRAM AND PARTS LIST ...

Page 72: ...ADREX ZINC 2 12 SE24141 RIGHT DOOR FRAME WITH HANDLE AND GASKET 1 13 SE68961 RIGHT HANDLE AND LATCH KIT 1 14 PL68961 RIGHT DOOR HANDLE 1 15 30062 SPRING PIN 3 32 X 1 2 1 16 30043 CLEVIS PIN 3 16 x 7 8 1 17 8435 08 BLACK OXIDE LATCH MECHANISM BEARING 1 18 30101 SPRING TENSION PIN 5 32 DIA X 1 1 2 L 1 19 23062 HE350 LEFT SIDE ROBAX GLASS 1 20 AC06400 3 4 FLAT X 6 BLACK SELF ADHESIVE GLASS GASKET 2 2...

Page 73: ...4 BLACK SCREW 10 X 5 8 ROBERTSON TYPE A 1 59 44080 RHEOSTAT WITH NUT 1 60 44091 ROCKER SWITCH 2 POSITION MSR 8 1 61 44087 RHEOSTAT NUT 1 62 44085 RHEOSTAT KNOB 1 63 SE45856 HE350 OWNER S MANUAL KIT 1 64 AC05959 METALLIC BLACK STOVE PAINT 342 g 12oz AEROSOL 1 65 30506 SCREW PAN TORX TYPE F 1 4 20 X 1 BLACK 3 66 PL68839 DÉCORATIVE ASH LIP 1 67 21463 REAR COMBUSTION CHAMBER INSULATION 1 68 21464 LEFT...

Page 74: ...1 91 60380 ELECTRIC WIRE DOUBLE BLACK SEW2 200 DEG C 18 AWG 4 ET 35 1 92 60381 ELECTRIC WIRE WHITE TEW 105 DEG C 18 AWG 6 1 93 60379 ELECTRIC WIRE DOUBLE BLACK SEW2 200 DEG C 18 AWG 16 ET 35 1 94 60374 ELECTRIC WIRE WHITE SEW2 200 DEG C 18 AWG 46 3 95 60375 ELECTRIC WIRE WHITE TEW 105 DEG C 18 AWG 12 5 1 96 60376 ELECTRIC WIRE WHITE TEW 105 DEG C 18 AWG 12 5 1 97 60377 ELECTRIC WIRE DOUBLE WHITE T...

Page 75: ...t its discretion may decide to repair or replace any part or unit after inspection and investigation of the defect The manufacturer may at its discretion fully discharge all obligations with respect to this warranty by refunding the wholesale price of any warranted but defective parts The manufacturer shall in no event be responsible for any uncommon indirect consequential damages of any nature wh...

Reviews: