background image

Operation - 16

GENERAL OPERATION

Daily Inspection

1. 


Always set the parking brake, shut off power 

unit engine, remove the ignition key, and ensure 

all moving parts have come to a complete stop 

before inspecting components, or attempting 

any repair or adjustment.

Park machine on a level surface, with the engine 

shut off and all fluids cold.

2.  Perform a visual inspection of both the power 

unit and the tiller. Look for loose or missing hard-

ware, damaged components, or signs of wear.

3.  Inspect the drive belts and tiller tines. Belts should 

be in good condition. Replace worn belts and bent 

or damaged tiller tines .

4.  Refer to the power unit operator’s manual. 

Check the power unit’s engine oil, hydraulic oil, 

cooling system, tire pressure, and fuel level. Add 

fluid or service as required.

5.  Test the power unit’s operator safety interlock 

system*.

Attaching

1.  Drive the power unit slowly forward into the hitch 

arms of the tiller. Align the lift arms of the power 

unit with the tiller hitch arms by raising or lower-

ing the front hitch and complete the engagement.

2.  Once completely engaged, close the front hitch 

locking lever.*

3. 

Engage the parking brake* and shut off the engine.

4.  Place the attachment belt onto the PTO drive 

pulley on the power unit. Ensure the belt is prop-

erly seated in each pulley.

5.  Engage the PTO belt tensioner.

6.  Raise the tiller slightly rotate the jack stand up 

to the operating position.

Detaching

1.  Park the power unit on a level surface and set 

the parking brake.*

2.  Rotate the jack stand down to the storage position.

3.  Lower the tiller to the ground.

4. 

Shut off power unit engine.

5.  Disengage the PTO belt tensioner.

6.  Remove the attachment belt from the PTO drive 

pulley of the power unit and hook onto the bolt 

provided for belt storage.

7.  Disengage the front hitch locking lever*.

8.  Restart the power unit and back slowly away 

from the tiller.

Operating Procedure

Before operation, perform daily inspection, shift the 

power unit into 

low range

, and verify the tiller skid 

shoes are set for the desired depth.

Mark out the work area to be tilled. For best results, 

start tilling on the right side of the work area and 

work to the left.

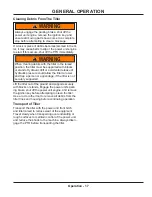
The tiller is designed to be used with the power unit 

traveling in reverse. Drive the power unit into the 

work area and position the tiller at the edge of the 

area to be tilled. With the power unit’s engine run-

ning between 2,000 and 2,500 RPM, engage the 

PTO switch. Adjust the throttle to the desired engine 

RPM. Slowly lower the tiller into the ground and 

begin to move the power unit in reverse. Continue 

lowering the tiller until the skid shoes contact the 

ground. Place the power unit’s primary SDLA lever 

in the float position by pushing it to the right until the 

detent engages. The lever will stay in this position 

until intentionally removed.

Continue moving in reverse at an appropriate speed 

for the soil conditions. If the tiller belts begin to slip, 

reduce ground speed or raise the depth of the tiller. 

When near the desired end of the row, slowly begin 

lifting the tiller out of the ground while the power unit 

is still moving. This will minimize the ditch created at 

the end of the row.

Disengage the PTO, move the power unit to the left 

of the tilled row, and drive back to the starting point 

to begin the next pass.

* Refer to power unit operator’s manual for operation of 

power unit controls.

Summary of Contents for KL480

Page 1: ...Operator s Manual Parts Drawings Tiller VENTRAC COM KL480 Revised 12 18 18 09 10021 Rev 04 Original Operator s Manual ...

Page 2: ..._________________________________________________________________ _____________________________________________________________________ Dealer Phone Number _______________________________________________________________ Dealer Fax Number _________________________________________________________________ Model A ____________________________ Serial B _____________________________ Affix Part Serial Nu...

Page 3: ...ort 11 Maintenance 12 Fuel Safety 12 Hydraulic Safety 13 OPERATIONAL CONTROLS PAGE 15 Jack Stand 15 Depth Gauge 15 GENERAL OPERATION PAGE 16 Daily Inspection 16 Attaching 16 Detaching 16 Operating Procedure 16 Clearing Debris From The Tiller 17 Transport of Tiller 17 SERVICE PAGE 18 Cleaning and General Maintenance 18 Belt Inspection 18 Attachment Drive Belt Replacement 18 Triple Drive Belt Replac...

Page 4: ...TABLE OF CONTENTS 4 SPECIFICATIONS PAGE 21 Dimensions 21 Features 21 PARTS PAGE 22 Main Frame Shields 22 Gearbox Belt Drive 24 Rotor Chain Drive 26 WARRANTY PAGE 28 ...

Page 5: ...the operator s manual will help you become familiar with each specific piece of equipment Under standing the operator s manual will help you as well as others avoid personal injury and or damage to the equipment Keep this manual with the machine at all times The manual should remain with the machine even if it is sold If this manual becomes damaged or unreadable it should be replaced immediately C...

Page 6: ...ughout this manual Right Hand and Left Hand is determined as if sitting on the power unit seat facing forward SIGNAL WORD DEFINITIONS Indicates a potentially hazardous situation which if not avoided could result in death or serious injury Indicates an imminently hazardous situation which if not avoided will result in death or serious injury This signal word is limited to the most extreme cases Ind...

Page 7: ...fety decals legible Remove all grease dirt and debris from safety decals and instructional labels If any decals are faded illegible or missing contact your dealer promptly for replacements When new components are installed be sure that current safety decals are affixed to the replacement components A B C D D E ...

Page 8: ... Description Part Number Quantity A Danger Shield Missing 00 0062 1 B Warning Moving Part Hazard 00 0101 1 C Danger Pinching Hazard 00 0102 1 D Danger Keep Hands Feet Clear 00 0123 2 E Warning Read Owner s Manual 00 0217 1 ...

Page 9: ...parts Be sure guards and shields are in proper working condition and are secured in place Make all necessary adjustments before operating machine Some pictures in this manual may show shields or covers opened or removed in order to clearly illustrate any instructions Under no circumstance should the machine be operated without these devices in place Alterations or modifications to this machine can...

Page 10: ... in a building without adequate ventilation Do not touch the engine or the muffler while the engine is running or immediately after stopping the engine These areas may be hot enough to cause a burn Do not change the engine governor settings or over speed the engine Operating engine at excessive speed may increase the hazard of personal injury To reduce the hazard of fire keep the battery compartme...

Page 11: ...und to improve stability While operating on slopes drive in an up and down direction when possible If turning is necessary while driving across slopes reduce speed and turn slowly in the downhill direction Assure a sufficient supply of fuel for continuous operation A minimum of one half tank of fuel is recommended Roadway Safety Operate with safety lights when operating on or near roadways Obey al...

Page 12: ...nents while the engine is running or imme diately after stopping the engine These areas may be hot enough to cause a burn Allow the engine to cool before storing and do not store near an open flame Do not change the engine governor settings or over speed the engine Operating engine at excessive speed may increase the hazard of personal injury Springs may contain stored energy Use caution when dise...

Page 13: ... tubes are in good condition Repair any leaks and replace any damaged or deteriorated hoses or tubes before starting the machine Hydraulic leaks can occur under high pressure Hydraulic leaks require special care and attention Use a piece of cardboard and a magnifying glass to locate sus pected hydraulic leaks Keep body and hands away from pinhole leaks or nozzles that eject high pressure hydraulic...

Page 14: ...d feet away Prior to tilling clear the work area of any rocks branches string or other debris that may clog the tiller If any debris becomes jammed in the tiller engage the power unit s parking brake shut off the engine and remove the ignition key before attempting to remove debris Tiller tines are sharp Wear leather gloves when working with tiller tines Shut off the PTO to stop the tiller tines w...

Page 15: ...ng depth To adjust the tilling depth 1 Park the power unit on a level surface and engage the parking brake 2 WARNING When making adjustments with the tiller in the raised position the tiller must be supported with blocks or stands Hydraulic drift or accidental release of hydraulic pressure could allow the tiller to lower and trap a person or appendage if the tiller is not securely supported Raise ...

Page 16: ... off power unit engine 5 Disengage the PTO belt tensioner 6 Remove the attachment belt from the PTO drive pulley of the power unit and hook onto the bolt provided for belt storage 7 Disengage the front hitch locking lever 8 Restart the power unit and back slowly away from the tiller Operating Procedure Before operation perform daily inspection shift the power unit into low range and verify the til...

Page 17: ...lease of hydraulic pressure could allow the tiller to lower and trap a person or appendage if the tiller is not securely supported Lift the tiller out of the ground and support securely with blocks or stands Engage the power unit s park ing brake shut off the power unit engine and remove the ignition key before attempting to clean the tiller Use a rod or other tool to remove all debris from the ti...

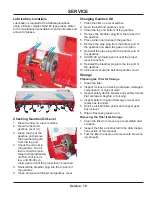
Page 18: ...install the new drive belts onto the gearbox and drive shaft pul leys Replace all 3 intermediate drive belts at the same time 7 Tighten the belt tension adjustment bolt Refer to triple belt tension adjustment below 8 Tighten the 3 gearbox plate bolts Torque to 31 ft lbs 42 Nm 9 Reinstall the drive pulley shield 10 Close and fasten the belt and gearbox cover Triple Drive Belt Tension Adjustment 1 R...

Page 19: ...reather plug from the top port of the gearbox 5 Place a drain pan beneath the gearbox 6 Remove the pipe plug from the bottom port of the gearbox and allow the gear oil to drain 7 Reinstall the pipe plug into the bottom port of the gearbox 8 Add 80 90 synthetic gear oil until the proper level is reached 9 Reinstall the breather plug into the top port of the gearbox 10 Close and secure the belt and ...

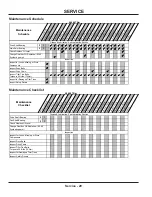
Page 20: ...on Inspect for Loose Missing or Worn Components Grease Lubrication See Lubrication Section Check Gearbox Oil Level Maintenance Checklist KL480 Tiller Maintenance Checklist o f L o c a t i o n s o f P u m p s A t 2 5 H o u r s A t 5 0 H o u r s A t 7 5 H o u r s A t 1 0 0 H o u r s A t 1 2 5 H o u r s A t 1 5 0 H o u r s A t 1 7 5 H o u r s A t 2 0 0 H o u r s A t 2 2 5 H o u r s A t 2 5 0 H o u r ...

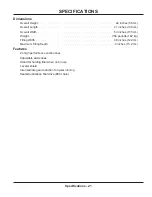
Page 21: ...th 53 inches 135 cm Weight 356 pounds 162 kg Tilling Width 48 inches 122 cm Maximum Tilling Depth 6 inches 15 2 cm Features 24 high performance carbon tines Adjustable skid shoes Stand for holding tiller when not in use Leveler shield Intermediate gear reduction for quiet running Sealed lubrication final drive 80 chain ...

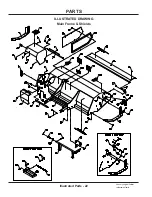
Page 22: ...Illustrated Parts 22 Use only original Ventrac replacement parts ILLUSTRATED DRAWING Main Frame Shields PARTS ...

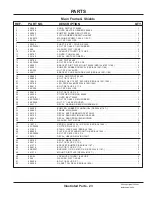
Page 23: ...12 BOLT 3 8 16 USS X 1 1 2 3 24 99 SF06 NUT SF 3 8 16 USS 8 25 90 0616 BOLT 3 8 16 USS X 2 1 26 64 0906 STIFFENER HOUSING KL480 1 27 60 0788 COVER BELT KL480 1 28 99 SF0405 1 BOLT SF 1 4 20 X 5 8 W RUBBER 2 29 99 E0046 NUT U 1 4 20 EXTRUDED 2 30 00 0217 DECAL WARNING READ OWNERS MAN 1 31 05 0095 BUMPER RUBBER CYLINDRICAL SERIAL 1187 2 32 62 0893 FRAME MAIN KL480 1 33 00 0123 DECAL KEEP HAND AND FE...

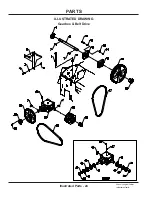
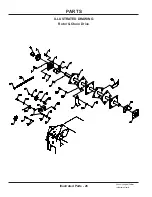
Page 24: ...PARTS Illustrated Parts 24 Use only original Ventrac replacement parts ILLUSTRATED DRAWING Gearbox Belt Drive ...

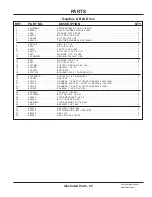
Page 25: ...15 83 3TB94 PULLEY 3 GROOVE X 9 4 DIA 1 16 83 Q120 BUSHING 1 1 4 Q1 1 17 81 BX035 BELT BX35 18 83 121016 BUSHING 1210 X 1 TAPERD LOCK 1 19 83 3TB36TB PULLEY 3B 3 6 TB BUSHING 1 20 81 B066 BELT B66 1 21 87 0189 GEARBOX 1 SHAFT 2 1 CW CCW SERIAL 1001 1168 1 21 87 0219 GEARBOX CW CCW 1 SHAFT 2 1 SERIAL 1169 1228 1 21 87 0189 GEARBOX 1 SHAFT 2 1 CW CCW SERIAL 1229 1 22 83 H16S BUSHING 1 SPLIT 1 4 KEY ...

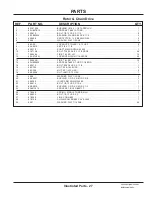
Page 26: ...PARTS Illustrated Parts 26 Use only original Ventrac replacement parts ILLUSTRATED DRAWING Rotor Chain Drive ...

Page 27: ...INE TILLER L H 12 12 99 A07NFN LOCKNUT NYLON 7 16 20 SAE 48 13 79 0049 R TINE TILLER R H 12 14 83 H800920 SPROCKET 80 9 T HRD 1 1 4 BOR 1 15 90 0514 BOLT 5 16 18 USS X 1 3 4 1 16 99 SF05 NUT SF 5 16 18 USS 2 17 99 SF08 NUT SF 1 2 13 USS 2 18 99 E0058 NUT JAM 1 2 13 USS 1 19 95 08 WASHER FLAT 1 2 SAE 5 20 85 B0027 BUSHING 1 2 ID X 5 8 OD X 5 8 2 21 40 0290 IDLER ARM CHAIN KL480 1 22 90 0814 BOLT 1 ...

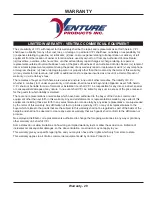
Page 28: ...d no claim of breach of warranty shall be cause for cancellation or rescission of the contract of sale of any Ventrac equipment Proof of purchase may be required by the dealer to substantiate any warranty claim Only warranty work performed and submitted by an Authorized Ventrac Dealer may be eligible for warranty credit This warranty extends only to Ventrac commercial equipment operated under norm...

Page 29: ...set forth herein V P I shall not be liable for cost of removal or installation nor shall V P I be responsible for any direct indirect special or consequential damages of any nature In no event shall V P I be liable for any sum in excess of the price received for the goods for which liability is claimed There are no representations or warranties which have been authorized to the buyer of the Ventra...

Reviews: