www.ventilation-system.com
22
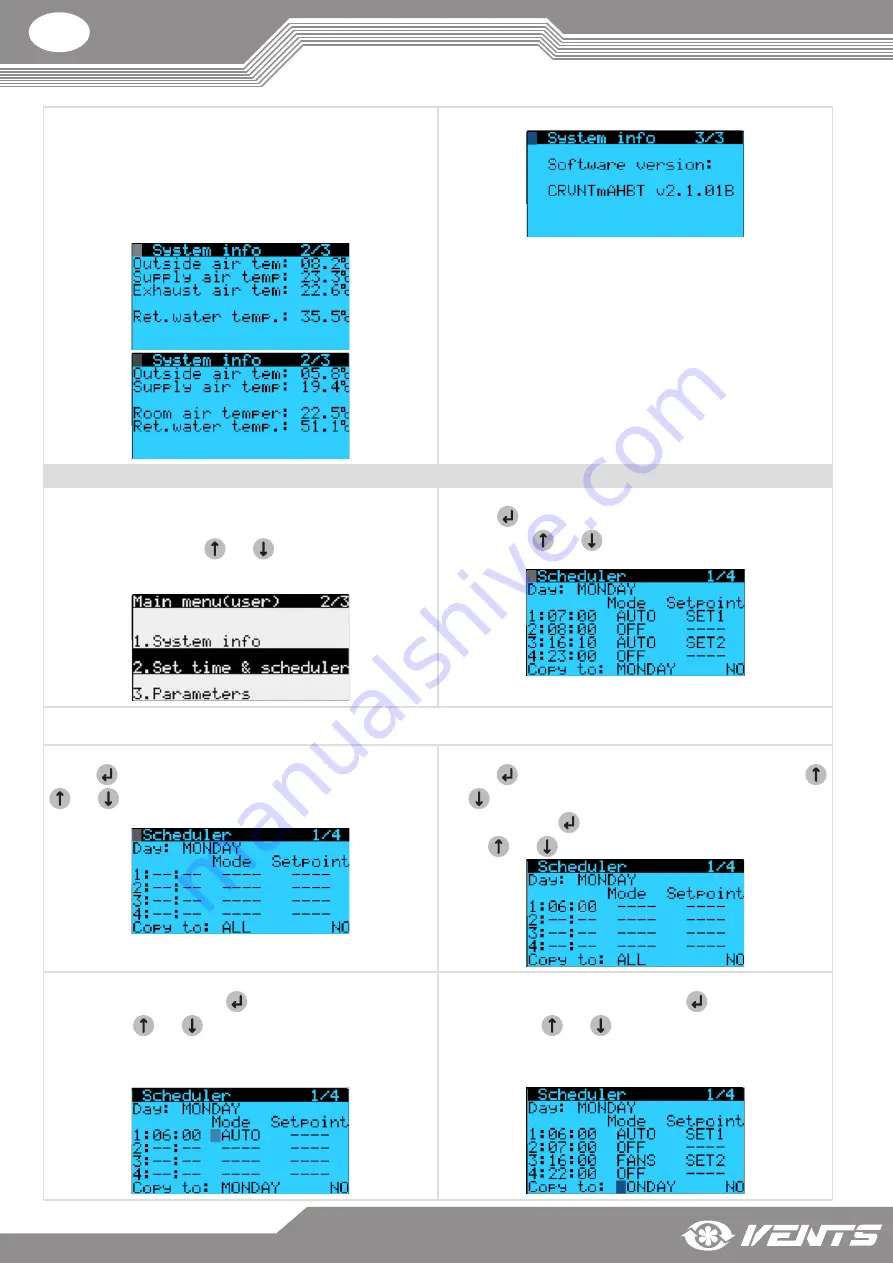
Page 2/3 contains the following parameters:
•
Outside air temperature [°C]
•
Supply air temperature [°C]
•
Exhaust duct temperature [°C]
•
Exhaust duct temperature [°C]. When selecting “Main sensor:
Exh. Air” in the “Parameter” field.
•
Room temperature [°C]. When selecting “Main sensor: in
thTune” in the “Parameter” field.
Page 3/3 contains the controller firmware information.
2. Set time & scheduler
To set the clock and operation schedule enter the user parameters
menu and select “Set time & scheduler”.
The “Set time & scheduler” menu consists of four pages. To navigate
between the pages use the
and
buttons.
WARNING! With the th-Tune control panel connected the operation
schedule is set via the control panel!
Page 1/4 enables setting the unit operation schedule.
Press the
button to select the desired parameter and then set its
value using the
and
buttons.
Schedule setup. This mode can be enabled only from the pGD1 control panel.
When using th-Tune the schedule is set up according to the th-Tune control panel description.
1. Day selection.
Use the
button to select the “Day” parameter and then use the
and
buttons to select the day for setting the schedule.
2. Setting the schedule recording start time.
Press the
button to start setting the first entry. Then use the
and
buttons to set the start time for the first entry in hours.
After that press the
button to set the time in minutes and then
use the
and
buttons to set the minute value.
3. Operation mode setup.
After setting the time press the
button to set the unit operation
mode. Use the
and
buttons to select one of the following
modes:
•
OFF • Auto
•
FANS • Scheduler
4. Selecting a setpoint.
After setting the operation mode press the
button to adjust the
setpoint. Use the
and
buttons to select one of the pre-
programmed setpoints. Open the “Set time & scheduler” menu on
page 3/3 to define the setpoints on page 4/4.


