1.
Connect the Smart Building Hub to Equipment
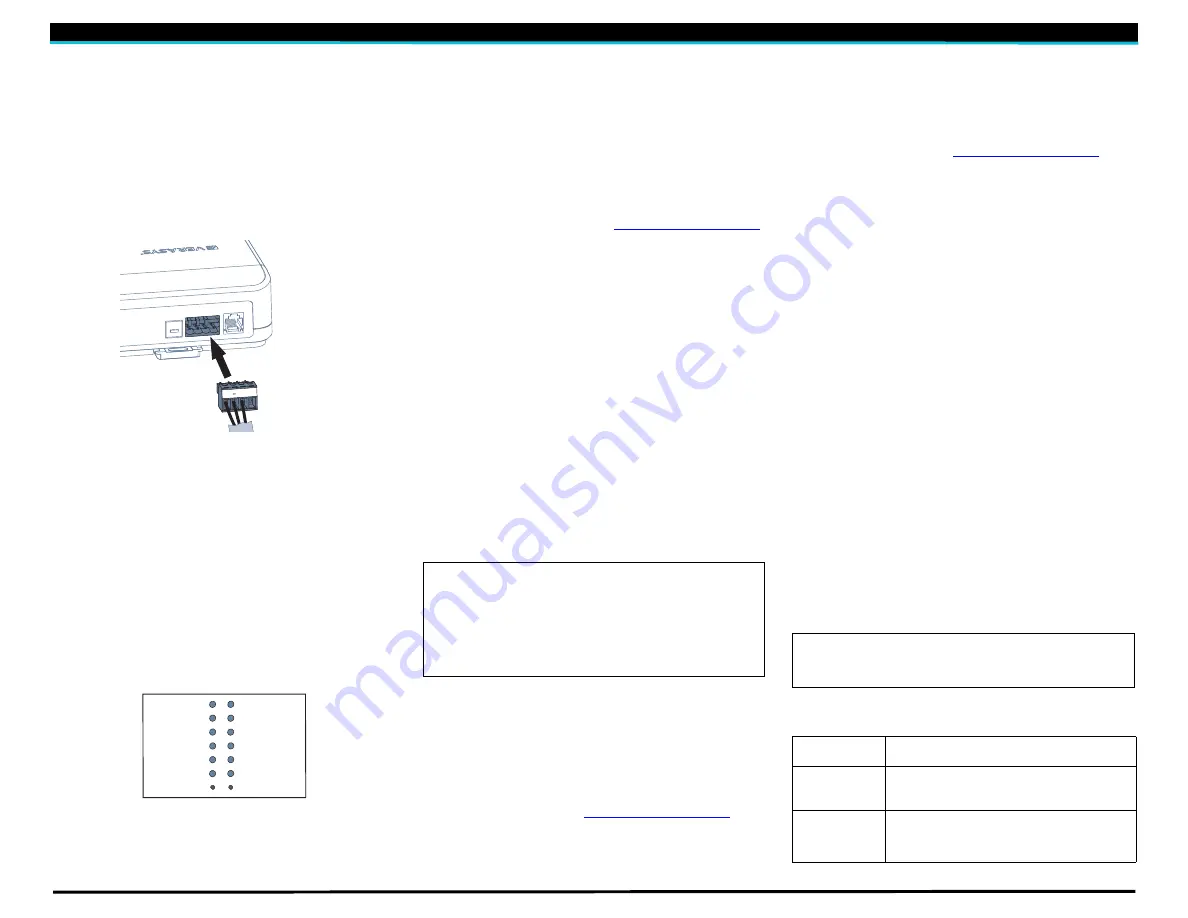
The Smart Building Hub (SBH) permanently connects to the
Verasys
TM
system using the 4-terminal System bus port. Wire
the system bus communications to the blue, 4-terminal
connector and plug it into the port.
Note:
If this device is at the end of a line, set the end of the
line switch to on.
Note:
The RJ-12 jack next to the 4-terminal block can be used
as a temporary connection to the System bus using the RJ-12
cable supplied with the SBH.
Figure 1: Connecting the SBH
a. Wire your cable to the supplied four-pin adapter as
illustrated.
b. Plug the Wi-Fi adapter that comes with the SBH into either
of the USB ports.
c. Connect the RJ45 Ethernet port to the building Ethernet
network as instructed by the building IT department. The
Ethernet must be plugged into the device if you choose the
(optional) Ethernet setup in step 6.
d. Connect power to the Smart Building Hub.
Once power is supplied to the SBH, the
WiFi AP
LED
flashes to indicate that the device is initializing. When the
Fault
LED turns off, the
WiFi AP
LED flashes, and the
RUN
LED is on, you can connect the SBH using the built-
in Wifi access point.
Figure 2: SBH LED Map
2.
Connect to the Smart Building Hub Wi-Fi access point
The SBH can be configured over Wi-Fi using a mobile device or
laptop.
a. In your Wi-Fi enabled device, access the Wi-Fi settings
and select the Verasys-SBH access point name.
b. Connect to the SBH Wi-Fi network using the supplied
credentials
from the beginning of this guide.
3.
Open a Web Browser
a.
Navigate to the following URL:
www.smartbuildinghub.com
,
to open the
SBH browser interface.
Note:
The SBH ships with a private smartbuildinghub.com
SSL certificate installed to ensure secure communication
with the SBH. However, this certificate does not indicate
that it is trusted in a browser. If you wish to install your own
certificate, refer to the
Smart Building Hub Network and IT
Guidance Technical Bulletin (LIT-12012324)
for more
information.
4.
Log in to the Smart Building Hub
a. Use the default Admin login credentials from the beginning
of this guide.
b.
Read and accept the SBH license agreement.
5.
Change Passwords and SSID
The first time you log into the SBH, the
Change Password and
Passphrase
web page appears. You must change the Admin
password, Wi-Fi passphrase, and the SSID.
a.
In the
New Admin Password
field, enter a new password.
b.
In the
Verify New Admin Password
f
ield, enter the same
new password.
c. In the
New Wi-Fi SSID
field, enter the new Wi-Fi SSID.
d.
In the
New Wi-Fi Passphrase
field, enter the new Wi-Fi
Passphrase.
e.
Click the
Save
button
.
Navigate to the following URL:
www.smartbuildinghub.com
, to
open the
SBH browser interface.
Note:
The SBH ships with a private smartbuildinghub.com SSL
certificate installed to ensure secure communication with the
SBH. However, this certificate does not indicate that it is trusted
in a browser. If you wish to install your own certificate, refer to
the
Smart Building Hub Network and IT Guidance Technical Bul-
letin (LIT-12012324)
for more information.
Navigate to the following URL:
www.smartbuildinghub.com
, to
open the
SBH browser interface.
Note:
The SBH ships with a private smartbuildinghub.com SSL
certificate installed to ensure secure communication with the
SBH. However, this certificate does not indicate that it is trusted
in a browser. If you wish to install your own certificate, refer to
the
Smart Building Hub Network and IT Guidance Technical
Bulletin (LIT-12012324)
for more information.
6.
Ethernet Setup
(
Optional)
This step describes how to access the SBH over an Ethernet
network.
a.
In the SBH UI, navigate to
Settings
>
Ethernet
.
b. On the
Ethernet
drop-down list, select
On
to enable the
SBH Ethernet port.
c. Click the
Save
button.
d. Take note of the address in the IP Address field. By
default, the SBH is configured to dynamically receive an IP
address from your network using DHCP.
Note:
If the IP Address does not appear, refresh the
screen.
e. Enter the IP address from the previous step. You now have
access to the SBH over an Ethernet network.
Refer to the
Smart Building Hub Network and IT Guidance
Technical Bulletin (LIT-12012324)
for more options.
7.
Use the Smart Building Hub
Select a device from the equipment list and use the web pages
from the SBH to view, commission, and configure devices as
needed.
Technical Specifications
Smart Building Hub
+
CO
M
SH LD
EOL
SYSTEM BUS
USB A
WI-FI CLIENT
WI-FI AP
USB B
UPGRADE
RUN
100/1G LINK
ETHERNET
FAULT
POWER
RESET
REBOOT
IMPORTANT: After you change the Wi-Fi passphrase or
SSID, the web server restarts and you must rejoin the SBH
Wi-Fi network using the new passphrase. On some mobile
devices, you must select and forget the original SBH Wi-Fi
network before rejoining the network with the new
passphrase. A laptop running Microsoft Windows is a device
that behaves this way.
IMPORTANT:
Save this guide. It contains your default user
name and password information. This information may be
needed to reset your Smart Building Hub to factory defaults.
Power
Consumption
38W maximum
Ambient
Temperature
Conditions
Operating:
0 to 50°C (32 to 122°F)
Operating Survival:
-30 to 60°C (-22 to 140°F)
Non-Operating:
-40 to 70°C (-40 to 158°F)
Ambient
Humidity
Conditions
Storage:
5 to 95% RH 30°C (86°F) maximum dew
point conditions
Operating:
10-90% RH, 30°C (86°F) maximum
dew point conditions


