Installin g the Chassis
I-Ga te 4000 P R O Ins tall ation
6-4
Veraz Networks Inc. Proprietary
02041802-05
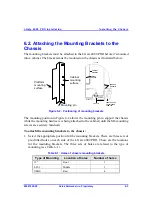
Use the holes that allow the appropriate clearance for your installation. For
example, if you are mounting the I-Gate 4000 PRO into a cabinet with a closing
door, choose the set of holes closest to the front of the I-Gate 4000 PRO chassis.
This will allow the I-Gate 4000 PRO to be mounted further behind the cabinet
door.
2. Use three of the included attachment screws to attach one of the mounting
brackets to the side of the chassis. It does not matter which side is attached first.
Do not tighten the screws until all three screws are in place. This will allow you
to adjust the mounting bracket if there are any alignment problems.
3. Before attaching the second bracket to the chassis, confirm that you are using the
set of holes that corresponds to those on the other side of the chassis.
4. Use the remaining three attachment screws to attach the second mounting
bracket to the side of the I-Gate 4000 PRO.
6.3. Inserting the Chassis into the Cabinet
Once you have attached the mounting brackets to the I-Gate 4000 PRO chassis, you
can insert the chassis into the cabinet, as described below.
To insert the chassis into the cabinet:
1. Measure the cabinet and determine which holes will be used for fastening the
chassis. Remember to make room for the PDU and network external switch shelf
(if applicable).
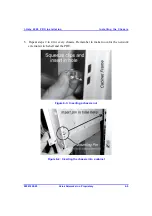
2. Insert four nuts into the holes specified in step 1. These nuts are housed in
Tinnerman clips, which allow you to fasten them into the holes. Hold the clips,
as shown in Figure 6-3, squeeze them, and insert them into the hole. You may
have to use a screwdriver or pliers to squeeze the clips.
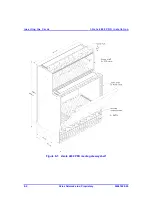
3. Carefully lift the empty chassis and insert it into the cabinet in the location
selected in step 1. Note that there are mounting pins located on each side of the
chassis (see Figure 6-4). Place these pins in the chassis screw holes as shown. In
this way, the chassis is supported until you tighten the chassis screws in step 4
below.
4. Tighten the screws to fasten the chassis to the cabinet.

