background image


Nov21 


INSTALLATION INSTRUCTIONS


1.


Ensure the mains are disconnected before handling the luminaire.


2.


In case of replacing an existing light: Remove the existing light according to the manufacturer’s 
instructions and disconnect it from the mains. 


3.


For dimmable installation you will need a 1-10V dimmer switch (not provided with the product). In 
this  case  please  follow  the  wiring  instructions  of  your  dimmer  switch  &  take  note  of  the  input 
voltages.


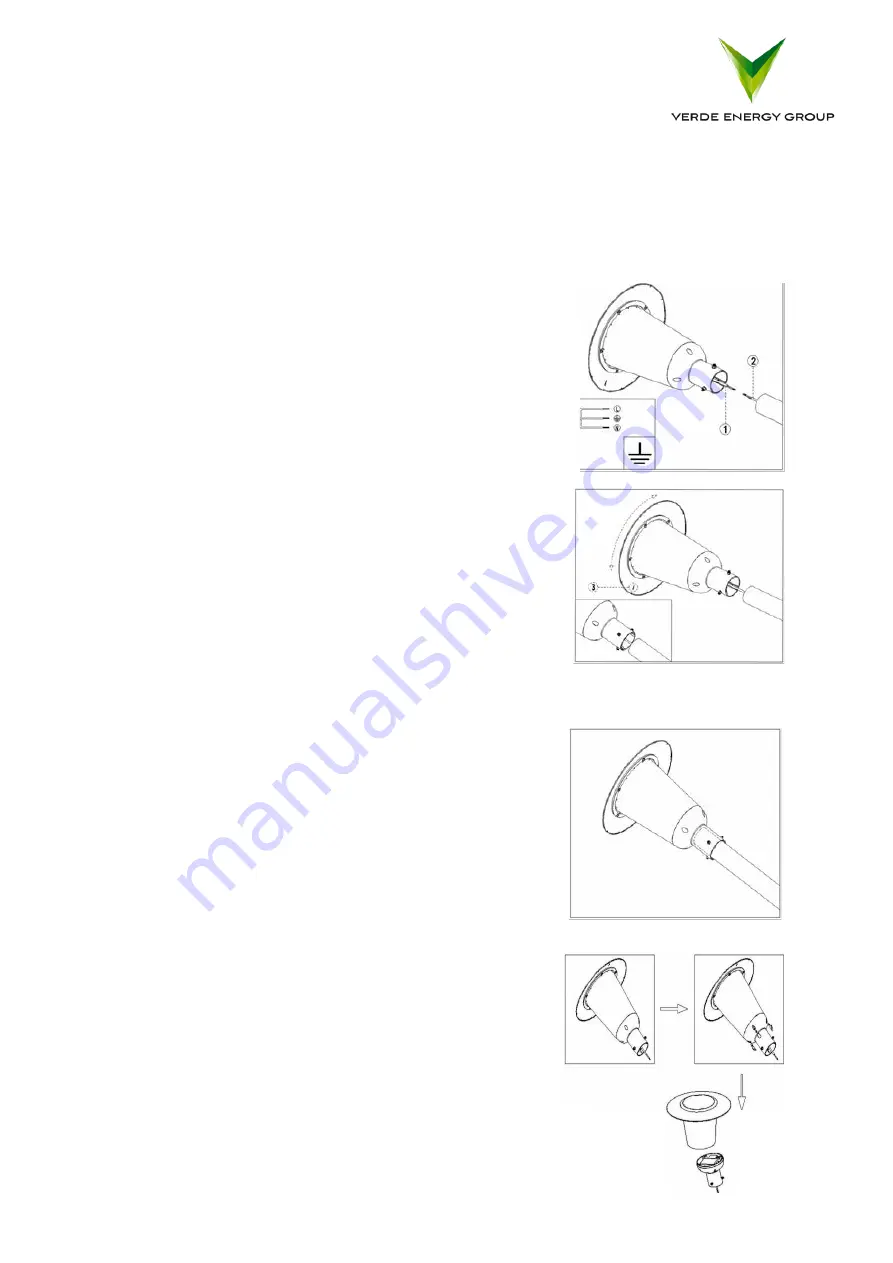
1.


Connect the power cord reserved for the luminaire and the 


power cord of the lamppost properly: 


L (brown) to the fuse, 


N (blue) to the neutral, 


yellow green to ground. 


The wiring should be waterproof.


2.


Insert the lamp lever arm into the lamp 


and rotate the lamp to the desired direction


(the arrow on the lamp marks the direction of light distribution).


3.


Please lock the three M8 nuts with a screwdriver.


4.


For maintenance and replacement: 


please unplug the four rubber plugs on the lamp, 


unscrew the screws in the four holes with a screwdriver, and 


separate the base from the lamp body. 


Summary of Contents for VER-CVL-15-730

Page 1: ...he control gear of this luminaire shall be only replaced by the manufacturer or his service agent or a similar qualified person 4 Before installation the fully qualified installer must determine whether the power supply is in the electrical input range stated in the Product Parameters table see below of the luminaire 5 Do not remove the LED light or LED driver cover 6 Any constructive change of th...

Page 2: ...to the installation maintenance and operation of the device lies with the buyer and handler of the device These parties may include but are not limited to the contractor installer purchaser owner and user of the product Consult Lighting Application Engineering services as needed Product parameters Model number Input Voltage Power Working Temperature C VER CVL 15 730 100 277 VAC 50 60Hz 12W 40 C 45...

Page 3: ...ch take note of the input voltages 1 Connect the power cord reserved for the luminaire and the power cord of the lamppost properly L brown to the fuse N blue to the neutral yellow green to ground The wiring should be waterproof 2 Insert the lamp lever arm into the lamp and rotate the lamp to the desired direction the arrow on the lamp marks the direction of light distribution 3 Please lock the thr...

Page 4: ...inaires be directly mounted on the surface of ordinary combustible materials Please do not cover the luminaries with any objects Do not use the product in a closed environment Only a professional can maintain luminaires non professionals should not do the maintenance The external wiring of this luminaire adopts a X type connection If the external flexible cable or wire of this luminaire is damaged...

Reviews: